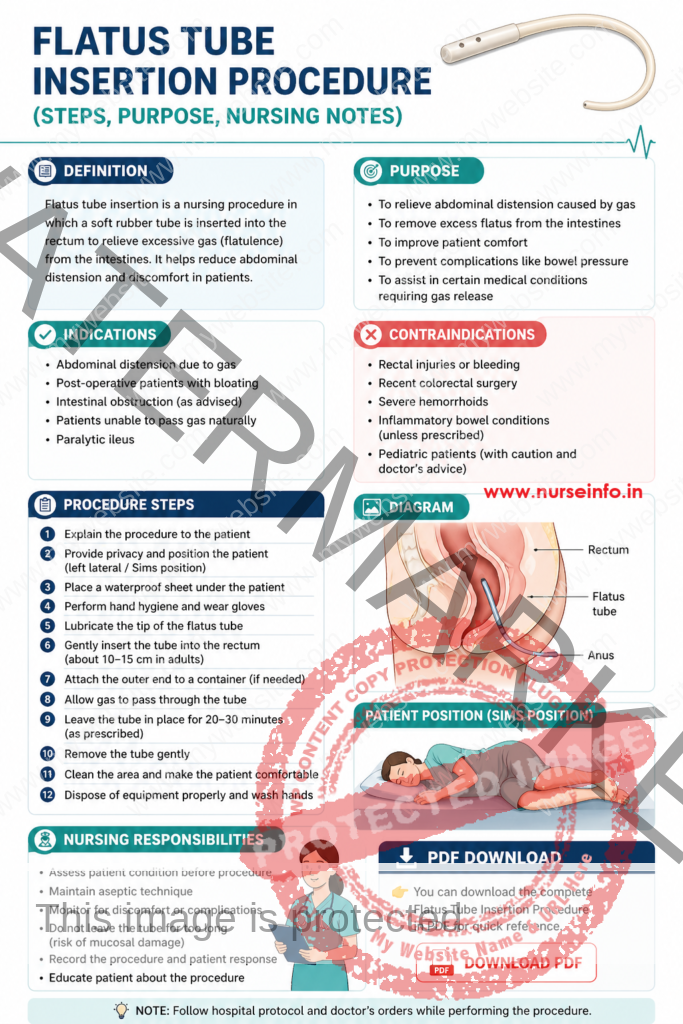
Mental health nursing, also known as psychiatric nursing, is a specialized branch of nursing that focuses on the care of individuals experiencing mental health challenges or psychiatric disorders. Mental health nurses play a crucial role in providing support, treatment, and advocacy for individuals with mental health conditions.
List of Mental HealthNursing Procedures are given below. Click the respective Topic to Read the respective Nursing Procedures in detail
Mental health nursing requires a unique set of skills, including empathy, active listening, and a non-judgmental attitude. Nurses in this field play a crucial role in promoting mental health, providing compassionate care, and supporting individuals on their journey to recovery. The field is dynamic and evolving, with an increasing focus on holistic and patient-centered approaches to mental health care.
Here is an overview of mental health nursing:
Assessment and Diagnosis:
Mental health nurses conduct thorough assessments to understand the individual’s mental health status, including their emotional, cognitive, and behavioral functioning.
Collaborate with other healthcare professionals to contribute to the diagnostic process and treatment planning.
Therapeutic Interventions:
Mental health nurses employ a variety of therapeutic interventions to help individuals manage their mental health conditions. This may include individual counseling, group therapy, cognitive-behavioral therapy, and other evidence-based practices.
Administer and monitor the effects of psychiatric medications as prescribed by psychiatrists.
Crisis Intervention:
Mental health nurses are often involved in crisis intervention, providing immediate support to individuals experiencing acute psychiatric crises or emergencies.
Collaboration with Multidisciplinary Teams:
Work closely with psychiatrists, psychologists, social workers, occupational therapists, and other healthcare professionals to provide comprehensive care.
Participate in treatment planning meetings and contribute to a holistic approach to patient care.
Patient Advocacy:
Act as advocates for individuals with mental health conditions, ensuring their rights are respected, and their needs are met.
Promote destigmatization and educate the community about mental health issues.
Education and Health Promotion:
Provide education to individuals, families, and communities about mental health, mental illnesses, and strategies for mental well-being.
Promote mental health awareness and preventive measures.
Community Integration:
Support individuals in their efforts to reintegrate into the community after hospitalization or periods of intense mental health support.
Collaborate with community resources to provide ongoing care and support.
Trauma-Informed Care:
Mental health nurses often employ trauma-informed care approaches, recognizing and addressing the impact of trauma on mental health.
Documentation and Evaluation:
Maintain accurate and thorough records of assessments, interventions, and treatment plans.
Evaluate the effectiveness of interventions and modify care plans accordingly.
Self-Care and Burnout Prevention:
Mental health nurses must prioritize self-care to prevent burnout. This includes recognizing the emotional toll of their work and seeking support when needed.
List ofChild Health Nursing (Pediatric) Procedure2024
Updated 2024
Child health nursing, also known as pediatric nursing, is a specialized field of nursing that focuses on the care of infants, children, and adolescents. Nurses in this field work with pediatricians and other healthcare professionals to provide comprehensive and specialized care to young patients.
List of Child HealthNursing (Pediatric) Procedures are given below. Click the respective Topic to Read the respective Nursing Procedures in detail
The term “barrier nursing” is given to a method of nursing care that has been used for over one hundred years when caring for a patient known or thought to be suffering from a contagious disease such as open pulmonary tuberculosis.
Barrier nursing is an approach to patient care that involves implementing strict infection control measures and physical barriers to prevent the transmission of infections. The goal of barrier nursing is to protect both healthcare providers and patients from the spread of infectious agents.
Isolation nursing is carried out by
placing the patient in a single room or side room
Barrier nursing: this occurs when a
patient’s is kept in a bay and extra precautions are implemented to prevent
spread of the germ
It is sometimes
called “bedside isolation”. As the name implies, the aim is to erect a barrier
to the passage of infectious pathogenic organisms between the contagious
patient and other patients and staff in the hospital, and hence to the outside
world. Preferably, all contagious patients are isolated in separate rooms, but
when such patients must be nursed in a ward with others, screens are placed
around the bed or beds they occupy
The nurses wear gowns, masks, and sometimes rubber gloves, and they observe strict rules that minimize the risk of passing on infectious agents. All equipment and utensils used to care for the patient are immediately placed in a bowl of sterilizing solution, and attending nurses observe surgical standards of cleanliness in hand washing after they have been attending the patient. Bedding is carefully moved in order to minimize the transmission of airborne particles, such as dust or droplets that could carry contagious material, and is cleansed in special facilities that include the use of steam heat for sterilization
Barrier Nursing Care
No visitors, only essential key staff
should be allowed in the isolation area
One nurse should look after the
isolation cases and ideally should not be involved in any other patient care
Write the name of the Barrier Nurse
on the front of the kennel
Use paper disposable towels for hand
drying and the cleaning of kennels as this will help reduce the risk of
spreading infection
Color Code all re-usable equipment
RED to identify as for isolation use ONLY so it doesn’t go walk-about
Have a separate waste bin for these
cases
Consider using a specific color vet
bed for these patients only
Consider using pulp disposable bowls
and trays for highly infectious patients so these can be discarded once used
Ensure a batch of disposable Personal
Protective Equipment such as gloves, aprons, masks, and overshoes are readily
available in the immediate vicinity
Autoclave or dispose of all reusable
equipment before using an another patient
UNIVERSAL PRECAUTIONS
Standard precautions
are meant to reduce the risk of transmission of blood borne and other pathogens
from both recognized and unrecognized sources. They are the basic level of
infection control precautions which are to be used, as a minimum, in the care
of all patients.
Hand hygiene
is a major component of standard precautions and one of the most effective
methods to prevent transmission of pathogens associated with health care. In
addition to hand hygiene, the use of personal protective equipment should be
guided by risk assessment and the extent of contact anticipated with blood and
body fluids, or pathogens
Universal Precautions include
Using disposable gloves and other
protective barriers while examining all patients and while handling needles,
scalpels, and other sharp instruments
Washing hands and other skin surfaces
that are contaminated with blood or body fluids immediately after a procedure
or examination
Changing gloves between patients and
never reusing gloves
Universal Precautions Apply to the Following Body Fluids
Blood
Semen and vaginal secretions
Cerebrospinal fluid (CSF)
Synovial fluid
Pleural fluid
Pericardial fluid
Amniotic fluid
The Center for Disease Control (CDC) recommends the procedure called Standard Precautions which includes the following:
All healthcare workers should
routinely use appropriate barrier protection to prevent skin and mucous
membrane exposure when contact with blood or body fluids is anticipated. Gloves
must be worn during phlebotomy and changed after contact with each patient.
Masks, protective eyewear, face shields, and/or gowns should be worn as
indicated when there is a potential for splashing or splattering of blood
and/or body fluids
Wash hands immediately if
contaminated with blood or body fluids and after removing gloves
Take the necessary precautions to
prevent injuries caused by needles, scalpels and other sharp instruments. Sharp
items must be placed in a puncture-resistant container
Mouth pieces, resuscitation bags, or
other ventilation devices should be available for use in areas in which the
need for resuscitation is predictable
Healthcare workers with exudative
lesions or weeping dermatitis should cover those areas with an occlusive
bandage
Pregnant healthcare workers are not
known to be at any greater risk of contracting HIV infection than those who are
not pregnant. Because the infection can be transmitted perinatally
Pregnant healthcare workers should be
especially familiar with and strictly adhere to precautions to minimize the
risk of acquiring HIV or Hepatitis B
Immunization of employees is required for infectious agents (measles, mumps, rubella) transmitted by air.
Key Features of Barrier Nursing:
Personal Protective Equipment (PPE):
Barrier nursing involves the use of various types of PPE, including gloves, gowns, masks, and eye protection. These protective measures create a physical barrier between healthcare workers and potentially infectious materials.
Isolation Precautions:
Patients who are placed under barrier nursing often require isolation precautions. These precautions can include contact isolation, droplet isolation, or airborne isolation, depending on the mode of transmission of the infectious agent.
Restricted Movement:
Limiting the movement of patients to essential activities helps prevent the spread of infectious agents within the healthcare facility. Movement restrictions may include limitations on visitation, patient transport, and participation in group activities.
Environmental Controls:
Strict cleaning and disinfection of the patient’s environment, including surfaces and equipment, are essential components of barrier nursing. This helps reduce the risk of environmental contamination and transmission of pathogens.
Visitor Restrictions:
Barrier nursing often involves restricting or controlling visitor access to prevent the potential spread of infections. Visitors may be required to wear PPE and follow specific infection control measures.
Education and Training:
Healthcare providers involved in barrier nursing receive specialized education and training on proper infection control practices, the correct use of PPE, and the implementation of isolation precautions.
Respiratory Hygiene/Cough Etiquette:
Encouraging patients and healthcare workers to practice proper respiratory hygiene, including covering the mouth and nose when coughing or sneezing, helps prevent the spread of respiratory infections.
Waste Management:
Proper disposal of contaminated materials and waste is crucial in minimizing the risk of transmission of infectious agents.
Hand Hygiene:
Stringent hand hygiene practices are a fundamental aspect of barrier nursing. Healthcare workers must perform handwashing or use hand sanitizers before and after patient contact and after removing PPE.
The discharge procedure in a healthcare setting is a critical aspect of patient care, ensuring a smooth transition from the hospital to home or another care setting.
Effective
discharge requires careful planning and continuing assessment of the patient’s
needs during his hospitalization. Ideally, discharge planning begins shortly
after admission.
Discharge Process
Discharge is the termination of care from a health care agency. Planning for discharge actually begins on admission, when information about the patient is collected and documented. The key to successful discharge planning is an exchange of information among the patient, the caregivers, and those responsible for care while the patient is in the acute care setting and after the patient returns home. This coordination of care is usually the nurse’s responsibility
Discharge is
preparation of patient to leave hospital and to return to own environment.
Patient is prepared for discharge when he is admitted in the hospital. He
should be prepared physically and mentally to leave the hospital or ward
Discharge
planning is the plan evolved before a patient is transferred from one
environment to another. This process involves the patient, family, friends, and
the hospital and community healthcare teams
Discharge
planning is an integral part of the continuity of nursing care for patients
throughout their hospital stay.
Purpose
To ensure continuity of care to
patient after discharge
To assist patient to complete
hospital formalities before returning home
To assist patient to return to a
state of optimal independent living
To assist the patient in discharge
process
To acknowledge patients right in
deciding to leave hospital
Reasons for Discharge
Cured
Transfer to other hospital
Discharged at request
Discharged against medical advice
Death
Equipment
Wheelchair,
unless the patient leaves by ambulance, patient’s chart, patient instruction
sheet, discharge summary sheet, plastic bag or patient’s suitcase for personal
belongings
General Instruction
Prepare
patient and family during hospitalization with adequate information in relation
to probable date of discharge, approximate in patient bill and relevant home
care
Departments to be informed
Drug return to pharmacy department
Diet cancellation
Oxygen/ventilator charges summary
Accounts department
Billing section
Preliminary Assessment
Check doctor’s written orders for
discharge
Inform patient and relatives about
discharge
Document relevant discharge
information
Make sure all the fees are included
such as special investigations, special matters or devices, doctors or
surgeon’s fees and narcotic drug used (if any)
Obtain discharge prescription after
retaining the medicines to be continued for that day and after discharge. Send
all other continued for that day and after discharge. Send all other medicines
for refunding (include ward replacement)
Send chart to billing section with
relevant information
One bill is ready and chart is
received back in ward, ensure that bill is settled. Check the cashier’s
signature in the discharge bill
Help the patient to obtain discharge
summary, medical certificate and drugs
Ensure that patient is instructed
regarding medication follow up, outpatient visit, etc
Accompany the patient up to transport
near exit gate
Procedure
Before the day of discharge, inform
the patient’s family of the time and date of discharge
Obtain a written discharge order from
the physician. If the patient discharges himself against medical advice, obtain
the appropriate form
If the patient requires home medical
care, confirm arrangements with the appropriate facility department or
community agency
On the day of discharge, review the
patient’s discharge care plan (initiated on admission and modified during his
hospitalization) with the patient and his family. List prescribed drugs on the
patient instruction sheet along with the dosage, prescribed time schedule, and adverse
reactions that he should report to the physician. Ensure that the drug schedule
is consistent with the patient’s lifestyle to prevent improper administration
and to promote patient compliance
Review procedures the patient or his
family will perform at home. If necessary, demonstrate these procedures,
provide written instructions, and check performance with a return demonstration
List dietary and activity instructions,
if applicable, on the patient instruction sheet and review the reasons for them
Check with the physician about the
patient’s next office appointment; if the physician hasn’t yet done so, inform
the patient of the date, time and location
Retrieve the patient’s valuables from
the facility’s safe and review each item with him. Then obtain the patient’s
signature to verify receipt of his valuables
Obtain from the pharmacy any drugs
the patient brought with him
If appropriate, take and record the
patient’s vital signs on the discharge summary form. Notify the physician if
any signs are abnormal such as an elevated temperature
Help the patient get dressed if
necessary
Collect the patient’s personal
belongings from his room
After checking the room for misplaced
belongings, help the patient into the wheelchair, and escort him to the exit;
if the patient is leaving by ambulance, help him onto the litter
After the patient has left the area,
strip the bed linens and notify the housekeeping staff that the room is ready
for terminal cleaning
Special Considerations
Whenever possible, involve the
patient’s family in discharge planning so they can better understand and
perform patient care procedures
Before the patient is discharged,
perform a physical assessment. If you detect abnormal signs or the patient develops
new symptoms, notify the physician and delay discharge until he has seen the
patient
Documentation
Record the time and date of recharge
The patient’s physical condition
Special dietary or activity
instructions
The type and frequency of home care
procedures
The patient’s drug regimen
The dates of follow-up appointments
The mode of departure and name of the
patient’s escort
A summary of the patient’s hospitalization,
if necessary
After Discharge
Record time, date and condition of
the patient at departure
Send chart to medical record
department and inform to the concern departments
After the patient has gone, the bed
should be washed, blankets kept in sunlight, Mackintosh washed and dried
The room cleaned, all utensils
cleaned and kept ready for next use
In case of infected cases, utensils
should be disinfected and then cleaned. The linen should be disinfected and
then send to laundry
When discharging the medicolegal
cases, the patient dead body should be handed over to the police, before that
concerning police station should be informed about the patient’s
discharge/death
Patient or dead body is handed over
to the police and asks the police to sign with date and time
Discharge Teaching Goals
Understand his illness
Complies with his drug therapy
Carefully follows his diet
Manages his activity level
Understands his treatments
Recognizes his need for rest
Knows about possible complications
Knows when to seek follow-up care
PATIENT ABSCONDED FROM HOSPITAL
Patient went out of the hospital
without Doctor’s or other staff’s knowledge
Hospital does not know that the patient
left and they do not know when the patient left
They found out during next rounds
Patients may not have discussed with
the doctor/hospital about going out
It is wrong to write, for example,
that the patient absconded at 7 PM. If the doctor (either directly or through
other paramedical staff) knows the time patient went out, it is not absconded;
it is Left against Medical Advice
Left against Medical Advice (LAMA)
Doctor asked the patient to
stay/continue treatment
Patient/patient’s relatives did not
inform their plan of leaving the hospital, but they left suddenly
But the hospital was aware of them
going out and the time patient left
Doctor had said that taking the
patient out may endanger life
Patient/patient’s relatives did not
sign anything
Hospital may not give any discharge
summary
In fact, patient may not have
discussed with the doctor/hospital about going out
Since the doctor (either directly or
through other paramedical staff) knows the time the patient is going out, it
should be recorded as “Patient left Against Medical Advice”
DAMA: DISCHARGED AGAINST MEDICAL ADVICE
Doctor has clearly explained that
taking the patient out may endanger life, but still patient/patient’s relatives
want to take the patient to some other hospital
They sign a declaration saying that
the risks were informed to them – by taking the patient out of hospital, they
are immediately endangering the life
Hospital gives a discharge summary
Occasionally,
the patient or his family may demand discharge against medical device (AMA). If
this occurs, notify the physician immediately. If the physician fails to
convince the patient to remain in the facility, he will ask the patient to sign
an AMA form releasing the facility from legal responsibility for any medical
problems the patient may experience after discharge. If the physician is not
available, discuss the discharge form with the patient and obtain his
signature. If the patient refuses to sign the AMA form, do not detain him. This
violates his legal rights. After the patient leaves, document the incident
thoroughly in your notes and notify the physician
As a guide
to the AMA process, consider the following list of Do’s and Don’ts:
Don’t ignore the patient who wants to
leave AMA. If at all possible, stop what you are doing and prepare to address
the issue
Do determine the decision-making
capacity of the patient. Do they comprehend the information and consequences
and understand the risks and benefits of the options, and can they communicable
these back to you?
Don’t blame or berate the patient or
anyone else for his desire to have
Do apologize of the patient has been
waiting or if there have been delays in the patient care process. Apologies are
free. Lawsuits cost millions
Don’t just ask the nurse to have the
patient sign a generic AMA form and leave. This course of action provides
little protection for the practitioner
Do enlist the patient’s family and
friends in your attempt to convince the patient to stay
Don’t express your frustration and
anger to the patient. Instead, earnestly convince him that your overriding
interest is his well-being. Make sure he knows that you are on his side against
a potential threat to his health
Do document the patient’s “informed
refusal” of crucial diagnostic testing (e.g. blood work or X-rays), procedures
(e.g. LP to rule out meningitis or subarachnoid hemorrhage), or treatments
(e.g. medications or transfusions) in the small detail as you would an AMA
Don’t refuse to provide treatment;
this could be considered abandoning the patient. Provide whatever treatment,
prescriptions, follow-up appointments, and specific discharge instructions the
patient will accept
Do document the details of the AMA
patient encounter in the patient’s chart. Include documentation of the
patient’s decision-making capacity, the specific benefits of your proposed
treatment and risk of leaving AMA, what you did to get the patient to stay, and
your compassionate interest in having the patient return for any reason. Have
the patient sign an AMA form that addresses these details, witnessed by a
family member and/or staff member
Don’t worry about whether or not the
patient’s insurance will deny payment if he signs out AMA. His insurance is not
your problems, but a malpractice suit will definitely by your problem.
LAMA: LEAVE AGAINST MEDICE ADVICE
LAMA has
been defined in the broadest terms as any patient who insists upon leaving
against the expressed advice of the treating team. Escape (absence without
leave, absconding, or elopement), whereby the patient leaves the hospital
without notification by escaping from an involuntary unit or walking out of a
voluntary unit, also has been considered by some clinicians and researchers to
be a form of discharge against medical device. Others do not regard escape as a
form of discharge against medical advice because the essential element of
physician’s expressed advice against leaving is lacking in this situation
MEDICOLEGAL CASES
A medicolegal
case is one where besides the medical treatment; investigations by law
enforcing agencies are essential to fix the responsibility regarding the
present state/condition of the patient. The case, therefore, has both medical
and legal implications
Registering
MLC is a MUST: attending casualty medical officer (CMO) has the authority to
decide whether the case is to be registered as medicolegal or not. There is no
scope for acceding to request/pressure from the relatives, patient himself or
his colleagues regarding the registration of MLC. Even if the accident (e.g.
trauma) has happened several days ago, if the complaints merit an MLC, then MLC
should be registered.
Medicolegal
cases: the following cases should be considered as medicolegal and as such the
medical officer is “duty-bound” to intimate to the police regarding such cases:
All cases of injuries and burns – the
circumstance of which suggest commission of an offence by somebody
(irrespective of suspicion of foul play)
All vehicular, factory or other
unnatural accident cases specially when there is a likelihood of patient’s
death or grievous hurt
Cases of suspected or evident sexual
assault
Cases of suspected or evident
criminal abortion
Cases of unconsciousness where its cause
is not natural or not clear
All cases of suspected or evident
poisoning or intoxication
Cases referred from court or
otherwise for age estimation
Cases brought dead with improper
history creating suspicion of an offence
Cases of suspected self-infliction of
injuries or attempted suicide
Any other case not falling under the
above categories but has legal implications
Admissions and Discharge
Whenever a medicolegal case is
admitted or discharged, the same should be intimated to the nearest police
station at the earliest. It is always better to inform the police through the
casualty of the hospital where the medicolegal register is usually maintained
and necessary entries can be made in it
While discharging or referring the
patient, care should be taken to see that he receives the Discharge
Card/Referral Letter, complete with the summary of admission, the treatment
given in the hospital and the instructions to the patient to be followed after
discharge
Failure to do so renders the doctor
liable for “negligence” and “deficiency of service”
If the patient is not serious and can
take care of himself, he may be discharged on his own request, after taking in
writing from him that he has been explained the possible outcome of such a
discharge and that he is going on his own against medical advice
Police have to be informed before the
said patient leaves the hospital. Sometimes the patient, registered as a
medicolegal case, may abscond from the hospital. Police have to be immediately
informed, the moment such an instance comes to the notice of the
doctor/hospital staff
Death of a
person admitted as a medicolegal case: the following are the do’s and don’ts in
case a person admitted as a medicolegal case expires.
Inform the police immediately
Send the body to the hospital
mortuary for preservation, till the legal formalities are completed and the
police releases the body to the lawful heirs
Request a medicolegal postmortem
examination
Do not issue a death certificate –
even if the patient was admitted
The dead body should never be
released to the relatives; it should only be handed over to the police
The medicolegal implications of LAMA need to be given serious consideration as the caregiver might not be protected from malpractice charges. There is little evidence that LAMA provides any malpractice protection. Many hospitals have a release form for patients to read and sign prior to leaving hospital against medical advice, relieving the hospital and medical staff of any responsibility related to the patient’s decision or its consequences. Hospital authorities should recognize that forms signed by a patient who is leaving against medical advice designed to protect the hospital in the event of an untoward consequence might have no legal protective value. The danger in such forms is that a physician may be tempted to rely on them instead of good clinical judgment and adherence to the recommended guidelines. The legal standard for protection from lawsuits continues to be good clinical practice with thorough documentation. Use of discharge against medical advice is not a safe road to legal immunity.
Here is a general outline of the discharge procedure:
1. Discharge Planning:
Discharge planning begins early in the patient’s hospital stay. The healthcare team assesses the patient’s needs, coordinates care, and plans for post-discharge support.
2. Medical Clearance:
Ensure that the patient has received medical clearance and is deemed stable for discharge by the attending physician.
3. Medication Reconciliation:
Review the patient’s medications, providing instructions for any changes or new prescriptions. Ensure the patient understands the medication regimen.
4. Patient Education:
Provide thorough education on post-discharge care, including:
Medication instructions (dosage, frequency, potential side effects).
Wound care (if applicable).
Dietary restrictions or recommendations.
Activity restrictions or modifications.
Signs and symptoms to monitor and report.
Follow-up appointments and tests.
5. Rehabilitation and Therapy Services:
If applicable, arrange for any necessary rehabilitation or therapy services post-discharge. Provide instructions and contact information.
6. Equipment and Home Care Services:
Coordinate the delivery of any necessary medical equipment, supplies, or home care services required for the patient’s recovery at home.
7. Follow-Up Appointments:
Schedule follow-up appointments with appropriate healthcare providers. Provide the patient with details, including the date, time, and location.
8. Final Medical Assessments:
Conduct final medical assessments, such as a final physical examination, and ensure that any outstanding tests or procedures are completed.
9. Completion of Discharge Papers:
Prepare and complete all necessary discharge paperwork, including the discharge summary, instructions, and any required documentation.
10. Financial Arrangements: – Provide information on any outstanding bills, co-payments, or financial matters related to the hospital stay. Offer assistance in understanding the billing process.
11. Transportation Arrangements: – Arrange for transportation if needed, especially if the patient is unable to drive or requires special transportation services.
12. Patient and Family Involvement: – Involve the patient and their family or caregivers in the discharge process. Ensure they understand the care plan and have the necessary resources for ongoing care.
13. Personal Belongings: – Assist the patient in gathering their personal belongings, and ensure that any valuables kept by the hospital are returned.
14. Handover to Home Healthcare Providers: – If home healthcare services are involved, provide necessary information to the home healthcare team, including the patient’s condition, care plan, and ongoing needs.
15. Ensure Comfort and Confidence: – Address any concerns or questions the patient may have and ensure they feel comfortable and confident in managing their care at home.
16. Departure: – Escort the patient and their belongings to the hospital exit, and ensure a smooth transition to the next phase of care.
PREOPERATIVE NURSING CARE – Purpose, Preparation of the Patient before Surgery, Obtain Informed Consent, Preoperative Teaching, Preparation of Patient (evening and day of surgery) and Sending the Patient to Operating Room
UPDATED 2024
Preoperative
nursing is based on the nurses understanding of several important
characteristics including high quality multidisciplinary teamwork, effective
and therapeutic, communication, and collaboration with the client, client’s
family and the surgical team.
PURPOSE
Preoperative nursing care is the care
given to the patient before surgery
Preoperative period for different
type surgery is different, e.g. for emergency surgery preoperative period is
very short; for a planned surgery time for surgery, is fixed with the mutual
consent of the surgeon and the patient
Preoperative care of the patient begins as soon as the surgeon make with diagnosis and decides that an operation is necessary for the patient
PREPARATION OF THE PATIENT BEFORE SURGERY
Psychological
Preparation
The patient may
tensed about his surgery because of ignorance, feet, etc. the nurses should
give psychological support to the patient.
Discuss with
the patient to give feel information about the surgery such as:
Type of surgery
Consequence of surgery
The problems to be faced
Expected duration of hospitalization
Expected time of resuming duty
Cost of surgery
Treatment done before surgery and if
purpose
Eradicate
Fear of Operation from the Patient
The means
surgery/operation itself make fear to the patient so for reducing that fear the
nurses should:
Allow the patient to ask questions
and clear all his doubts
Introduce the patient to some ones
who has similar surgeries and successfully recovered from the symptoms
Explain how to get rid of pain after
surgery
Tell the patient when he can have
meals
Answer all questions soaked by the
patients in a language he can understand
Let the patient see the persons,
places and equipment involved in the operation
Always short the procedures with an
example
For many patients, their admission to
the hospital is an experience in their times. In such situation, the nurses
should make them feel at home in by eradicating their fear
OBTAIN INFORMED CONSENT
The nurses should get an informed
consent from patient/guardian for each operation
Never compel them to give their
consent
They should understand the language
used in the consent form
Explain the complications that may
occur in the period of anesthesia
BUILD UP THE GENERAL HEALTH OF THE PATIENT AND CORRECTION OF THE DISEASE PROCESS FOR SPEEDY RECOVERY
Assist the doctor to carry out
thorough physical examination
Collect all baseline dates
Arrange for the blood donors
Diet may be adjusted to correct
underweight/overweight of the patient
PREOPERATIVE TEACHING
We should
teach the patient to increase his health by giving advices like (a) stop
smoking, (b) maintain personal hygiene, (c) deep breathing and coughing
exercises: active and passive exercise
Surgical Preparation of the Skin
Skin
preparation helps reduce the number of microorganism present on skin and thus
reduce the possibility of wound infection. Shave the area and clean the area
will spirit/swab
PREPARATION OF THE PATIENT ON THE EVENING BEFORE OPERATION
Remove all jewelry and hand over them
to the relatives
Remove the lipstick and nail polish
Shave the area to be operated
Ask shaving, ask the patient to have
a through bath and dress in clean clothes
The patient should be reassured to
prevent anxiety and fear of operation
PREPARATION OF THE PATIENT ON THE DAY OF SURGERY
Help the patient to go to toilet and
for mouth care
Remind the patient and his relative
about the fasting before surgery
Check the orders for bowel
preparation
Clean the operation site with soap
and water thoroughly, dry the area with clean towel
Cover the site with sterile towel and
fix it by means of bandages
Introduce nasogastric tube, urinary
catheter if ordered
Stop all medications unless
specifically ordered by the surgeon
SENDING THE PATIENT TO OPERATING ROOM
Administer the premedication to the
patient one hour before surgery
Check the vital signs
Write the patients name, age, sex,
ward, bed no, diagnosis, hospital number etc., on a identification card and
fasten it on to the dress or as on arm to prevent mistaken identify
Ask the patient on to void just
before sending to operating room
Transfer the patient on to a patient
trolley and cover him with clean sheets to prevent draught
Never leave the patient alone on
trolley
Always send the patients charts with
all reports
Always send the patient with an
attended up to the operation theater
OXYGEN ADMINISTRATION – Definition of Terms, Effects of Oxygen on Body, Indications, Purpose, Classifications, Home Oxygen Therapy, Complications of Oxygen and Oxygen Safety
UPDATED 2024
Oxygen (O2)
is administered as a corrective treatment for conditions resulting in hypoxia
(low level of oxygen in the blood). Oxygen is classed as a medication and must
be prescribed by a doctor and administered correctly to prevent over or
under-oxygenation. Remember oxygen is non flammable, but it does aid combustion.
Patients and visitors should therefore be educated about the increased risk of
fire and the precautions necessary to reduce the risk when supplementary oxygen
is in use.
Oxygen must
only be administered at the rate and percentage prescribed, as over-oxygenation
can be dangerous for some individuals, particularly those with dangerous for
some individuals, particularly those with chronic lung disease who are
retaining carbon dioxide, and infants, where there is also a risk of
retinopathy.
DEFINITION OF TERMS
FiO2:
fraction of inspired oxygen (%)
PaCO2:
the partial pressure of CO2 in arterial blood. It is used to assess
the adequacy of ventilation
PaO2:
the partial pressure of oxygen in arterial blood. It is used to assess the
adequacy of oxygenation
SaCO2:
arterial oxygen saturation measured via pulse oximetry
Heat
moisture exchange (HME) product: are devices that retain heat and moisture
minimizing moisture loss to the patient airway
High flow: high
flow systems are specific devices that deliver the patient’s entire ventilatory
demand, meeting, or exceeding the patients peak inspiratory flow rate (PIFR),
thereby providing an accurate FiO2, where the total flow delivered
to the patient meets or exceeds their peak inspiratory flow rate the FiO2
delivered to the patient will be accurate. High flow is in approved areas only.
Consult your NUM if unsure
Humidification:
it is the addition of heat and moisture to a gas. The amount of water vapor
that a gas can carry increases with temperature
Hypercapnia:
increased amounts of carbon dioxide in the blood
Hypoxemia:
low arterial oxygen tension (in the blood)
Hypoxia: low
oxygen level at the tissues
Low flow:
low flow systems are specific devices that do not provide the patient’s entire
ventilatory requirements; room air is entrained with the oxygen, diluting the
FiO2
Minute
ventilation: the total amount of gas moving into and out of the lungs per
minute. The minute ventilation (volume) is calculated by multiplying the tidal
volume by the respiration rate, measured in liters per minute
Peak
inspiratory flow rate (PIFR): the fastest flow rate of air during inspiration,
measured in liters per second
Tidal
volume: the amount of gas that moves in, and out, of the lungs with each
breath, measured in millimeters (6-10 ml/kg)
Ventilation-Perfusion
(VQ) mismatch: an imbalance between alveolar ventilation and pulmonary
capillary blood flow
EFFECTS OF OXYGEN ON BODY
Oxygen is a gas, which has no smell
or color and is heavier than air
It is stored at high pressure in
black and white cylinders
With oxygen there is always a serious
fire risk
Smoking is not allowed anywhere
nearby oxygen cylinder
No open fire or any inflammable
material should be kept near the oxygen cylinder
Oil, grease or alcohol should never
be used on the connections of the cylinder
The cylinder is mounted on a stand
for easy and should be tested before taking it to the bedside
To test it open the cylinder with the
key and then open the small valve very little and test the flow of oxygen from
the cylinder into a bottle half filled with water (wolf bottle)
The bottle has a rubber cork with two
holes tubes passing through it
The cylinder is connected by means of
rubber tubing to the longer tube
Oxygen flows into the wolf bottle and
then oxygen is given to the patient
DEFINITION
Oxygen
administration treats the effects of oxygen deficiency (anoxemia) but it does
not correct the underlying causes.
Oxygen therapy is important to keep a healthy level of tissue oxygenation
INDICATIONS
Breathlessness due to asthma,
pulmonary embolism, emphysema, cardiac insufficiencies, etc
Obstructed airway due to growth,
enlarged thyroid
Cyanosis
Shock and circulatory failure
After severe hemorrhage
Anemia
Patients under anesthesia
Asphyxia due to any reason, e.g.
drowning, inhalation of poisonous gases, hanging, etc
Poisoning with chemicals that alter
the tissues ability to utilize oxygen, e.g. cyanide poisoning
Carbon monoxide poisoning
Postoperative chest surgery and
thyroidectomies
Insufficient oxygen in atmosphere
Air hunger
PURPOSE
To supply O2 in conditions
when there is interference with normal oxygenation of blood
To reduce the effects of anoxemia
To maintain healthy level is tissue
oxygenation
CLASSIFICATIONS
Oxygen is
administered by either low flow or high flow systems. Low flow administration
devices include nasal cannula, oxygen mask, oxygen tent, etc. high flow
administration devices include venturi mask, some devices can be used for both low
and high flow administration, e.g. oxygen hood incubator, etc
Nasal Cannula
It is the
most important low flow device used to administer oxygen of a rubber or plastic
tube that extends around the face. Curved prongs that fit into the nostrils.
One side of the tube connects to oxygen tubing and oxygen supply. The cannula
is often held in place by an elastic band that fits around the clients head or
under the chin
The nasal
cannula is easy to apply and does not interfere with client’s ability to eat or
talk. It is very comfortable and permits some freedom of movement. Oxygen is
delivered via the cannula with a flow rate of up to 4 L/min. higher flow rates
dry air mucous and do not further increases inspired oxygen concentrations
Equipment
Oxygen supply with a flow meter
Humidifier with sterile distilled
water
Nasal cannula and tubing
Tape if needed to secure the cannula
in place
Gauze to pad the tubing over the
cheek
Procedure
Determine the need for oxygen therapy
and the physicians order
Assist the client to a semi-Fowler’s
position as possible. It permits easier chest expansion easier breathing
Explain about the procedure and
inform the client and support persons about safety precautions connected with
oxygen use
Set-up the oxygen equipment and
humidified
Turn on the oxygen at the prescribed
rate and ensure proper functioning
Put the cannula over the clients face
If the cannula will not stay in place
tape if at sides of face
Slip gauze pads under the tubing over
the cheek bones to prevent skin irritation as necessary
Assess the client regularly
Assess the vital signs, color,
breathing pattern and chest movement
Check the equipment are working
regularly
Make sure that safety precautions are
being followed
Record initiation of therapy and all
nursing assessments
Nasal Catheters
Nasal
catheters are used infrequently, but they are not absolute. The procedure
involves inserting an oxygen catheter into the nose to the nasopharynx. Because
securing the catheter must be changed at least every 8 hours and inserted into
the other nostril, for this reason, the nasal catheter is a less described
method because the client may have pain when the catheter is passed into
nasopharynx and because trauma can occur to the nasal mucosa. The nasal
catheter permits free movements for the patient and nursing care may be given
with much more ease
Oxygen Mask
An oxygen
mask is a device used to administer oxygen, humidity it is shaped to fit tightly
over the mouth and nose and is secured in place with a strap. There are four
types of oxygen masks:
Simple face masks: used for short-term oxygen therapy. If delivers O2 concentration from 40 to 60% at liter flows of 5-8 liter per minute
The partial rebreather mask: delivers O2 concentrated of 60-90% liter flows of 6-10 L per minute
The nonbreather mask: delivers the highest O2 can possible by means other than inhibition or mechanical ventilation that is 95-100% at liter flows of 6-15 L/minute
Venturi mask: delivers O2 can precise to with 1.1 and is often used for clients with COPD O2 can at from 24-40% /50% depending on the brand at liter flows of 4-8 L/minute. Initiating oxygen by mask in mucus the same as initiating O2 by cannula
HYGIENE (Personal Hygiene) – Definition, Morning and Evening Care, Personal Hygiene, Care of Hair, Maintaining Hair Care, Hair Combing, Hair Wash/Bed Shampoo, Pediculosis Treatment, Care of the Eyes, Nose and Ears, Oral Hygiene, Care of Dentures, Bed Bath, Care of Hands, Feet and Nails, Care of Pressure Points/Bedsore, Care of the Perineum, Clothing, Exercise, Habits, Sex and Health and Mental Health
UPDATED 2024
DEFINITIONS
Hygiene: hygiene is defined as the
science and art which is associated with the prevention and promotion of
health. Hygiene is science of health, which includes all the factors
contributing to healthful living.
Habits: habits are the highly
automated and self-executed behavior of man. Habits can be related to physical
activities or mental like those related to paying attention or thinking
Personal hygiene: personal hygiene
implies to those principles of physical cleanliness and mental health, which
are practiced by a person at individual level
Sexual health: sexual health is an
integration of the somatic, emotional intellectual and social aspects of sexual
being, in ways that positively enrich and enhance the personality,
communication and love
Mental health: mental health is
defined as the capacity in an individual to form harmonious relations with
others and to participate in or contribute constructively to the changes in his
social and physical environment
School hygiene: school hygiene or
school health is a branch of community health to facilitate optimum health to
school children. It also includes prevention of diseases, early diagnosis
Attitude: it is a mental structure or
framework that includes motivational, perceptual, emotional and cognitive
reactions. It also manifest the individual concepts, thoughts or imaginations,
which direct his behavior towards a specific direction
Health behaviors: it includes all
those activities and actions adopted by man as a protection against diseases.
The concept of health behavior includes rules of personal health, good health
habits, and taking preventive steps against diseases
Menstrual hygiene: menstrual
discharge is a normal physiological process. Menstrual hygiene describes the
basic elements of hygiene during menstruation to promote feeling of well-being
and prevention of diseases. This hygiene practices includes daily bath, keeping
the genital organs clean and dry, placing a clean sanitary pads and taking
proper nutrition and rest
INTRODUCTION
The word
hygiene has evolved from the Greek term “Hygia” which means “Goodness of
Health”. Hygiene is the science of health and includes all factors which
contribute to healthful living. Hygiene is the science of health and it
preservation, it also refers to practices that are conducive to good health.
Good personal hygiene is important to a person’s general health.
Definition
Hygiene
defined as “the science and art which is associated with the preservation and
promotion of health”.
Hygiene is
defined as that “science of health, which includes all the factors contributing
to the healthful living”
Types of Hygiene
Social hygiene: social medicine has
replaced the word social hygiene, it objective to study man as a social animal
in its total environment. The scope of social medicine includes science of
social structure and functions, social pathology and social treatment, etc
Industrial hygiene: occupational
health, which has broader meaning. Its scope is extended up to the health of
labor working in all types of occupation and different aspects of health
School hygiene: school hygiene or
school health is an important branch of community health, which facilitating
optimum health to school children
Preventive medicine: nowadays, a
broader term community medicine is used. Preventive medicine plays primary role
in immunization as specific protection and general methods of improvement in
health
Personal hygiene: personal hygiene or
personal health implies to those principles of physical cleanliness and mental
health. Personal hygiene is not only limited to taking care of body and keeping
it clean, rather the mental and spiritual aspects are also an integral part of
it
Factors Influencing Hygiene Practices
Personal preferences: each individual
has his own desires and preferences about when to bathe, shave, and perform
hair care. Same way each individual select different products according to the
personal preferences, needs and financial resources. The nurse assists the
client in delivering individualized care to the client
Social practices: social groups
influence hygiene practices and preferences. During childhood, hygiene
practices are influenced by family customs and as children enter their
adolescent years, hygiene practices may be influenced by the peer group
behavior. During the adult years, work groups and friends shape the
expectations of people and in the older adults hygiene practices may change
because of living conditions and available resources
Socioeconomic status: the type and
extent of hygiene practices are influenced by a person’s economic resources.
The nurse determines which products/supplies, the client can afford
Health belief and motivation:
knowledge regarding the importance of hygiene for well-being influences hygiene
practices. Only knowledge is not enough. The client must be motivated to
maintain self-care
Cultural beliefs: a client’s cultural
beliefs and personal values influence hygiene care
Physical condition: certain type of
physical limitations or disabilities often lacks the physical energy to perform
hygiene care e.g. a client with traction or who has an intravenous line, will
need assistance for hygiene maintenance
MORNING AND EVENING CARE
A patient’s
bath may be given at any time, according to the patient’s needs, but certain
routines are generally followed on a ward.
Morning Care
The
procedure followed in the morning affects the patient’s comfort
throughout the day
Each morning before breakfast, the
patient should be assisted to the bathroom, or a bedpan or urinal should be
provided, according to the patient’s activity level
The patient is then given the
opportunity to wash his/her hands and face and brush his/her teeth. The bed
linen is straightened, and the over bed table is cleaned in preparation for the
breakfast tray
After breakfast, the patient has a
complete bath (type is dependent upon the patient’s condition and mobility),
mouth care, a change of clothing and a back massage
Bed linens are changed; and the unit
is cleaned and straightened to provide a comfortable and safe environment for
the patient
Evening Care
The care the patient receives at the
end of the day greatly influences the patient’s level of relaxation and ability
to sleep
An opportunity is provided for
elimination; the patient’s hands and face are washed; the teeth are brushed; a
back rub is given
Bed linens are straightened; the
patient’s unit is straightened to ensure comfort and safety. It is important
that there are no items, which the patient could slip on, or fall over, such as
chairs or linens, on the floor
PERSONAL HYGIENE
Personal
hygiene has a significant role in every society. Every culture develops and
maintains its standards and methods of maintaining personal cleanliness. Habits
are formed for performing actions to keep the body clean and functioning
normally.
Personal
hygiene includes all those personal factors which influence the health and
well-being of an individual. It consists of the body regarding bathing and
washing, care of hair, nails and feet, mouth cleanliness and care of the teeth,
care of the nose and ears, clothing, postures, exercises, recreation, rest and
relaxation, sleep habits and nutrition
Personal hygiene is necessarily maintained for a person’s comfort and well-being. A variety of personal and socio-cultural factors influence the client’s hygiene practices. The nurse determines a client’s ability to perform self-care and provides hygienic care according to the client’s needs and preferences. While providing hygiene, the nurse must preserve as much client’s independence as possible, ensure privacy, convey respect and foster the client’s physical comfort.
Definition
Personal
hygiene defined as that “the healthy practices and lifestyle helps in the
maintenance and promotion of individual health physically, emotionally,
socially and spiritually”
Purposes of Personal Hygiene and Protect from Disease
To prevent illness
To promote good health
To improve the standard of health
To maintain quality life of an
individual
To promote mental well-being
To promote socially and spiritually
health
To improve the self-esteem in the
society
To maintain resistance and prevent
form infection
Principles of Personal Hygiene
Hygiene practices are learnt
Changes occur throughout the life
span, it also affects the health care practices
Individual differences exit from one
individual to other
Health practices of people vary with
cultural values and personal values
Health practices directly influences
the physical, mental, social and spiritual health of an individual
Good health practices prevent entry
of microorganisms into the body
Nature acts as a first line of
defense on human health natural light and ventilation
Factors Influences on Personal Hygiene
Social practices: social groups
influence including the type of personal care. During childhood, hygiene is
influenced by family customs
Personal preferences: each person has
individual desires and preferences about when to bath, shave and perform hair
care. Individual selects different products according to personal preferences,
needs and financial resources
Body language: an individual general
holds for the person. Body image is a person’s subjective concept of his or her
physical appearance. These images can change frequently. When individual
undergo surgery, illness or a change in functional status, body image can
change dramatically
Socioeconomic status: a person’s
economic resources influence the type and extent of hygiene practices used.
Socioeconomic status may influence his or her ability to regularly maintain
hygiene
Health beliefs and motivation:
knowledge about importance of hygiene and its implication for well-being
influences hygiene practices. However, knowledge alone is not enough. The individual
also must be motivated to maintain self-care
Cultural variables: an individual’s
cultural beliefs and personal values hygiene care. People from diverse cultural
background follow different self-care practices. Culturally maintaining
cleanliness may not hold the same importance for some ethnic groups as it does
for others.
Physical condition: the nurse quickly
learns that clients with certain types of physical limitations or disabilities
often lack of physical energy and dexterity to perform hygienic care. A client
in traction or a cast or who has an intravenous line or other device connected
to the body will need assistance with hygiene
Importance of Personal Hygiene
Maintenance of physical hygiene in a
state of health is a personal value and individual responsibility
Personal hygiene helps maintenance of
physical and psychological homeostasis
Personal hygiene helps to promote
individuals comfort, safety and well-being
A clean mouth and teeth aids to the
patients a feeling of self-approval
Healthy hygienic practices and
technique, which provides economy of time, material and energy
Stimulation of circulation by massage
and brushing is essential to maintain the hair healthy
Keeping the scalp clean by brushing
and shampooing will help to relieve form dandruff
Moving the body joints in their whole
range of movement helps to prevent muscle contraction and improve circulation
Good personal hygiene is essential
during sickness as well as in health
Nurses Role in Personal Hygiene
Direct provision of hygienic care
provides the nurse with an ideal opportunity for daily assessment of the
patient’s physical and emotional state
The process of daily bathing, oral
hygiene, care of the hair, nails and massage forms a vital part of the
nurse-patient interaction
The nurse should assess the needs of
patients and identifying related nursing problems
The nurse needs to collect further
information about the patient’s identified problems
The nurse needs to develop an
appropriate nursing care plan in terms of the data collected and relevant
nursing principles
The nurse has to implement the
nursing care plan to provide optimum quality of nursing care for individual
patients
The nurse has to evaluate the success
of the nursing care plan and adjusting it to meet the patient’s changing needs
The nurse also participates in
carrying out the physician’s orders and refers to the physician pertinent
observations and information about the patient
The nurse has to motivate the patient
to resume independence and responsibility for care as the condition permits
The nurse must apply knowledge of
pathophysiology to provide good preventive hygienic care. The nurse has to
integrate knowledge of anatomy, physiology and pathology during hygienic care
Flatus tube or a rectal tube inserted into the rectum to relieve flatulence and gaseous distension of the abdomen
Passing of flatus tube is defined as an introduction of a tube into the rectum for expulsion of gas
A rectal tube, also known as a rectal catheter or rectal balloon catheter, is a medical device inserted into the rectum for various purposes. Here are some common uses of rectal tubes:
Colonic Decompression: Rectal tubes may be used to relieve colonic distension or decompress the colon in cases of severe constipation, obstruction, or pseudo-obstruction. This helps to remove gas and feces from the rectum and lower colon.
Preoperative Preparation: In some surgical procedures, particularly those involving the lower gastrointestinal tract, a rectal tube may be used to clear the rectum of stool before surgery. This can help improve visualization during the procedure.
Fecal Incontinence Management: Rectal tubes can be used to manage fecal incontinence by providing a means to divert and collect liquid stool.
Rectal Irrigation: Some medical conditions, such as neurogenic bowel dysfunction, may require rectal irrigation. A rectal tube can be used to instill fluids into the rectum for cleansing purposes.
Purpose
To remove flatulence from the lower
bowel
To relieve abdominal distension
Used before giving a retention enema
General Instructions
Introduce the rectal tube into 4 to 6
inches
Rectal tube should not leave more
than 30 minutes
Longer periods of insertion can lead
to permanent sphincter damage
The tube can be re-inserted every 3
to 4 hours if necessary
Preliminary Assessment
Check
The doctors order for any specific
precautions
Patients general condition
Diagnosis of the patient
Self-care ability of the patient
Mental status to follow instructions
Articles available in the unit
Preparation of the Patient and Environment
Explain the sequence of the procedure
Provide privacy
Provide left lateral position
Arrange the articles at the bed side
Place the Mackintosh under the
buttocks of the patients
Equipment
A clean tray
containing:
Flatus tube in a kidney tray with
water
Vaseline
Wet swabs in a bowl
Paper or Mackintosh or towel
Paper bag
Long artery forceps
Screen
Procedure
Wash hand thoroughly
Place the patient in left lateral
position
Lubricate the flatus tube and insert
4 to 6 inches into the anal canal
The free end of the tube is kept in water
in a kidney tray
Keep the tube in a place for 20
minutes
Presence of air bubbles in the water
indicates that flatus is being expelled
Remove the tube and place it in the
K-basin
After Care
Clean and area with wet cotton swabs
Position the patient comfortably
Replace the article after cleaning
Wash hand thoroughly
Record the procedures and findings in the nurses record sheet
Nursing Procedure – COLD APPLICATION (Definition, Purpose, Classification, Physiological Effects, Principle, Contraindications, Complication and General Instructions)
UPDATED 2024
Cold
application is more effective than heat for sprains or other soft tissue
injuries and is the preferred treatment within the first 48 hours after injury.
Cold is applied to prevent swelling (edema); however, cold application usually
will not reduce edema that is already present. Methods of cold application
include the use of a compress, icecap, ice collar, ice pack, sponge bath, and
hypothermia (cooling) blanket.
DEFINITION
Cold
application means the application of an agent cooler than the skin. Cold
application is also either moist or dry.
Moist cold: applications are ice to
suck, cold compress and evaporating lotion
General Cold
Applications
Moist cold: cold sponging, cold bath,
cold packs
Dry cold: hypothermia
PHYSIOLOGICAL EFFECTS
Cold
Application: Primary Effects
Peripheral vasoconstriction
Decreased capillary permeability
Decreased local metabolism
Decreased oxygen consumption
Blood flow is decreased
Blood viscosity is increased
Lymph flow is decreased
Motility of leukocytes is decreased
Muscle tone is decreased
Secondary
Effects
The primary effect of cold application may last only for 30 minutes to one hour, after this time, a recovery time of one hour must be allowed or secondary effects (vasodilatation) will take place.
CONTRAINDICATIONS
Cold should not be applied on
patients who are in a state of shock and collapse
Cold should not be applied when there
is edema
Cold should not be applied when there
is muscle spasm
Cold should not be applied in
diseases or disorders associated with impaired circulation
Cold should not be applied when there
is decreased sensation
Cold should not be applied when there
is infected wound
Cold should not be applied when the
patient is having shivering or having a very low temperature
PRINCIPLES INVOLVED
Cold causes construction of blood
vessels and decrease the blood supply to the area
Cold decreases metabolism and the
cell activity or growth
The end organs of the sensory nerves
in the skin convey the sensation of cold; the sensations are interpreted in the
brain
Woolen materials absorb moisture
slowly, but hold moisture longer and colds off less quickly than the cotton
materials
Moisture left on the skin causes
rapid cooling due to evaporation of the moisture
Prolonged exposure to moisture
increases the skins susceptibility to maceration and skin breakdown
COMPLICATIONS
Pain
Blisters and skin breakdown
Maceration (with moist cold)
Gray-bluish discoloration
Thrombus formation
Hypothermia
GENERAL INSTRUCTIONS
In hyperpyrexia, the temperature of the body should be bought gradually and steadily. Sudden cooling is dangerous to the patient
Protect the patient from getting chills, a shivering can raise the temperature, it also allows a patient to catch a cold
After the procedure, dry the part gently by patting and not by rubbing by removing the moisture, thereby, in prevent maceration of the skin and further cooling by evaporation
Maintain the correct temperature for the entire duration of the application
Never ignore the complaints of a patient, however, small they appear to be.
NURSING PROCEDURE – DIET FOR PATIENTS (Gastrojejunostomy Feeding, Breastfeeding and Artificial Feeding)
Purpose, General Instructions, Preliminary Assessment, Preparation of Patient and Environment, Equipment, Procedure and After Care
UPDATED 2024
GASTROJEJUNOSTOMY FEEDING
Gastrojejunostomy
feeding is defined as enteral nutrition is a liquid food preparation directly
into the stomach or small intestine via a tube
It is an
ideal method of providing nutrition for the person who is unable to swallow
food and drink normally but has intact gastrointestinal function
It is the
introduction of liquid good through a tube or catheter which the surgeon has
already introduced into the stomach through the abdominal wall
Indications
Tumors or operations on the upper
gastrointestinal tract
Cancer of the esophagus
Stricture of the esophagus caused by
poisoning in case of fistula
General Instructions
It is essential that the area of the
skin around the tube be kept clean and dry
A water proof ointment such as zinc
oxide may be applied around the tube to protect the skin from the irritation of
the hydrochloric acid
Foods given through the gastrostomy
tube are some as those given by nasogastric tube and the same amounts are given
at the same intervals
Methods of Administration
Intermittent feeding: given four to
six times a day rather the continuously is delivered as a bolus through a
longer lumen tube. Volume for formula usually 250-450 ml is placed in a large
syringe and inserted into the proximal end of the tube
Intermittent gravity drip:
administration delivers a similar volume 250-450 ml of feeding over 20-30 ml a
minute, four to six times a day
Continuous administration: delivers
fluid through a small lumen tube at a constant rate via orogastric and
nasogastric routes. The rate of flow is carefully regulated. The nurse should
calculate the amount of fluid to be infused during an hour and regulates the
infusion pump accordingly
Preliminary Assessment
Check
The doctors order for specific
instruction
Level of consciousness of the patient
Self-care ability of the patient
Mental status to follow instructions
Articles available in the unit
Operation of
the Patient and Environment
Explain the sequence of the procedure
Provide privacy
Arrange the articles at the bedside
Place the patient in a comfortable
position
Keep the environment clean and tidy
Keep ready with feed to be given
Equipment
A clean tray
containing
A funnel, rubber tubing, glass
connection screw and a clamp
A glass of drinking water
Required amount of fed, temperature
100 degree F
Sterile lubricant to protect
surrounding area
Sterile dressing and forceps in a
dressing tray
Medicine as per odor
Kidney tray
Many tailed binder if required
Mackintosh and towel
Stethoscope
Syringe
Procedure
Wash hands thoroughly
Place the mackintosh or towel; clean
the surrounding area of the opening. Cover the wound with sterile piece of gauze
Unscrew the clamp from the
gastrostomy tube and attach the funnel and rubber tubing; keep the tube pinched
to prevent air from setting in
Aspirate the gastric contents by
attaching a syringe
Pour some clean water into the funnel
and lower a little to let our air
Then pour the feed before the funnel
is empty
If any medicines are ordered, these
are given after feed
Give water after giving medicines
Disconnect the tabbling and funnel
Clean and apply sterile instrument
around the wound, dress it with sterile dressing and apply the binder
After Care
Remove the Mackintosh and towel
Position the patient comfortable
Secure the tube with plaster
Replace the articles to utility room
Hand wash
Record the procedure in nurse record
sheet
BREASTFEEDING
Breastfeeding
is the best food for the baby. It’s not only gives nourishment but also suffice
the baby’s emotional needs.
Advantages
It is the best natural food for the
baby
It fully meets the nutritional
requirement of the infant and promotes optimal growth
It protects the baby from the
infections
It satisfies the sucking reflex of
the child
It is always clean and sterile
It is available at the correct
temperature and requires no preparation
Lactoferrin present in the breast
milk inhibits the growth of bacteria
Gastrointestinal disturbances are
less in breast fed, children, due to presence of lactobacillus fibrous
It creates bonding between the mother
and child
It helps parents to space their
children
It reduces infant mortality rate
It helps in involution of the uterus
It gives baby a sense of security
Contraindication for Breastfeeding
Mother
Breast diseases e.g., mastitis,
breast abscess
Cardiac diseases and active
tuberculosis
Infectious diseases
Mental illness of mother
Unconscious mother
Baby
Babies with cleft lip and cleft
palate
Premature and sick babies who have
poor sucking reflex
Oral thrush
Breastfeeding Methods
General Instructions
Mother should keep her body clean and
wear clean cloths
Before each feed, clean the breasts
and hands of the mother
Mother should be in comfortable
position during feeding
Hold the nipple between index and
middle finger
Feed the baby on demand; it helps the
baby to gain weight
Feed the baby for minimum 10 minutes
on each breast
Instruct the mother to feed the baby
even when the child is ill
Burping should be done after each
feed to expel the air from the baby’s stomach
When the baby is 4 to 6 months old start
weaning, because, mother’s milk is not sufficient to sustain growth after 6
months of age
If the baby’s napkin is wet, dirty,
change the napkins and cloths before each feeding
Weigh the child every month and
record it
Teach the mother to have adequate rest to avoid tension, fatigue and stress
ARTIFICIAL FEEDING
Artificial
feeding is given to infants instead to the breast milk. Breast milk is often
substituted by cow’s milk. The cow’s milk is substituted by dried milk,
evaporated milk, etc.
Difference
between human’s milk and cow’s milk
Human –
carbohydrate (7%), protein (1.5%) and fat (3.5%)
Cow –
carbohydrate (4%), protein (4%) and fat (4%)
Preparation of formula
The milk
formula should be planned to meet the nutritional requirement of the infant
which is based on his age and weight
Caloric
requirement: 110 calories per kg of baby weight
Fluid
requirement: 165 ml per kg of baby weight
Milk
requirement: 100 to 130 ml per kg of body weight
Number of
feeds in 24 hours: 7 feeds
Time
interval between each feed: 2-3 hours
Preparation
of Milk Formula for a Day
Take 460 ml
of milk, 140 ml of water and add 9 teaspoonful of sugar and boil it and keep it
in the refrigerator, for each feed, take 85 ml of milk, ward it and feed the
baby
Different Ways of Feeding in Infant
By using the feeding bottle and teat
By nasal tubes
By belcroy feeder
By dropper
By using spoon
General Instructions
Plan the formula according to the
nutritional requirement of the baby
The feeding bottle, teat and other
articles used for the feeding should be sterile
The milk feed should be warm
The mother and the child should be in
a comfortable position
Ensure a slow and steady flow of milk
by making a hold in the teat neither too big nor too small
Change the napkin before the feed, if
it is wet or soiled
The feeds should be given at regular
intervals
The mother should wash her hands
thoroughly before preparing the feed and feeding the child
Offer a small quantity of water at
the end of each feed
Never pinch the baby’s nose to make
him to open his mouth instead press his cheeks
Preliminary Assessment
Check
The doctors order for any specific
instructions
Plan the formula according to the
nutritional needs of the infant
Time at which the last feed was given
General condition of the baby
Baby’s ability for sucking
Articles available in the unit
Preparation of the Infant and the Environment
Arrange the articles at the bedside
Provide privacy
Change the napkin if it is wet
Bath the baby in necessary
Keep the feeding bottle ready
Equipment
A tray
containing
Mackintosh and towel
Baby dress and napkin
Feeding bottle and teat in a sterile
container
Required amount of feed (sterile)
Sterile water in a bottle
A piece of clean towel or flannel
Gown and mask for the nurse
Procedure
Wash hands thoroughly
Hold the baby in a position similar
to one used for breastfeeding
Check the temperature of the feed by
dropping few drops on the inner aspect of the wrist joint
Hold the bottle in an angle of 45
degree and bring the teat to the lips and then into the mouth of the baby
Take care to keep the teat filled
with milk throughout the feeding
Break the wind (burping) in between
the feeds
When the feed is finished, give
sterile water to the baby
After Care
Keep the baby on the shoulders and
pat over his back
Wipe the face
Remove the towel and lay the baby in
the cradle
Replace the articles in the proper
place after cleaning