Home Blog Page 2

ORAL HYGIENE

ORAL HYGIENE Care of Independent , Dependent & Unconscious Patients , Care of Dentures

UPDATED 2024

Oral hygiene means maintaining the cleanliness of the mouth. Oral hygiene includes measures to prevent the spread of disease from the mouth and increase the comfort of the patient

It is important because mouth is the portal entry of food and digestion starts from mouth. So, the entry of any pathogen in mouth directly affects health.

Oral hygiene means the cleanliness of the mouth oral hygiene includes measure to prevent the spread of disease from the mouth and increase the comfort

Objectives

  • To keep the mouth and teeth in good condition
  • To prevent the mucous membrane from becoming dry and cracked
  • To prevent sores which resulting in ulceration
  • To prevent bacterial in the mouth from causing local and general infections
  • Emollients help to soften the dry mucus membrane to prevent cracking

Purpose

  • To prevent and treat mouth infections
  • To keep the mouth fresh and clean
  • To prevent the mucus membrane from becoming dry and cracked
  • To prevent dental caries and tooth decay
  • To prevent sores which resulting in ulceration
  • To stimulate salivation and increase appetite
  • To prevent infection of parotid glands
  • To prevent complications such as stomatitis, glossitis, pyorrhea and parotitis, etc
  • To stimulate circulation in gums thus maintaining health firmness
  • To maintain oral hygiene among bedridden patients

The Patient who may require Frequent Mouth Care

  • Unconscious patients
  • Helpless patient
  • Patient with higher pyrexia
  • Malnourished and dehydrated patients
  • Patients who are not taking oral feeds
  • Patients have local diseases of mouth
  • Paraplegic patients
  • Patients having a local disease of mouth
  • Postoperative patients

Scientific Principles

  • Any new treatment or exposure to unfamiliar situation produces fear and anxiety
  • Food particles left in the mouth promote the growth of microorganism
  • Soap which is constituent of most dentrifrice has a low surface tension and spreads readily and penetrate in between teeth
  • Cold water reduces friction and hot water destroys dentures
  • Cough reflex is depressed in unconscious patients
  • Giving mouth care provides opportunity to observe the condition of mouth and teeth
  • Knowledge about the technique of keeping the mouth healthy helps in practicing it and maintains
  • A clean mouth and teeth aids to the patient a feeling of self-approval
  • Emollient help to soften the dry mucous membrane to prevent cracking
  • Patients comfort and safety may be enhanced by practice of good techniques, which provide economy of time, material and energy

Solutions Commonly Used for Mouth Wash

  • Potassium permanganate (KMnO4) 1:5000 (crystal to a glass of water)
  • Sodium chloride – one teaspoon to a pint of water
  • Potassium chloride – 4-6%
  • Hydrogen peroxide (H2O2) 1:8 solution

Dentifrices Used

  • Glycerin with lime juice equal parts
  • Sodium bicarbonate paste
  • Reliable tooth paste or powder

Emollient Used Commonly

  • Clean or butter
  • White Vaseline
  • Liquid paraffin
  • Glycerin borax
  • Olive oil

Preliminary Assessment of the Patient and Environment

  • Identify the patient and observe the general condition of the patient
  • Check the condition of the mouth
  • Assess the ability of the patient to cooperate
  • Prepare the patient for acceptance and realization
  • Assess the status of health habits
  • Decide the type of dentifrice and emollient to be used
  • Assess the frequency of mouth care needed
  • Note the precautions to be observed while moving the patient
  • Articles available in the unit
  • Make sure about any or drink to be given after mouth care if advisable

Equipment

A tray containing of:

  • Mackintosh and towel
  • Small jug with warm water
  • Feeding cup
  • Small cups – 2
  • Artery forceps – 1
  • Dissecting forceps – 1

A small container containing of:

  • Paper bag
  • Kidney tray
  • Choose one of the solutions for mouthwash
  • Choose one of the emollients
  • Gauze piece
  • Face towel – 1

Procedure

  • Bring patient to edge of bed
  • Position pillow according to comfort of patient
  • Place small mackintosh with face towel on patient’s chest
  • Place K-basin close to chin of patient
  • Raise head end of the bed to 45 degree
  • Pour antiseptic solution into cup
  • Soak gauze piece in solution and squeeze out excess solution by using artery clump
  • Use same clamp to clean patient’s mouth (avoid mixing of clamps)
  • Clean using up and down movements from gums to crown, clean oral cavity from proximal to distal, outer to inner aspect
  • Discard used cotton balls into K-basin
  • Provide tumbler of water and instruct the patient to gargle mouth. Position K-basin so that spillage is avoided
  • Clean tongue from inner to outer aspect
  • Provide water to rinse mouth and dry face with towel
  • Lubricate lips using swab stick
  • Rinse the used articles and replace equipment
  • Document time, solution used, condition of oral cavity, abnormalities noticed and patient’s response

Complication of Neglected Mouth Care

Local Complications

  • Parotitis: inflammation of the parotid glands
  • Stomatisis: inflammation of the mucus membrane of the mouth
  • Gingivitis: inflammation of the gums
  • Glossitis: inflammation of the tongue
  • Dental caries: forms cavity in the teeth
  • Root abscesses: pus formation in the root of the teeth
  • Periodontal diseases: it is also known as pyorrhea or pus formation in the sockets of teeth
  • Bleeding gums: deficiency of vitamin C and use a hard brushing of the teeth

Complication Neighboring Structure

  • Parotitis: inflammation of the parotid gland
  • Rhinitis: inflammation of sinus cavity
  • Otitis media: inflammation of middle ear
  • Tonsillitis: inflammation of the tonsils
  • Adenitis: inflammation of the adenoids

Systemic Complication

  • Anorexia: loss of appetite
  • Bacterial endocarditis: inflammation of the endocardium
  • Gastritis: inflammation of the stomach
  • Nephritis: inflammation of the kidneys
  • Rheumatic arthritis: inflammation of the joints

Recording and Reporting

  • Record the procedure with date, time and condition of the mouth, teeth, etc, on nurse’s record
  • Report and record any abnormal condition to the ward sister and physician
  • Give health education to the patient and relatives on oral hygiene

ORAL HYGIENE FOR INDEPENDENT PATIENTS

Patients who are able to sit in a Fowler’s or semi-Fowler’s position can usually perform their own oral hygiene as long as the necessary supplies are within easy reach. For independent patients, sitting on the edge of the bed or standing at the sink is also an option when performing oral hygiene.

While a patient is performing oral hygiene, it is important for you to observe the process and provide any necessary teaching about brushing and flossing. This is also a good time to discuss the importance of oral hygiene and good oral health with the patient

When patients become ill, have surgery, or have a medical condition that inhibits the use of their hands, you must perform oral hygiene for them. Before assuming dependent patients are incapable of performing any of their oral hygiene, be sure to assess their level of dependence and invite them to participate in any way they can.

Be sure to add the level of assistance that is required to the patient’s plan of care. The healthcare team can then be aware of how and to what extent they have to assist the patient with oral care

ORAL HYGIENE FOR DEPENDENT PATIENTS

Patients become ill, have surgery, or have a medical condition that inhibits the use of their hands; you must perform oral hygiene for them. Before assuming dependent patients are incapable of performing any of their oral hygiene, be sure to assess their level of dependence and invite them to participate in any way they can be sure to add the level of assistance that is required to the patient’s plan of care. The healthcare team can then to aware of how and to what extent they have to assist the patient with oral care

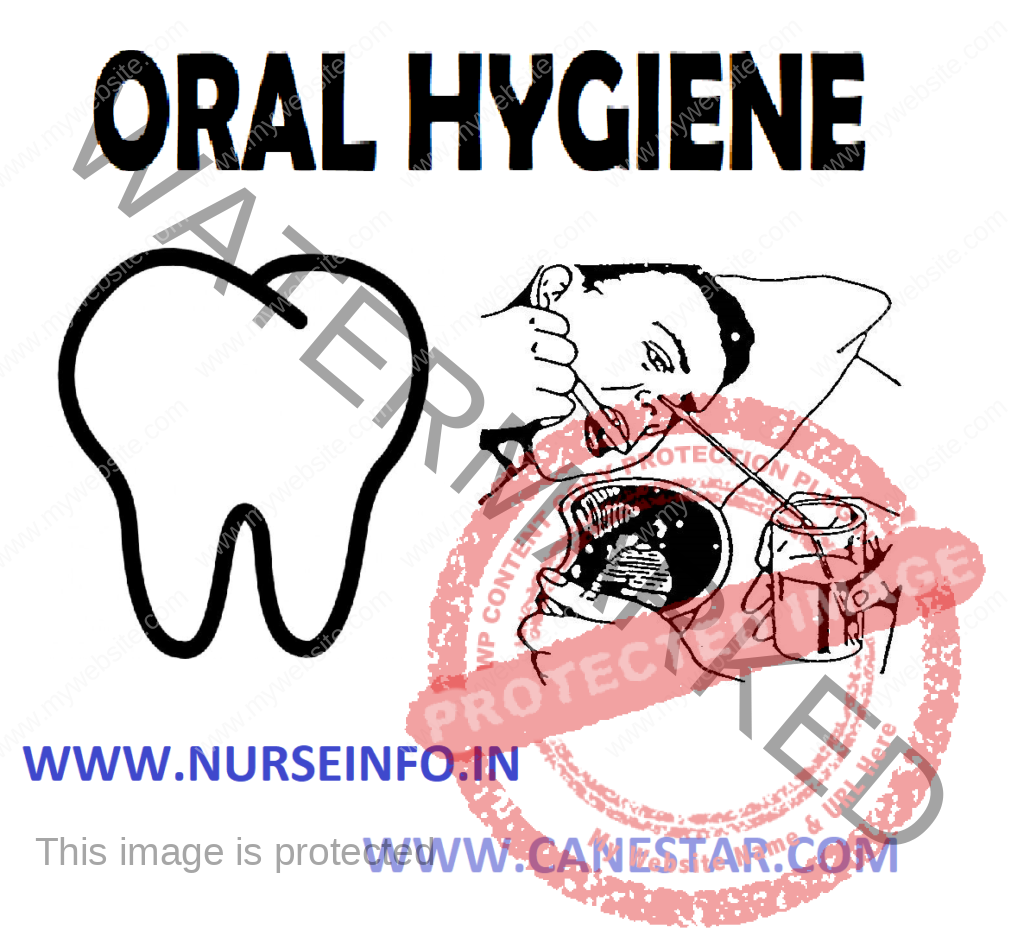
ORAL HYGIENE FOR UNCONSCIOUS PATIENTS

Proper positioning can help reduce the risk of aspiration. For an unconscious patient, the best position is side-lying with the patient’s head turned toward you in either a semi-Fowler’s position or with the head of the bed flat. Placing the patient is one of these positions allows fluid and any oral secretions to collect in the dependent side of the mouth and drain out

Use a soft-bristled toothbrush and toothpaste to brush your patient’s teeth gently to remove any debris, and then brush the patient’s tongue. Use a syringe and water to rinse the teeth and tongue. Then use foam swabs moistened with diluted hydrogen peroxide or other facility-approved solution to remove crusts and secretions from the mucous membranes of the mouth. Be sure to suction any oral secretions that pool in the patient’s mouth during the procedure

Since, an unconscious patient cannot report any mouth pain or discomfort, perform a thorough assessment of the oral cavity each time you provide oral hygiene. If you note any inflammation, infection, sores, or bleeding, initiate treatment immediately since oral health can affect the patient’s overall health status

CARE OF DENTURES

Care of dentures of artificial teeth is the responsibility of the nurse to guard against offending patient, by helping them to take care of their mouth

Equipment Needed

  • Soft bristled tooth brush
  • Denture tooth brush
  • Dentifrice
  • Warm and cold water in glasses
  • Gauze pieces
  • Wash cloth
  • Plastic denture cup
  • Gloves
  • Basin

Care of Dentures

Procedure

  • Explain and secure the cooperation of the patient
  • Remove the denture and inspect the oral cavity for abnormalities if any
  • Wash hands and keep the articles near the bed side sink
  • Take a basin and fill half of it with water
  • Put on gloves to reduce transmission of infection
  • Ask the patient to remove dentures and place them in the basin
  • Brush the dentures. Use back and front motion. Clean inside and outside by brushing
  • Rinse dentures thoroughly in running water
  • Return them to the patient to keep them in a denture cup in cold water
  • With a soft bristled tooth brush the gum with tooth paste as well as the palate of tongue also
  • Rinse the mouth thoroughly with cold water
  • Wipe the face and make the patient comfortable

Procedure

Precautions

  • In cleaning dentures, they should be held firmly as water reduces friction between the teeth and finger. They are liable to slip and fall down
  • Denture should be dipped in cold water to prevent friction
  • Hot water may destroy dentures, dentures are expensive and may be difficult to replace if broken or lost
  • Privacy should be maintained
  • Discourage the use of brushed with hard bristles because they cause grooves in dentures
  • If the patient is capable of self-care, arrange the articles within the easy reach of the patient
  • Encourage the patients to wear the denture during the day. This will improve the eating technique, speck appearance and contour of the mouth
  • Seriously ill patient or a patient who is under anesthesia or an unconscious patient, the denture is removed for fear of dislodging the denture and blocking the respiratory passage
  • When dentures are removed from the patient mouth, they should be stored in a labeled container to prevent lost and breakage
ORAL HYGIENE - Care of Independent , Dependent & Unconscious Patients , Care of Dentures
ORAL HYGIENE – Care of Independent , Dependent & Unconscious Patients , Care of Dentures

PREPARATION OF SPUTUM SMEAR

PREPARATION OF SPUTUM SMEAR – Sputum, Purpose of Sputum Examination, General Instructions and Procedure (COMMUNITY HEALTH NURSING)

UPDATED 2024

A smear is prepared in a clean slide, spread with thin film of the material to be examined. In bacteriology, material spread on a surface as a microscopic slide

SPUTUM

Sputum is material from the mucous lining of the bronchial tubes and trachea. Its consistency varies from a thin, watery fluid to thick, purulent material, and it has a Ph of 6.6 to 7.1

PURPOSE OF SPUTUM EXAMINATION

An examination of sputum is made chiefly to reveal the presence of bacteria. Bacteria commonly looked for in sputum include those that cause tuberculosis or pneumonia

GENERAL INSTRUCTIONS

  • The most favorable time to collect a sputum specimen is early in the morning to avoid having food particles mixed with it
  • There is more sputum in the morning because it has not been coughed up during the night
  • The container most commonly used for the collection is a disposable plastic cup
  • If the sputum is not examined at once, sputum is kept at room temperature until it can be examined
  • Instruct the patient to wash the mouth with plain water few minutes before taking the specimen
  • Totally 3 consecutive specimens should be taken, spot smear A- 1st day, early morning B-2nd day and spot smear on next day C-3rd day

PROCEDURE

  • A 24 hours sample is better if not overnight sputum in a clean container
  • Select a new unscratched slide using a broomstick
  • Spread sputum on the slide using a broomstick
  • Allow the slide to air dry for 15-30 seconds
  • Fix the slide by passing it over the flame of spirit lamp
  • The slide may be wrapped in clean paper and sent to the primary health center along with the request
PREPARATION OF SPUTUM SMEAR – Sputum, Purpose of Sputum Examination, General Instructions and Procedure (COMMUNITY HEALTH NURSING)

SUTURE REMOVAL

SUTURE REMOVAL – Purpose, Principle, Usual Timing, Factors Affecting, Types, General Instructions, Preliminary Assessment, Preparation of Patient and Environment, Procedure, Equipment and Post-Procedure Care

UPDATED 2024

Suture removal is a process removing materials used to secure wound edges or body parts together from healed wound without damaging newly formed tissue

The timing of suture removal depends on the shape, size and location of the sutured incision

The sutures may be removed by the surgeons or by the surges regarding to the tropical customs. In all cages, the surgeon gives the written order for the removal of the sutures

PURPOSE

Sutures are foreign bodies and if they are not removed they are capable of causing local inflammation

PRINCIPLE

  • Never pull the visible portion of the suture through underlying tissue
  • Suture line is cleansed before and after suture removal
  • No part of the stitch which is above the skin level enter and contaminate the tissue under the skin

USUAL TIMING

  • Scalp and free: 2-5 days
  • Abdominal wounds: 7-10 days
  • Lower limbs: 10-14 days

FACTORS AFFECTING THE SUTURE REMOVAL

  • Type of suture
  • Wound bedding

TYPES

  • Removing staples: to remove staples, the nurse simply inserts the tips of the staple remover under each wire staples. Squeezes are center of the staple with the tips, freeing the staples from the skin
  • Intermittent suture: the surgeon tied each individual suture made in the skin
  • Continuous suture: it is the series of sutures with only two knots
  • Retentions suture: they are placed deeply than skin sutures

GENERAL INSTRUCTIONS

  • Confirm the doctor’s order for the removal of the sutures
  • The suture removal is done in conjunction with the dressing change
  • When removal interrupted in sutures, alternate one are removed first
  • Suture material left beneath the skin acts as a foreign body and clients the inflammatory response
  • If wound dehiscence occurs during the removal of sutures, inform the surgeon immediately
  • After removing the sutures, even if the wound is dry, the small dressing is applied for the day or two to prevent infection
  • If wound discharge occurs, the patient should be instructed to contact the surgeon
  • Abdominal belts or many tailed bandages may be applied as the abdomen after removal of abdominal sutures in obese patients to prevent wound dehiscence and evisceration

PRELIMINARY ASSESSMENT

  • Check the physician’s order
  • Assess the general candidates of the patient
  • Check the specific precautions of any
  • Check the consciousness of the patient and his ability to follow instructions

PREPARATION OF PATIENT AND ENVIRONMENT

  • Explain the procedure to the patient
  • Provide privacy, if needed
  • Clean the area before and after the procedure

EQUIPMENT

  • Water proof thrash bag
  • Adjustable light
  • Clean gloves, if the wound is dressed
  • Sterile gloves
  • Sterile forceps
  • Normal saline solution
  • Sterile gauze pads
  • Antiseptic cleaning agent
  • Sterile curve tipped suture scissors
  • Povidone-iodine sponges
  • Optional adhesive butterfly strips and compound benzoin tincture or other skin protectant

PROCEDURE

  • To remove the interpreted sutures, grasp the suture at the knot with a toothed forceps and pull it gently to expose the portion of the stitch under the skin
  • Cut the suture with a sharp scissors between the knot and the skin on one side either below the knot or opposite the knot. The pull the thread out of one piece
  • The suture which is already above the skin should not be drawn under the skin. After removal of sutures, every suture should be examined for completeness. The number of suture’s shower be countered before and after removal
  • Mattress intercepted sutures have no threads underlying the skin. The visible part of the suture opposite the knot should be cut and the suture is removed by putting in the direction of the knot
  • If a continuous suture is applied, it is cut through, close at each skin orifice on one side and the cut sections are removed through the opposite side by gentle traction

POST-PROCEDURE CARE

  • After the removal of any suture we showed clear the area
  • We can give dressing also the area to prevent infection
  • Tell the patient to keep the area clean
  • Document the status of the wound, after suture removal
SUTURE REMOVAL – Purpose, Principle, Usual Timing, Factors Affecting, Types, General Instructions, Preliminary Assessment, Preparation of Patient and Environment, Procedure, Equipment and Post-Procedure Care

PATIENT POSITIONING – LATERAL & SIM’S POSITION

LATERAL POSITION

UPDATED 2024

Patient lies on left side with legs flexed at thighs. The upper leg is flexed more than the other. A pillow is kept in front of the abdomen and at the back and one under the upper leg.

Indications

  • Lateral position is used for giving back care enemas and colonic irrigation
  • Used for examination of perineum or rectum inserting suppositories
  • For taking rectal temperature
  • For change of position
  • Later position is a relaxing position
  • Giving back care

Procedure

  • Explain the procedure to the patient
  • Provide privacy
  • For left lateral position, place the patient on left side with buttocks to the edge of bed, both thighs flexed and left arm underneath
  • For right lateral position, place the patient on right side with buttocks to the edge of bed, both thighs flexed and right arm underneath
  • Place air ring under the hips to reduce pressure on trochanters and at the hip joints, the cotton rings or foam pads under the ankles of lower legs to reduce the pressure on ankles
  • Align the patient in good position and make sure the patient is not lying on his arm
  • Support the body parts in good alignment for comfort

Left lateral position: with one pillow under the head, patient is placed to lie on the left side

Use of left lateral positions:

  • For giving edema
  • For inserting suppositories
  • To take rectal examination
  • To take rectal temperature

Contraindications of this position are

  • After hip surgery
  • After orthopedic surgery

SIM’S POSITION

Sim’s position is similar to the lateral position except that the patient’s weight is on the anterior aspects of shoulder girdle and hip. The patient’s lower arm is behind him and the upper arm is flexed at the shoulder and elbow.

Indications

  • This position is used for unconscious patient
  • It is used for rectal examinations
  • Used for vaginal examinations
  • Used for relaxation in antenatal exercises

Procedure

  • Explain the procedure to the patient
  • Collect articles need at the bed side
  • Provide privacy
  • Place the patient on the side
  • One pillow is placed under the head with the left check resting on it
  • The left arm is drawn behind the body and the right arm may be in any position comfortable for the patient
  • The right thigh is flexed against the abdomen
  • The left leg is extended well
  • Cover the patient with top sheet neatly

Contraindications

Patients with deformities of the hip or knee may be unable to assume this position

SUPINE & DORMANT  RECUMBENT

LITHOTOMY & PRONE

KNEE-CHEST/GENUPECTORAL & TRENDELENBURG’S

FOWLER’S & C-SHAPED

ROSE & RECOVERY

PATIENT POSITIONING

 PATIENT POSITIONING –  LATERAL & SIM'S POSITION - Purpose, Principles, Factors Involved, Types, General Instructions, Preliminary Assessment, Equipment and Procedure

PATIENT POSITIONING – LATERAL & SIM’S POSITION – Purpose, Principles, Factors Involved, Types, General Instructions, Preliminary Assessment, Equipment and Procedure

NURSING PROCEDURES LIST CLICK HERE

DISINFECTION OF THE PATIENT UNIT

DISINFECTION OF THE UNIT

UPDATED 2024

Disinfectants defined as the agent or solutions used to kill or destroy the growth of microorganisms

Disinfectants are the agent that free from infection. The term is usually applied to a chemical or physical agents kills vegetative forms of microorganisms

Common Disinfectants Used

  • Dettol (chloroxylenol): 1:2 to 1:1000 strength
  • Hibitane (chlorhexidine): 1:100 strength
  • Eusol (sodium hypochlorite): 1: 80 strength
  • Lysol (cresol and soap solution): 1:40 strength
  • Savlon (0.3% chlorhexidine and 3% cetrimide) – 1:20
  • Phenol (carbolic acid) – 1:10 to 1:20 strength
  • Formalin (formaldehyde) 50 g/l liter of water
  • Betadine (iodine) – 1: 40 strength
  • H2O2 (liberates O2) – 1:80 strength

Dilution formula: the volume of stock solution to be used.

Formula: strength of lotion required/strength of stock solution (multiply) volume of solution required

Responsibilities of Nursing Personnel

  • To delegate the responsibilities to other
  • To supervise the ward cleanliness
  • To provide adequate supplies for cleaning
  • To make the patients environment safe
  • To replace or repair the damages article
  • To keep the environment pleasant to promote comfort of the patient
  • To maintain the unit attractive and free from physical, chemical and biological hazards

Environment Setting

  • Atmospheric: temperature of 20-22 degree celcius is considered comfortable
  • Humidity of 40 – 60 % is more suitable
  • The room should be well ventilated
  • Adequate and artificial light should be provided
  • Noise should be minimum as it interferes with the rest and sleep of the patient. Damp dusting is done to maintain the purity of air
  • Eliminate unpleasant odors by maintaining proper cleanliness
  • Provide good water supply
  • Sewage system must be in working order

CARE OF PATIENT UNIT

TYPES OF WARDS IN PATIENT UNIT & PRINCIPLES OF CLEANLINESS

TERMINAL CLEANING OF PATIENT CARE UNIT

DISINFECTION OF THE PATIENT UNIT - NURSING PROCEDURE - Responsibilities, Atmosphere settings, disinfectants used, formula
DISINFECTION OF THE PATIENT UNIT – NURSING PROCEDURE – Responsibilities, Atmosphere settings, disinfectants used, formula

ORAL REHYDRATION THERAPY

ORAL REHYDRATION THERAPY – Purpose, the Formula for ORS, Equipment Needed, Procedure, Action of ORT and General Instructions

UPDATED 2024

Oral rehydration therapy (ORT) is the giving of fluid by mouth to prevent and/or correct the dehydration that is a result of diarrhea

PURPOSE

  • To prevent dehydration
  • To prevent morbidity and mortality due to acute diarrheal diseases

THE FORMULA FOR ORS

The formula for ORS (Oral Rehydration Solution) recommended by WHO and UNICEF contains

  • 3.5 g sodium chloride
  • 2.9 g trisodium citrate dehydrate (or 2.5 g solution bicarbonate)
  • 1.5 g potassium chloride
  • 20 g glucose (anhydrous)

The above ingredients are dissolved in one liter of clean water

EQUIPMENT NEEDED

  • Take one liter of boiled and cooled drinking water
  • Clean glass of 200 ml capacity
  • A clean vessel to mix the solution
  • A clean spoon to mix the solution and feed the child

PROCEDURE

  • Pour one liter of clean water into a clean vessel
  • Open a packet of ORS and pour all the contents into the vessel
  • Stir with a clean spoon till it completely dissolves
  • Take some solution in a clean glass
  • Feed the child frequently with small doses of the solution

ACTION OF ORT

  • Oral rehydration therapy does not stop the diarrhea, but it replaces the lost fluids and essential salts thus preventing or treating dehydration and reducing the danger
  • The glucose contained in ORS solution enables the intestine to absorb the fluid and the salts more effectively. ORT alone is an effective treatment for 90-95% of patients suffering from acute watery diarrhea regardless of cause

GENERAL INSTRUCTIONS

  • Oral rehydration therapy is the cheap, simple and effective way to treat dehydration caused by diarrhea
  • ORT is a safe and can be used to treat anyone suffering from diarrhea, without having to make a detailed diagnosis before the solution is given
  • Children must always treat immediately because they become dehydrated more quickly
  • The must learn to recognize the signs of dehydration which need ORS or special care
  • If ORT is given at home early, dehydration can often be prevented and many children will not become so ill
ORAL REHYDRATION THERAPY – Purpose, the Formula for ORS, Equipment Needed, Procedure, Action of ORT and General Instructions

INFRARED THERAPY (HOT APPLICATION)

INFRARED THERAPY (HOT APPLICATION) – Purpose, Preliminary Assessment, Preparation of Patient and Environment, Equipment, Procedure and After Care

UPDATED 2024

Infrared radiation is long visible rays of spectrum used therapeutically for production of heat in tissues

PURPOSE

  • To promote comfort
  • To soften connective tissues
  • To promote healing of bed sores
  • To improve circulation
  • To relieve spasm and pain
  • To promote suppuration
  • To relieve congestion in internal organs

General Instructions

  • The patient and the therapist must wear protective goggles during the procedure
  • Instruct the patient not to touch the lamp, nor to move close to it during procedure
  • Advice the patient not to touch lamp
  • Warn the patient that lamp would become hot after few minutes
  • Advisable for nurse to stand or stay with patient throughout treatment
  • Patient and nurse to avoid facing lamp
  • Keep the patient’s skin clean and dry before using infrared lamp
  • It helps in the pigmentation of skin, production of vitamin D and bactericidal activity
  • The duration of treatment is usually 20 minutes

Preliminary Assessment

  • Doctors order for any specific instruction
  • General condition and diagnosis of the patient
  • Self-care ability to follow instructions
  • Type and duration of the treat
  • Articles available in the unit

Preparation of the Patient and Environment

  • Explain the procedure to the patient
  • Provide privacy if needed
  • Arrange the patient according to the treatment
  • Expose only the needed part

Equipment

  • Infrared lamp
  • Inch tape
  • Top sheet
  • Goggles

Procedure

  • Wash hands
  • Expose area to which heat is to be applied
  • Drape patient appropriately to avoid exposures
  • Put on goggles to protect patient’s eyes
  • Place lamp at a distance 45 cm to 55 cm (18 inches)
  • After 5 minutes commencement of treatment

After Care

  • Check the condition of patient’s skin for burns, redness and the discomfort
  • Position the patient comfortably on the bed
  • Replace the articles
  • Wash hands
  • Record the procedure in nurse’s record sheet
INFRARED THERAPY (HOT APPLICATION) – Purpose, Preliminary Assessment, Preparation of Patient and Environment, Equipment, Procedure and After Care

DRUG ADMINISTRATION

DRUG ADMINISTRATION

UPDATED 2024

Definition

A drug or medicine is a substance used for diagnosis, treatment, cure, relief or prevention of disease

Medicine is defined as a substance used to promote health, to prevent and cure disease

Purpose of Medicine

  • It is used for diagnosis
  • It treats the disease condition
  • To prevent health alterations
  • To promote health condition
  • To treat infections, allergic and inflammation
  • To relieve pain

Forms of Medications

  • Capsule: solid dosage form for oral care. Medicine is powder, liquid or oil of and encased by gelatin shell
  • Lotion: medicine in liquid suspension applied externally to protect skin
  • Solution: liquid preparation that may used orally, parentally or externally, can also be instilled into body organ or cavity (e.g. bladder irrigation) contains water with one or more dissolved compounds, most be sterile for parentaral use
  • Suppository: solid dosage form mixed with gelatin and shaped inform of pellet for insertion into body cavity (rectum or vagina)
  • Suspension: finely divided drug particles dispersed in liquid medium
  • Syrup: medication dissolved in concentrated sugar solution, may contain flavoring to make medication more palatable
  • Tablet: powdered dosage form compressed into hard disks or cylinders in addition to primary medication contains binders integrators, lubricates and filler

Types of Medication Action

  • Therapeutic effect: it is the expected or predictable physiological response a medication causes
  • Site: effect is the unintended secondary effects a medication predictably will cause. Side effects may be harmless or injurious
  • Adverse effect: there are generally considered serve responses to medication. For example, a client maybe becomes comatose when a drug is ingested
  • Toxic effect: may develop after prolonged intake of a medication or when a medication accumulation in the blood because of impaired. Metabolism or excretion
  • Idiosyncratic reaction: medicine may cause an idiosyncratic effect. This occurs when a patient over react or under reacts to a drug or has a reaction different form the normal
  • Allergic reaction: it is an unpredictable reaction to a drug. In this, the drug acts as an antigen and antibodies are produced. Allergy causes antigen-antibody reaction

Factors Influence the Medication Dosage

  • Age: infants, children and the old requires smaller dosage of a drug than that of an adult
  • Weight: a person of overweight requires a large dose the usual one
  • Male requires: large dose then females
  • Cumulative action of the drug: the frequency and dose of a drug administered depends upon the rate of excretion from the body
  • Tolerance: it is capacity of taking excessive does without producing toxic effect
  • Habituation: when a particular drug used continuously for a long period. The drug is withdrawn they may stop physical craving for it and show definite organic symptoms
  • Addition: prolonged use of alcohol and narcotics may produce an extreme form of habituation and result in a condition known addiction
  • Route of administration: drugs given by IV route have a very quick and immediate action

Route of Administration

The route of a drug depends on its properties, desired effect, and patient’s physical and mental condition

  • Oral administration: it is the most common route and the most convenient route for most patients
  • Sublingual: the drug is placed under the tongue and letting it slowly dissolve, e.g. nitroglycerine
  • Inhalations: the patient inhales the fumes in the lung to have a local and systemic effect, e.g. nitrous oxide (anesthetic effect)
  • Inunctions (topical application): it is the application of the drug to the skin, usually by a friction, e.g. ointment
  • Instillation: it is putting a drug in liquid form into the body cavity, such as urinary bladder or into body orifices such as ears, eyes and nose
  • Insertions: means introducing solid forms of drugs into the body orifices, e.g. suppositories are introduced into the rectum or vagina
  • Implantation: means planting or putting in of solid drugs into the body tissues
  • Parenteral administration: parenteral means giving of therapeutic agents outside the alimentary tract. It is the type if administration accomplished by a needle

Intramuscular: into the muscle

Subcutaneous: into the subcutaneous tissue

Intradermal: into the dermis

Intravenous: into the vein

Intraarterial: into the artery

Intracardiac: into the cardiac muscles

Intrathecal: into the spinal cavity

Intraosseous: into the bone marrow

Intraperitoneal: into the peritoneal cavity

Eight Rights of Giving Medication

Right Patient

  • Check the name on the order and the patient
  • Use 2 identifiers
  • Ask patient to identify himself/herself
  • When available, use technology (for example, bar-code system)

Right Medication

  • Check the medication label
  • Check the order

Right Dose

  • Check the order
  • Confirm appropriateness of the dose using a current drug reference
  • If necessary, calculate the dose and have another nurse to calculate the dose as well

Right Route

  • Again, check the order and appropriateness of the route ordered
  • Confirm that the patient can take or receive the medication by the ordered route

Right Time

  • Check the frequency of the ordered medication
  • Double-check that you are giving an ordered dose at the correct time
  • Confirm when the last dose was given

Right Documentation

  • Document administration after giving the ordered medication
  • Chart the time, route, and any other specific information as necessary. For example, the site of an injection or any laboratory value or vital sign that needed to be checked before giving the drug

Right Reason

  • Confirm the rationale for the ordered medication. What is the patient’s history? Why is he/she taking this medication?
  • Revisit the reasons the long-term medication use

Right Response

  • Make sure that the drug led to the desired effect. If an antihypertensive was given, has his/her blood pressure improved? Does the patient verbalize improvement in depression while on an antidepressant?
  • Be sure to document your monitoring of the patient and any other nursing interventions that are applicable

Care of Medicine and Medicine

  • All the medicines and drugs must be checked as they are received from the dispensary
  • Dangerous drugs are given by special order and every dose should be accurate
  • Medicine cupboard should be kept in room, near to the ward
  • All poisonous drugs must be kept separately in a separate cupboard and it must be kept locked and the keys should be with ward sister
  • Medicine for external use should be kept in a separate part of the cupboard
  • The cupboard should be kept in well lighted and poison bottles should be clearly labeled
  • There should be separate compartment for mixture, tablets, powders, etc
  • The container should be arranged alphabetically so that it is easy to find them
  • A register should be maintained to keep the account of the dangerous drugs
  • Check the expiry date of every drug and make sure of it before its expiry date
  • Emergency drugs should be kept in a place where they are readily obtained for emergency use

Rule of Administration of Medicines

Rule Regarding Labels

  • Administer medications only form the properly labeler container
  • Poisonous drugs should be labeled in red ink
  • Read labels of medicine 3 times and check with doctor’s order
  • Pour the medicine form the bottle only after shaking the bottle
  • Do not use the medicine that is different in color, test, odor and consistency

Rules Regarding Measuring Medicine

  • Always use a calibrated ounce glasses or medicine glass to measure the medicine
  • Always give exactly what is ordered
  • Make sure that the medicine glasses are clean and dry before pouring medicine
  • Hold the ounce glass at eye level and place thumbnail of the hand at the required level and then pour the medicine
  • Pour the medicine just before the time of administration into the medicine glasses

Rules Regarding Administration

  • Observe the five rights in giving each medication; right patient, right time, right medicine, right dosage and right method of administration
  • Give medicines only after checking a signed medication order by the doctor
  • Accept verbal orders, only in emergency to save the life of a patient
  • Always identify the patient before giving medication
  • Stay with the patient until he has taken medicine completely
  • An error in medication should be immediately reported to the ward sister
  • Use proper light while giving medicines because aim light can cause errors
  • Never give water after giving cough syrups. It leaves a soothing effect to prevent cough
  • Drugs which stimulate appetite should be given before food

Rules Regarding Recording of Drugs

  • Record each does if medicine soon after it is administered
  • Follow standard observations in recording medicine
  • Record time, dose and route of the medicine given
  • Record only those medicines, which have been administered
  • Record unusual effects such as allergic reactions

Precautions to be taken

  • Check the doctor’s order, no medicine should be given without doctor’s written order
  • Give the medications only form a clearly labeled container
  • Be sure that the medicine glasses are clean and dry before use
  • Shake the liquid medicine before pouring into the ounce glass
  • Wipe the mouth of the bottle, close it tightly and replace the bottle in the proper place after use
  • Pour the medicine from the bottle on the side opposite to the label
  • Once poured out, the medicine should not be returned to the bottle to prevent contamination of the whole medicine
  • Give medicine at the correct time and see that patient takes it
  • Always give the medicine that you have prepared yourself
  • Do not leave the medicine with the patient
  • Record after drug is given

Nurses Responsibility in Drug Administration

The nurse should know the following

  • The nature of the drug: that is the name classification, types of preparation, effects, dosage absorption and excretion, routes and time of administration
  • Essential parts of a medication order
  • Abbreviations and symbols used in writing a medication order
  • Weights and measures used
  • Preparation of solutions and calculation of fractional dose
  • Storing of medicines in proper containers
  • Factors of safety in the administration of medicines
  • Ethical and legal aspects

Legal Aspects of Drug Administration

  • Under the law the nurses are responsible for their work, though there is a written order
  • The nurses must know the minimum and maximum dose of every medicine which she gives to the patient and its effect
  • The nurse must know the law about the use of narcotics. These drugs must be kept in a separate cupboard the cupboard is kept locked and key is kept with the ward sister or senior nurse on duty
  • The special register should be maintained for narcotics drugs, which includes clear detail about the patient nurse and the doctor who ordered the narcotic drug
  • The nurse must observe five rights of giving medications to avoid errors
  • The narcotic drugs should be stocked only persons. Institutions who have licensed to do so

Scientific Principles

  • Almost all drugs are harm producer and are foreign materials that the body producing reactions
  • Additional force of water towards the glass produces a downward curve called meniscus
  • The human tongue presents an irregular surface and so tablets, powders and capsules produce friction and prevent easy swallowing
  • The sense of taste is acute and unpleasant taste may produce nausea and vomiting, the taste buds of the tongue can be partially desensitized by cold drinks
  • Well diluted drugs and empty stomach favor absorption of drugs. But certain drugs are irritating to mucous membrane of the stomach
  • Medical record is a legal one and reference for future study and research
  • Using common medicine glasses promote cross infection
  • Volatile liquids when kept open or not tightly corked diffuse through air and get decomposed
  • An element of error is a possibility of all human activity and commit or omit a dose of medicine means the existence of the end of life of the person
  • Understanding of how the drug benefits how it is to be given and side effects of the drug will help the patient to take drug regularly and a report to the physician concerned
  • Administration of the medicine is a therapeutic measure it will be therapeutic only, if the patient ge the desired effect of the drug
DRUG ADMINISTRATION - Definition, Purpose, Types and Forms, Route of drug administration, Eight rights, Rules, Care, Precautions, Nurse Responsibility, Legal Aspects, Principles
DRUG ADMINISTRATION – Definition, Purpose, Types and Forms, Route of drug administration, Eight rights, Rules, Care, Precautions, Nurse Responsibility, Legal Aspects, Principles
SOURCES OF DRUG
SYRINGES AND NEEDLES
ORAL MEDICATION
INJECTIONS
TYPES OF DRUGS AND FLUIDS
SELECTION OF SITE FOR INJECTION
COMMONLY USED INTRAVENOUS DRUGS
INTRAMUSCULAR INJECTION
SUBCUTANEOUS INJECTION
INTRADERMAL INJECTION
INTRAVENOUS INJECTION
INTRAVENOUS INFUSIONS
TRANSDERMAL ROUTE
TRANSMUCOSAL
RECTAL & TOPICAL ROUTE OF DRUG ADMINISTRATION
SPECIAL DRUG DELIVERY SYSTEM
INSTILLATION OF EAR DROPS
INSTILLATION OF NASAL DROPS

NURSING PROCEDURES LIST CLICK HERE

CARE OF HANDS , FEET & NAILS

CARE OF HANDS, FEET AND NAILS

UPDATED 2024

Hands are more contaminated area and soaking in water enables the nurse to clean them thoroughly

Feet are considered to be the least clean area. Placing the foot in the water and cleaning facilitates through cleaning

Care nail is done by cut short finger nails and the toe nails. To prevent skin injury and injection

Purpose

  • To keep clean
  • To prevent skin injury (% scratching)
  • To prevent infection
  • To promote comfort
  • To improve grooming
  • To promote self-esteem
  • To detect or examine the abnormalities
  • To prevent worm infestations

Patients with diabetes mellitus or peripheral vascular disease should be observed for adequate circulation of the feet. Because of poor vision and decreased mobility, the elderly are at risk for foot disorders. Care of hands and feet can be administered during the morning bath or at another convenient time

Important Key Points (Tips)

  • Notice general physical conditions that may place the patient at risk for infections
  • Prevent interruptions during the procedure
  • Soak in warm water to soften nails and loosen foreign particles
  • Prevent spread of microorganisms

Factors Affecting the Care

  • Infection and injury
  • Vascular insufficiency
  • Systemic disease condition
  • Poor health practices
  • Sociocultural background

Examination Includes

Examination of all skin surfaces, areas between fingers and between toes, shape, size and number of fingers and toes. The condition of the nails such as nail plate, nail color, the lunula, shape, thickness, texture, angle and then tissues around the nails

Common Problems

  • Calculus: thickened position of epidermis. It is painless
  • Corns: eratosis caused by friction and pressure from shoes
  • Plantar warts: fungal lesions on sole of foot
  • Ingrown nails: it occurs due to improper nail trimming
  • Athletics foot: tinea pedis – fungal infection of foot
  • Rams horn nails: long curved nails
  • Paronychia: inflammation of tissues surrounds nails

Foot Care

Special Foot Care

Patients with diabetes and peripheral vascular diseases

  • Clean the feet daily in lukewarm water using soap
  • Dry the feet and the part between toes
  • Do not cut corns of calculus
  • Wear shoes with porous uppers
  • If dryness is noted along the feet, use olive oil or lanolin and rub gently into the skin
  • Avoid wearing elastic stocking
  • Inspect the feet the soles, the heels and the area between toes daily
  • Wear clean socks and stockings daily
  • Do not walk bare foot
  • Wear shoes or chapels, especially designed soft ones
  • Exercise lower extremities to improve circulation
  • Avoid burns to feet by hot water or hot water bag
  • Treat minor injuries immediately under strict aseptic techniques
  • Consult doctor for even minor injuries

Equipment

  • Clean basin – 2 with warm water
  • Large tray – 1
  • Basin to dip foot or hand – 1
  • Sponge cloths
  • Towel – 1
  • Nail clipper – 1
  • Mackintosh and towel – 1
  • Over bed table – 1
  • Bath thermometer – 1

Procedure

  • Collect the articles and place near the bed side to save time and energy
  • Explain the procedures to allay fear and anxiety
  • Wash hand to prevent cross-infection
  • Provide privacy by screening
  • Take the warm water 100-110 degree F in a basin
  • Wash the hands first and then feet with soap and water and dry it with clean towel
  • Soak the nails in the warm water and apply soap
  • Brush the nails and place between fingers and toes and clean if with water
  • Remove the water basin and dry the areas with towel
  • Cut short the nails and collect it in the K-basin or paper bag
  • Use wet cotton balls or gauze pieces to clean the tips of the nails

After Care

  • Place the patients hand, feet comfortably
  • Replace the articles and equipment
  • Discard the dirty water in sluice room
  • Wash the articles used and keep ready for the next use
  • Wash hands
  • Record and report the date, time, procedure and abnormalities noted in the nurse’s record
CARE OF HANDS , FEET & NAILS - Definition, Purpose, Care, Equipment, Procedure, After Care
CARE OF HANDS , FEET & NAILS – Definition, Purpose, Care, Equipment, Procedure, After Care

NURSING PROCEDURES LIST CLICK HERE

NURSING IMPORTANT QUESTIONS – CLICK HERE

NURSE FUNDAMENTAL PROCEDURES

MEDICAL SURGICAL NURSING

IMPORTANT TIPS TO CARE FOR HAND, NAIL AND FEET

Caring for the hands, feet, and nails is an essential part of personal hygiene and overall well-being. Here are key important points for the care of hands, feet, and nails:

Hands:

  1. Hand Washing:
    • Wash hands regularly with soap and water, especially before meals and after using the restroom.
    • Use hand sanitizer when soap and water are not available.
  2. Moisturizing:
    • Apply moisturizer to prevent dryness and cracking.
    • Pay attention to the skin between the fingers.
  3. Nail Care:
    • Keep nails trimmed and clean to prevent dirt and bacteria from accumulating.
    • Use a nail brush to clean under the nails.
  4. Protection:
    • Wear gloves when doing household chores or activities that involve exposure to harsh chemicals or rough surfaces.
  5. Avoiding Harsh Chemicals:
    • Minimize exposure to harsh detergents and cleaning agents that can dry out the skin.
  6. Sun Protection:
    • Apply sunscreen to the hands to protect from sun damage, especially when spending extended periods outdoors.
  7. Healthy Habits:
    • Avoid biting nails and cuticles.
    • Keep nails dry to prevent fungal infections.

Feet:

  1. Proper Footwear:
    • Wear comfortable, well-fitting shoes to prevent foot pain and deformities.
    • Choose breathable shoes to avoid moisture buildup.
  2. Regular Cleaning:
    • Wash feet daily, especially between the toes, and thoroughly dry them to prevent fungal infections.
  3. Exfoliation:
    • Use a pumice stone to gently exfoliate rough areas on the soles of the feet.
  4. Moisturizing:
    • Apply moisturizer to the feet, especially to dry or cracked areas.
  5. Nail Care:
    • Trim toenails straight across to avoid ingrown toenails.
    • Avoid cutting the corners too short.
  6. Regular Inspections:
    • Check feet regularly for any signs of cuts, sores, or infections, especially for individuals with diabetes.
  7. Foot Elevation:
    • Elevate the feet when sitting to reduce swelling, especially after prolonged periods of standing.

Nails:

  1. Regular Trimming:
    • Trim fingernails and toenails regularly to maintain a neat appearance and prevent ingrown nails.
  2. Gentle Cleaning:
    • Clean under the nails regularly to prevent the buildup of dirt and bacteria.
  3. Avoiding Nail Biting:
    • Refrain from biting or picking at nails and cuticles to prevent infections and damage.
  4. Nail Hydration:
    • Apply cuticle oil or moisturizer to keep the cuticles and nails hydrated.
  5. Nail Polish Care:
    • If using nail polish, give nails breaks between applications to prevent discoloration and weakening.
  6. Healthy Diet:
    • A well-balanced diet rich in vitamins and minerals contributes to the health of nails.

SURGICAL DRESSING

SURGICAL DRESSING – Purpose, Type of Dressing, General Instructions, Procedure, Cleaning the Surgical Wound, Dressing the Wound and After Care (Follow-up Care)

UPDATED 2024

Surgical dressing is a sterile technique used to promote wound healing. It is a protective covering placed on the wound.

Factors Influences in Surgical Dressing

  • Patient acceptance
  • Ease of application/removal
  • Bleeding control
  • Exudate control
  • Pain management
  • Prevent allergic reaction/blistering
  • Conformable
  • Comfortable
  • Cost effective

PURPOSE

  • To protect the wound from mechanical injury
  • To splint or immobilize the wound
  • To absorbs drainage
  • To prevent contamination from bodily discharges (feces, urine)
  • To debride the wound by combining capillary action and the end wining of necrotic tissue and in its mesh
  • To inhibit or kill microorganism by using dressings with antiseptics, antimicrobial properties
  • To provide a physiologic environment conductive to healing
  • To provide mental and physical comfort for the patient

TYPE OF DRESSING

Dry-to-dry Dressing

  • It is used primarily for wounds closing by 1 degree intention
  • Offers good wound protection, absorption of drainage and esthetics, e.g. patient provides pressure for homeostasis
  • Disadvantage – they adhere to wound surface when drainage dries, removal can cause pain and disruption of granulation tissue

Wet-to-dry Dressing

  • They are particularly useful for untidy or infected wounds that must be debride and closed by 2-degree intension
  • Gauze saturated with sterile saline or an antimicrobial solution in packed into the wound, eliminating dead space
  • The wet dressings are then covered by dry dressings
  • As drying occurs, wound debris and necrotic tissue are absorbed into the gauze dressing by capillary action
  • The dressing is charged when it became dry

Wet-to-wet Dressings

  • Used on clean open wounds as on granulating surfaces. Sterile saline as an antimicrobial agent may be read to saturate the dressings
  • Provide a more physiologic environment, which can enhance the local healing process as well as ensure greater patient comfort
  • Disadvantage: surrounding tissues can become macerated, the risk of infection may rise and bed linens become damp

GENERAL INSTRUCTIONS

  • The procedure of changing dressings, examining and closing the wound, use principles of asepsis
  • The initial dressing change in frequently done by the physician especially for craniotomy orthopedic or thoracotomy procedure; subsequent dressing changes are the nurse’s responsibility

EQUIPMENT

Sterile

  • Gloves – disposable
  • Scissors, forceps
  • Appropriate dressing materials
  • Sterile saline
  • Cotton dipped swabs
  • Culture tubes (infection)
  • For draining wound add extra-gauze and packing material absorbent and pad and irrigation set

Unsterile

  • Gloves
  • Plastic bag for discarded dressings
  • Tape proper size and type
  • Pads to protect patient bed
  • Gown for nurse, if wound is infected

PROCEDURE

Pre-preparation

  • Inform the patient of dressing change. Explain procedure and have patient lie in bed
  • Avoid changing dressing at mealtime
  • Ensure privacy by drawing the curtains on closing the door. Expose dressing site
  • Respect patient modesty and prevent patient from being chilled
  • Wash hands thoroughly
  • Place dressing supplies on a clean, flat surface
  • Place clean towel or plastic bag under part of the body where wound is located
  • Cut off pieces of tape to be. Used in dressing change
  • Place disposable bag nearby to collect soiled dressings
  • Determine what types of dressing are necessary

CLEANING THE SURGICAL WOUND

  • Use aseptic technique
  • Open package of sterile gloves; open sterile cleaning sterile supplies
  • Wear sterile gloves
  • Clean along wound edges using a small circular motion from one end of incision to the other do not scrub back and forth across the incision line
  • Sterile saline in the cleansing agent of choice. Topical antiseptics (alcohol, basic a may be used on intact skin surrounding the wound but should never be used within the wound)
  • Repeat same process with drain site separately
  • Discard used cleaning supplies in disposable
  • Pad the incision site and drain site dry with sterile dressing sponge

DRESSING THE WOUND

  • Maintain asepsis with use of sterile gloves
  • After wound in dry apply appropriate dressing
  • Tape dressing, using only the amount of tape required for secure attachment of dressing

Use premade drain sponge (can be prepared by making 5 cm slit with sterile scissors in 4 multiply 4 inches gauzes sponge)

       Dressing the drainage tube insertion tube: be sure that one sponge in place at a right angle to the second sponge. So the slits are going in different direction if drainage in heavy, a sterile absorbent pad or extra gauze may be placed overall

  • When dressing an excessive draining wound

Consider need for extra dressings and packing materials

Use Montgomery straps if frequent dressing are required

Protect skin surrounding wound from copious on irritating drainage by applying some type of skin barriers

AFTER CARE (Follow-up Care)

  • Assess patient’s tolerance to the procedure and help patient more comfortable
  • Discard disposable items according to hospital protocol and clean equipment that is to be recessed
  • Wash hands
  • Record nature of procedure and condition of wound, as well as patient reaction
SURGICAL DRESSING – Purpose, Type of Dressing, General Instructions, Procedure, Cleaning the Surgical Wound, Dressing the Wound and After Care (Follow-up Care)

NURSING PROCEDURES LIST CLICK HERE

Nurse Info