ASSISTING WITH ELECTROCONVSULSIVE
THERAPY – Definition, Indications, Contraindication, Articles, Procedure, Types
and Risks Associated with ECT (Mental Health Nursing)
Electroconvulsive
therapy (ECT) is a treatment in which a grand mal seizure is artificially
induced through the application of an electric current to the brain while
client is under general anesthesia. The current is applied through electrodes
placed bilaterally on the frontal temporal region or unilaterally on the same
side as the dominant hand. Most clients require six to ten treatments
History: the
first electroconvulsive therapy was performed in 1938 in Rome by Italian
psychiatrists Ugo Cerlette and Lucio Bini. Electroconvulsive therapy was widely
accepted from around 1940-1955. This period was followed by a 20 year span
during which ECT was considered objectionable. A second peak of acceptance
began around 1975 and has been increasing to the present
DEFINITION
Electroconvulsive
therapy is a physical therapy, in which there is an application of electrical
current to the temporal region of the brain to produce a grand mal type of
seizure, for bringing about therapeutic effects
Antihypertensives – beta-blockers
(atenolol, esmolol, and labetalol) , calcium channel blockers (nifedipine and
nicardipine)
Anticholinergic agents –
glycopyrrolate, atropine
Narcotics – fentanyl, remifentanil,
alfentanil
PROCEDURE
Electroconvulsive
therapy involves the passage of an electrical stimulus of 70-150 volts to the
brain for 0.7-1.5 seconds to produce a grand mal seizure. Seizure induction is
necessary to achieve the therapeutic effect, which is thought to be the result
of an alternation in the post synaptic response to the neurotransmitters in the
central nervous system
The client
receives atropine sulfate subcutaneously before the procedure and at the
beginning of the treatment an intravenous dose of sodium pentothal. Electrode
jelly is applied bilaterally to the temples or unilaterally to the padded
electrodes. An airway or soft mouth gag is put in the client’s mouth to prevent
tongue bite. Succinyl choline is also administered. The resulting grand mal
seizure closely closely resembles a tonic phase (tightening of muscles) for
approximately 10 seconds and a clonic phase (rhythmic movements of the muscles)
for 30 seconds. The movements are slight and often limited to plantar flexion
of the feet, followed by rhythmic twitching of the toes. The seizure is
accompanied by a short period of apnea and then stertorous (snoring like)
respiration. Because the muscle relaxant paralyses the respiratory muscles as
anesthetist is present to administer oxygen to the client and assist
respiration by mechanical means, if necessary. Usually, the client sleeps for
5-10 minutes after seizure, slowly awakens and does not remember the treatment
INDICATIONS
Treatment of intractable depression
that is severe depression in which antidepressant medications have been
ineffective or not tolerated well
Treatment of manic episodes of
bipolar disorders whereby therapy with lithium or other medications are
ineffective or not tolerated well
Shown to induce remission with
clients who present with acute schizophrenia, but is of little value to treat
chronic schizophrenia
Catatonia responds well to ECT with
improvement in motor symptoms (posturing, rigidity, catalepsy)
CONTRAINDCATIONS
There are no
absolute contraindications to ECT, however relative contraindications are:
Increased intracranial pressure
Cerbrovascular accident
Space occupying intracranial lesions
Cervical injury or problem
Head injuries
Recent myocardial infarction
TYPES
Modified: treatment approach whereby
pretreatment medications are utilized to initiate treatment
Unmodified: treatment without the aid
of medication. A concern with this approach is the high morbidity associated
with treatment, thus this method is no longer in use
RISKS ASSOCIATED WITH ECT
Mortality: death is rare and usually
is related to cardiovascular complications
Cognitive impairment memory loss has
both retrograde and anterograde component
Brain damage
ASSISTING WITH ELECTROCONVSULSIVE THERAPY – Definition, Indications, Contraindication, Articles, Procedure, Types and Risks Associated with ECT (Mental Health Nursing)
ADMISSION AND DISCHARGE PROCEDURES –
Types of Admission, Admission on Voluntary Basis, Admission under Special
Circumstances and Admission under a Reception Order (Mental Health Nursing)
TYPES OF ADMISSION
The Mental
Health Act (MHA) 1987 repeals Indian Lunacy Act, 1912 and Lunacy Act, 1977
(Jammu and Kashmir) and extends to whole of India. Under this Act, a mentally
ill person means a person who is in need of treatment by reason of any mental
disorder other than mental retardation
ADMISSION ON VOLUNTARY BASIS
Any person
aged eighteen and above can voluntarily get admission for inpatient treatment.
In case of minor (less than 18 years of age) mentally ill, can be presented for
admission by the guardian as a voluntary patient
However, the
medical officer in charge should be satisfied about the need for inpatient
treatment
Even though
these hospital admissions are considered ‘voluntary’ they are regulated by
states to ensure that:
Persons with mental disorders are
sufficiently competent to make decisions of this kind
In appropriate pressure or outfight
coercion has not been exerted on a person already in custody to admit
themselves, and
The person is truly willing to seek
treatment therapy improving the prospects for success
ADMISSION UNDER SPECIAL CIRCUMSTANCES
Admission to
psychiatric hospital under special circumstances can also be made on request of
a relative or a friend of the patient if the patient is not in a position to
express willingness for admission as a voluntary patient, provided the medical
officer in charge is satisfied that it is in interest of the patient to do so. This
application should be accompanied by two medical certificates (one from a
medical officer who is working in Govt. service) stating that the person has
such mental illness that requires inpatient observation and treatment
ADMISSION UNDER A RECEPTION ORDER
An application for reception order may be made by the medical officer in charge of a mental hospital by the spouse or by a relative of the mentally ill patient for admission to the Magistrate. The application should be accompanied by two medical certificates from two independent medical practitioners certifying the need for admission for treatment and that it is in interest for personal safety of the patient or that of others. The consideration of the application should be made in the presence of applicant, the allegedly mentally ill person and the person appointed by the allegedly mentally ill to represent him. A reception order is valid up to 30 days or till discharged
ADMISSION AND DISCHARGE PROCEDURES – Types of Admission, Admission on Voluntary Basis, Admission under Special Circumstances and Admission under a Reception Order (Mental Health Nursing)
Urine testing for sugar and albumin
are the tests which are a part of routine urinalysis done at clinics (PHC) or
in the home setup by the commonly health nurse during home visit
The community health nurse carries a
simple urinalysis kit in her bag and makes a urine test during home visits, to
find out the abnormalities in the urine
PURPOSES
To measure amount of glucose present
in urine for patient suspected to have diabetes mellitus
To measure presence of albumin for
patient suspected impaired renal function
PRINCIPLES INVOLVED
Specimen serves as a media for
transmission of disease producing organisms to the personnel who handle them carelessly
The accuracy and reliability of
findings depend upon the correct method of collection and transportation of
specimens
Urine specimens allowed to stand at
the room temperature for a long time will give a false result due to
decomposition of urine
Contaminated and improperly collected
specimens will produce false results which will adversely affect the diagnosis
and treatment of patients
All equipment used for urine testing
must be clean
Make a second test when there is a
doubt
GENERAL INSTRUCTIONS
Ask the patient to clean the genital
area with soap and water then water alone, before collecting specimen
Instruct the patient to pass time
into clean urinal or clean kidney tray or directly into specimen bottle
Advice to take care not to spill the
urine on the outside of the container
EQUIPMENT NEEDED SUGAR AND ALBUMIN TEST
Test tubes,
test tube holder, Benedict’s solution, acetic acid, spirit lamp, match box,
kidney tray, specimen collection bottle, dropper or pipette, 5 ml syringe,
fresh urine sample, and urosticks
PROCEDURE
Unbutton the
community bag lower compartment remove hand washing and urine test articles,
arrange the equipment in a convenient place, wash hands and collect fresh
sample of urine from the individual
Sugar test:
take 5 ml of Benedict’s solution in a test tube; boil it to see color change.
If not add 8 drops of urine with dropper shake well and boil it again. The
result may be recorded to the color as blue, green, yellow orange and red. Blue
indicates absence of sugar, green 1%, yellow 2%, orange 3% and Brick red 5%
Albumin
test: fill ¾ of a test tube with filtered urine. See the reaction of the urine
is acidic. If found alkaline, add one drop of acetic acid and make it acidic.
Heat the upper third of the test tube over the spirit lamp and allow it to boil
A cloud may appear either due to phosphate or albumin. Add acidic acid drop by drop into the test tube. If the urine still remains cloudy, it indicates the presence of albumin. If becomes clear, it indicates the presence of phosphate
URINE TESTING – Purposes, Principle Involved, General Instructions, Equipment Needed Sugar and Albumin Test and Procedure (COMMUNITY HEALTH NURSING)
TEACHING DAIS AT HOME – Importance of
Dais Training, Considerations in Dais Training, Objectives of Dais Training
Program, Selection of Dais, Training of Dais, Procedure to Teach Care, Stipend,
Certification, Hygiene Practices of Dai During Nursing Care, Supervision of
Healthcare Workers, Principal Duties of a Supervisor (According to H. Nisson),
Types of Supervison, Objectives of Supervision, Principles of Supervision and
Supervision of Healthcare Workers (COMMUNITY HEALTH NURSING)
The dais or
traditional birth attendants (TBA) are an integral part in providing maternal
care services especially in the rural areas and urban slums
Dai not only
assist at the time of child birth but she is also a counselor to the village
women during pregnancy and after delivery and in the times of illness
IMPORTANCE OF DAIS TRAINING
Training of dais on correct practices
can bring about a radical change in improving the health of mothers and
newborns
The trained dais can be utilized for
spreading in their work may reduce the morbidity and mortality
Teaching of proper skills and sterile
technique in their work may reduce the morbidity and mortality
CONSIDERATIONS IN DAIS TRAINING
Some dais will grasp the subject very
rapidly while others will be slow. The teaching must be in a very simple
language and should be repeated many times
Dais learns best in small groups
Dais learn best when they participate
in the learning process
The dais vocabulary is small and
simple. She learns new terms slowly
Discuss, ask questions and learn how
they do things before each class and demonstration
Evaluate you are teaching, observe
and supervise five or more deliveries in each year
OBJECTIVES OF DAIS TRAINING PROGRAM
Antenatal care: the dais in the
community should motivate for antenatal pregnancy advice to take balanced diet
and adequate rest during antenatal period
The dais should able to identify the
high risk women and maternal complications. The dai should prepare the
antenatal mother mentally and physically for normal delivery
Delivery practices: clean practices
such as clean hands, clean surface, clean razor blade, and clean cord tie and
clean cord stump
Postnatal: the dai should have basic
knowledge to provide newborn care such as warmth, infection control, advice on
immunization and birth spacing
SELECTION OF DAIS
The traditional birth attender are
actually practicing the profession are to be invited
Preferably some elderly ladies in the
community
TRAINING OF DAIS
The training will be residential for
6 working days at the postpartum centers or the rural family welfare and health
centers where at least 50-60 deliveries are conducted per month
The trainers would be the lady health
visitors or public health nurse who is in charge of the labor room of the
center under the overall guidance and supervision of the medical officer in
charge
The topic of the day would be covered
using a flip chart in the morning for not more than 30 to 40 minutes. The dais
should be given the opportunity to ask questions, clear doubts and interact
with each other
The rest of the day there should be
an agent in the antenatal clinics, labor room and in the maternity wards
The dais should also be exposed to
antenatal check up and counseling of pregnant women
At each training session, there
should be only 5 to 6 dias so that they can give individuals attention
During the training session, each dai
should be allowed to conduct to five deliveries under supervision
PROCEDURE TO TEACH CARE
Measurement of weight
Blood pressure measurement
Detection of edema, anemia, etc
Antenatal checkup
Referral of cases
Taking precautions during pregnancy
and delivery
Postnatal care of the mother
Care of newborn and inspection of the
newborn
Birth registration
STIPEND
During
training 300 INR will be paid for each dai for the entire training period (1
month). During the training a picture manual is given to each dai for their
references
CERTIFICATION
The entire
dais that have attended twelve month training sessions and have conducted at
least 10 deliveries under clean safe conditions and the health of the mother
and the child have been safe up to 42 days after delivery will receive a
certificate at a specially organized function on 11th May World
Population Day every year at the PHC by the PHC medical officer
Dias is the important messengers they
carry information to the community. They motivate community people or
immunization, sterilization and birth spacing, etc
Dais will be able to give information
or vital events that may have taken place after your last visit to the village
HYGIENE PRACTICES OF DAI DURING NURSING CARE
Remove bangles and ring before
delivery and when caring for the mother
Keep
the mails clean and short
Wash hands with soap before and
during the labor and delivery
Boil scissors and cord ties before
cutting the cord
Use only clean materials for vulva
before, during and after labor
SUPERVISION OF HEALTHCARE WORKERS
Supervision means overseeing the
employees at work. It has been defined as the authoritative direction of the
work of one’s subordinates. It is a necessary concomitant of their hierarchical
organization in which each level of subordinate to one immediately above it and
subject to its order
Supervision can be defined as a
process by which the subordinates are helped according to their needs by their
immediate supervisors to make improve their abilities so as to their jobs
efficiently to themselves and to the organization in which they function
PRINCIPAL DUTIES OF A SUPERVISOR (ACCORDING TO H. NISSON)
To understand the duties and
responsibilities of his own positions
To plan the execution of the work
To divide the work among subordinates
and to direct and assist them in doing it
To improve his own knowledge as
technical expert and leader
To improve his work methods and
procedures
To train the personnel
To evaluate the performances of the
employees
To correct mistakes, solve employee’s
problems and develop discipline
To keep subordinates informed about
policies and procedures of the organization and above the changes to be made
To cooperate with colleagues and seek
advice and assistance when needed
To deal with employee suggestions and
complaints
TYPES OF SUPERVISION
Direct
supervision: this can be exercised at the ward or unit level in the hospital or
primary health center or sub center of the community setting. This is done
through face-to-face talk it to the workers. it provides opportunity to the
workers to give reply
Indirect
method: it is done with the help of record and reports between the supervisor
and supervisee. It ensures that every worker is allotted work in accordance
with the plan of operation and with the prescribed methodology in keeping pace
with the time as far as possible
OBJECTIVES OF SUPERVISION
To promote optimum functioning of
each worker as well as the functioning of each unit
To help the staff to do their job
skillfully and effectively to give
maximum output with minimum resources – cost effectiveness
To help in formulation of new
policies and also to interpret policies and objectives of the organization to
the subordinates and suggests ways and means to improve them
To safeguard the workers from making
mistakes and thereby to protect the public
To improve the attitudes of the
member towards the work or program
PRINCIPLES OF SUPERVISION
Good supervision is based on the need
of the individual. The supervisors assess the training needs of the subordinate
before delegating the responsibility and authority
Good supervision is based on the job
description of the individual to be supervised
Good supervision establishes good
interpersonal relationships among the members of the organization and the
general public
Good supervision helps the
subordinates to set personnel goals in accordance with organizational goals
Good supervision helps to create a
physical, psychological and social climate in which the individual is free to
function at his optimum functional level
Good supervision is employee centered
rather than production centered
Good supervision is a continuous and
ongoing process and also respects the individuality of the subordinates
Good supervision helps the nurse to
make a pattern for analysis and to analyze continuously her success in reaching
her objectives
Good supervision is well planned.
Objectives, methods of supervision and the criteria for evaluation, etc. are
established ahead of time
SUPERVISION OF HEALTHCARE WORKERS
Home
visiting with the staff: surprise visits are more effective when they are
planned. Surprised visits have very little value in supervision as the main
purpose of supervision is to guide and help the staff. Surprised visits may be
done on rare occasions and situations, especially when inspecting the work of
an unsatisfactory worker
Field
visiting: along with the staff should be planned in relation to the total
supervisory program. The supervisor should maintain some form of individual
record for guiding the staff
Nursing
personnel at the clinics: the supervisor observes the clinical setup,
sterilization of equipment, maintenance of equipment, clinical records and
nursing procedures being carried out by the nursing personnel
Nursing
personnel working in PHC: supervisor supervise the staff nurse working in
hospitals attached to PHC maternity homes. The supervisor observes bedside care
and nursing procedures, storage of drugs, sterilization of articles,
maintenance of equipment, health teaching carried out in the hospitals, records
and report maintenance
School health activity: the supervisor should help the staff in planning and executing school health programs and other community health work
TEACHING DAIS AT HOME – Importance of Dais Training, Considerations in Dais Training, Objectives of Dais Training Program, Selection of Dais, Training of Dais, Procedure to Teach Care, Stipend, Certification, Hygiene Practices of Dai During Nursing Care, Supervision of Healthcare Workers, Principal Duties of a Supervisor (According to H. Nisson), Types of Supervison, Objectives of Supervision, Principles of Supervision and Supervision of Healthcare Workers (COMMUNITY HEALTH NURSING)
SCABIES – Causes of Scabies, Clinical
Manifestations and Community Standing Order/Management (COMMUNITY HEALTH
NURSING)
Scabies is a
contagious disease caused by a mite, sarcoptes scabiei. The disease is spread
through contact with individuals or rarely through contact with infected
clothes, bed linen or towels
CAUSES OF SCABIES
Unhygienic living conditions
Lack of personal hygiene
Sharing of clothes and bedding
Neglected health
CLINICAL MANIFESTATIONS
The main complaint is itching. Its
starts in the evenings and is generally during the day. Often scabies starts in
the hands, later the insects spread to the trunk, elbows, armpits, waist,
genitals, and buttocks and under the breasts in women
Scabies lesions are dry, if infected
by bacteria, the lesion look messy since there is pus. Infection also causes
fever. Natural itching also leads to ulcer to scratching by fingers
COMMUNITY STANDING ORDER/MANAGEMENT
Assess the general condition
Examine the family members for
scabies
Secondary infections should be
treated with antibiotics
Provide bath, scrub well with scalp
and water and dry
Apply Benzyl benzoate – 25% emulsion
external use all over the body at night except face – continuously 3 days
Advise to wash all the linens in hot
water used by the patient and dry under the sunlight
Sulfur ointment can also be used in a
similar manner for 3 days
Inform the patient that treatment is
incomplete unless one more cause of treatment for 3 days is done after a period
of two weeks
Examination and treatment should be
given for schoolmates, playmates and family members
Health education should be given to
the family members
SCABIES – Causes of Scabies, Clinical Manifestations and Community Standing Order/Management (COMMUNITY HEALTH NURSING)
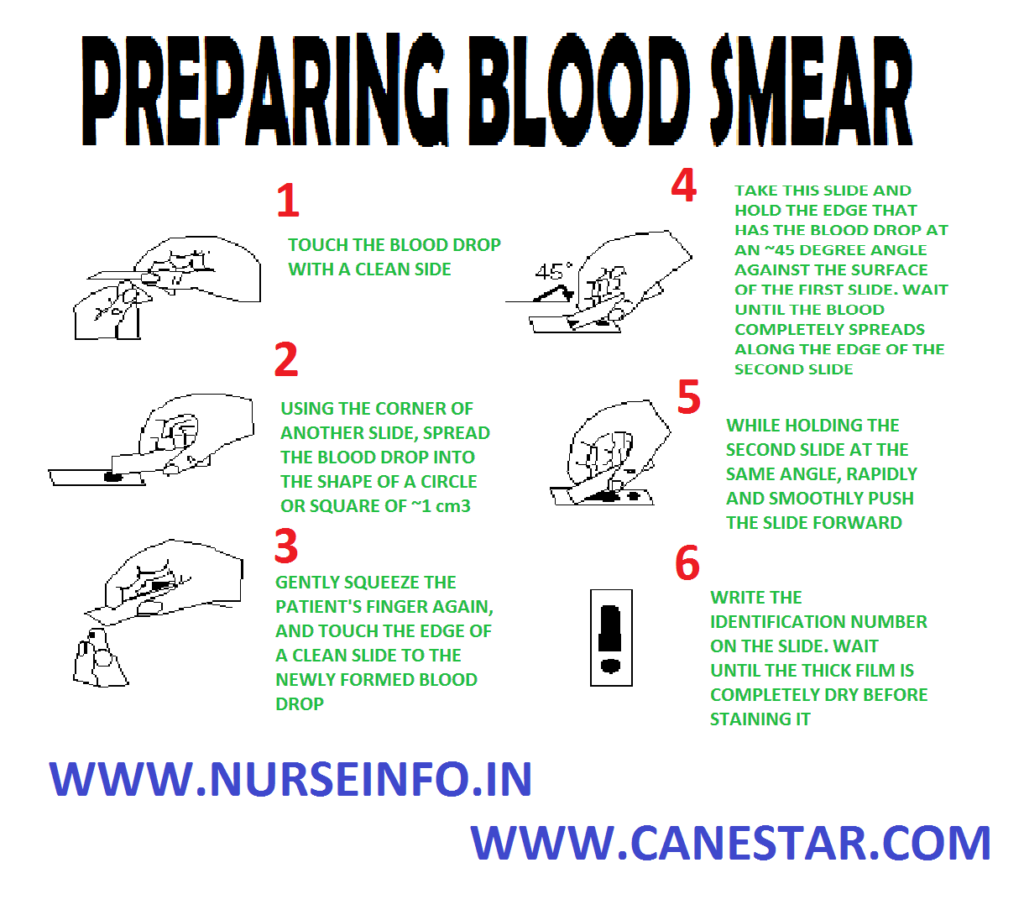
PREPARING BLOOD SMEAR – Purposes,
Equipment, Procedure and Blood Smear Preparation to Rule Out Malaria (COMMUNITY
HEALTH NURSING)
Blood smear
is done by a drop of blood is received on to a clean slide. This is smeared to
render a thin film of blood by placing a second slide just beyond the drop of
blood and slowly drawing it forward along the first
PURPOSES
To determine the cell count
To find out the presence of certain
parasites, e.g. malaria parasites and filarial parasites
EQUIPMENT
A tray
containing
Clean slide 2, sterile needle in a
container
Methylated spirit in a bottle
Kidney tray or paper bag for used
swabs
Cotton swabs in a bowl
PROCEDURE
Explain the steps of procedure
Make the patient to sit or place in a
lying position
Wipe his finger with spirit swab
Press the fingertip and gently prick
with a sterile needle
Allow a drop of blood to fall on the
slide and quickly make the smear evenly by the edge of the second slide
Apply a little bit of cotton on the
fingertip of the patient and instruct him to apply slight pressure over it
Send the slide with a requisition to
the laboratory for examination under microscope
BLOOD SMEAR PREPARATION TO RULE OUT MALARIA
Cleanse fingertip with spirit swab
Prick the fingertip with Hagedom’s
needle
Press finger and allow the blood to
ooze
Discard the first drop
Place 3 or 4 large size drops of
blood on glass slide
With the corner of another slide, mix
all the first 3 or 4 drops of blood to form a large circular patch of the size
of a “paisa” or coin
Thin smear done by drop of blood
taken on slide and push it straight with another slide in such a way to obtain
a thin smear with a tongue shaped tip
Place the slides to dry in air by
keeping it in absolutely horizontal position
Place the slides in a box. Protect it
from dust, flies and cockroaches
PREPARING BLOOD SMEAR – Purposes, Equipment, Procedure and Blood Smear Preparation to Rule Out Malaria (COMMUNITY HEALTH NURSING)
HOME TEACHING – Objectives of Health Education, Topics for Teaching at Home Setting, Principles of Health Education, Conducting Delivery at Home, Preparation of the Mother for Home Delivery, Maternity Kit, First Stage of Labor (in the Home), Second Stage, Third Stage, Immediate Care of the Newborn and Instruction to Family (COMMUNITY HEALTH NURSING)
Health teaching or education is a
holistic process with intellectual psychological and social dimension related
to activities that increase the abilities of people to make informed decisions
that affect their personal, family and community well being
Health education is a process that
informs, motivates and helps people to adopt and maintain healthy practices and
lifestyles, advocates environmental changes needed to facilitate this goal and
conducts professional training and research to the same end
OBJECTIVES OF HEALTH EDUCATION
The WHO has
stated the aims of health education as follows.
To ensure that health is valued as an
asset to the community
To equip the people with skills, knowledge,
and attitudes to enable them solve their health problems by their own actions
and efforts
To promote the development and proper
use of health services
Other members of the family may be
involved, who can have greater influence and control on the individual
It gives chance for the nurse to look
for new health problems
TOPICS FOR TEACHING AT HOME SETTING
Antenatal mother: the nurse can teach
normal anatomy and physiology of reproductive system and process of conception.
The nurse provides teaching about the importance of antenatal checkup, diet,
avoidance of drugs, importance of exercises, recognition of danger, signals
during pregnancy and preparation of safe delivery
Postnatal mother: the community
health nurse should teach about postnatal hygiene, diet, exercises, breast
care, breastfeeding, family planning and newborn care. The nurse should provide
information about long-term postnatal teaching regarding newborn care, dangers
of native medicine, immunization, prevention of infection and breastfeeding
New natal care: the nurse should
teach to the mother and family about newborn care, breastfeeding, prevention of
infection about long-term plan such as prevention of diarrhea, acute
respiratory tract infections, child safety, worm infestation, additional foods,
etc
Infant: the nurse should provide
knowledge through teaching cum demonstration to the family and the mother about
the infant’s immunization, prevention of diarrhea, malnutrition, child safety
and additional foods
Preschool children: the nurse should
teach in the home set up to the mother and family members about pre-school
diet, safety, monitoring growth and development, preschool education,
prevention of diarrhea, scabies, worm infestations and acute respiratory tract
infections
PRINCIPLES OF HEALTH EDUCATION
Health teachings help the people to
develop interest in improving their own living conditions. It happen when
health teachings are based on felt needs of the family
Health teaching should be based on
the principle of interest
The nurse should adopt the methods
for health education should encourage people’s participation
The health teaching program should
focus from known to unknown
The nurse should consider the factors
such as level of understanding, education and literacy of people to whom the
teaching is directed
The nurse should maintain good human
relationship with the educational approaches
Provide opportunities for the people
to learn by doing
Help the people to motivate to have
desire change in their attitudes and behaviors
Reinforce the message by repeating
and using different methods and medias
CONDUCTING DELIVERY AT HOME
Delivery stage or labor is also known
as intranatal period. Full form normal delivery occurs after nine months or 40
weeks. The normal delivery period is about 24 hours. This time period is very
critical for the health and survival of both mother and child
Domiciliary or home deliveries are
conducted only normal and low risk mothers by trained dais, auxillay nurse
midwives, lady health visitors, etc
PREPARATION OF THE MOTHER FOR HOME DELIVERY
The main aim of preparation for
natural child birth is to teach the ability to relax mentally and physically
during the first stage
To teach the intelligent use of the
body muscles during the second stage and so to produce a natural, controlled,
interesting and happy confinement
To teach exercises for the muscles or
the pelvic floor and joint mobility and improvement of posture
MATERNITY KIT
Plastic bag, containing plastic apron
and sheet, with soaps, nailbrush and towel in a waterproof bag – 1
Kidney tray – 2
Bowls (lotion) – 2
Artery forceps – 2
Dissecting forceps – 2
Scissors – 1
Bowl lifting forceps – 1 pair
Gloves – 1 pair
Instrument box (containing syringe
and needles) – 1
Complete set of enema can with
connection – 1 (tubing catheter and clamp)
Uretheral catheter (rubber) – 1
Mucus extractor – 1
Spring balance – 1
Oral thermometer – 1
Rectal thermometer – 1
Stock of cotton for making boiled
swabs – 1
Sterile gauze pieces for cord
dressing, mouth wipes cord binders
Dettol -1 bottle
Spirit – 1 bottle
Bottle with antiseptic drops for
baby’s eye – 1
Bottle with cord – 1
Fetoscope – 1
Measuring tape – 1
OTHER ARTICLES NEEDED
Newspaper, clean banana leaves or
jute sacks
Chula (stove)
Large container to be used as
sterilizer
Shallow mud pots about 8” diameter
(town mothers may provide bed pan)
Linen – properly prepared and
adequate in quantity
For mother – sanitary towels or old
rags that have been washed, boiled and ironed
Bed covering
Specially scrubbed bed, floor canvas
or clean mat
Drinking vessel
ARTICLES NEEDED FOR BABY
Enough clothes – washed, dried clean
clothes used to wrap the baby
Katori (cup) for oil, if used
Soap
Cotton wool or small pieces of clean
soft old rag
Cradle with firm bottom
Katori (cup) and spoon for boiled
drinking water
Bottle with cork for boiled water
FIRST STAGE OF LABOR (IN THE HOME)
Greet the family and ascertain
details regarding duration of labor pain, etc
Reassure mother and family and place
midwifery bag on newspaper
Place your watch and other personal
belonging in a convenient safe place
Ask the family to prepare boiling
water
Take out soap and towel from
midwifery bag
Wash hands thoroughly under running
water and dry
Put on the apron, prepare the mother
for examination
Examine the mother palpate abdomen
and ascertain positions, watch nature of pain, enquire about bowel action, when
urine is passed, etc. if mother is in first stage give enema, examine the urine
and take blood pressure
Wash hands and take out the necessary
equipment from bag and put them in a covered container and boil for 20 minutes
(enamel bowls, 2 kidney trays, 2 covered basins, a pair of artery forceps,
scissors, 1 teaspoon, cord tie)
Boil eye dropper and syringe and
cotton swab (if required) separately
Boil gloves and catheter (if used)
separately and check temperature
Watch the progress of labor and give
sufficient nourishment (tea, milk, etc)
Prepare to receive baby
SECOND STAGE
Wash hands and put on mask
Set up articles for confinement on
newspaper or clean banana leaf in order to use
Prepare about a pint of lotion 2% (3
drachma in a pint)
Take a sterile bowl, artery forceps,
sterile swab and prepare for perineal wash
Place the mother in a comfortable
position for delivery and bring mother down towards foot end of bed leaving
enough space for delivering baby
Scrub hands thoroughly for about three
minutes using germicides
Swab the perineum with dettol lotion,
swab away from vaginal orifice
Support perineum with the sterile pad
and deliver the baby as it has been taught
Soon after the baby’s head is
delivered, clean the eyes, nose and mouth to remove mucus and if necessary suck
out mucus by a mucus catheter
Separate the cord and baby, soon the
pulsation of the cord stops
THIRD STAGE
Keep a kidney tray or mud pot ready to
receive placenta
Wash hands thoroughly with soap
Watch for the separation of placenta
and deliver it as you were taught
Rinse hands and lean the perineum,
examine the labia and perineum for lacerations or tears
Apply sterile pad loosely and make
the mother comfortable
Examine the placenta to see that all
parts are complete.
Wash hands thoroughly
Take the mother’s temperature, pulse
and respiration
Assemble all the articles, wash them
and if possible boil and replace in the midwifery bag
Examine the mother carefully before
leaving the home
IMMEDIATE CARE OF THE NEWBORN
Prepare equipment for baby’s bath in
a protected corner of the room, baby clothing, methylated spirit and spring
balance
Wash hands, put on apron, take the
baby in lap after protecting lap with a sheet
Remove the excess vernix on the skin
and do not bath unless the family insists
Put one drop of 1% silver nitrate in
each eye
Inspect the cord for seepage and if
bleeding, religature and apply tincture of benzoin iodine, dress and cord if
required or if indicated
Inspect the infant thoroughly for
abnormalities
Put the child in clean clothes
Place the baby in the bed with head
on one side
Remove apron, clean and replace
equipment
INSTRUCTION TO FAMILY
Watch for abnormal bleeding of mother
and report if unusual amount appears. Watch for any bleeding from the cord, if
it bleeds, take the child to the doctor
Place the baby to the breast after 6
to 12 hours
Teach to do proper perineal care as
per using soap and water and change of sanitary pads as indicated
Advice the family to give full diet.
She needs food to regain her strength and help ensure sufficient milk for the
baby
HOME TEACHING – Objectives of Health Education, Topics for Teaching at Home Setting, Principles of Health Education, Conducting Delivery at Home, Preparation of the Mother for Home Delivery, Maternity Kit, First Stage of Labor (in the Home), Second Stage, Third Stage, Immediate Care of the Newborn and Instruction to Family (COMMUNITY HEALTH NURSING)
WOUND DRESSING AT HOME – Purpose,
Principle of Wound Dressing, Advantages of Dressing, Types of Dressing,
Equipment Needed and Procedure (NURSING PROCEDURE)
A surgical
wound dressing is a protection with a sterile covering of gauze or other
materials applied over a wound after cleaning it with all aseptic precautions
PURPOSE
To clean the wounded area
To dress the wounds to prevent
infection
To promote wound healing
PRINCIPLES OF WOUND DRESSING
Everything that comes with a wound
must be sterilized in the most effective way consists with facilities in the
home, school and industry
Hand washing must be done before
handling the equipment and dressing the wound
Boil instruments, cotton swabs,
vigorously for 5 minutes
The chief chemical disinfectant used
in the care of wound is alcohol
The chief purpose in caring for a
wound is to prevent infection since tissues under the skin are less resistant
than the skin to infection
ADVANTAGES OF DRESSING
To absorb drainage
To prevent contamination
To protect the wound from mechanical
injuries
To promote homeostasis as in a
pressure dressing
To provide mental and physical
comfort of the patient
TYPES OF DRESSING
Dry dressing: the wound is cleaned by
some antiseptics and dried and dry dressing is applied after the application of
medicine to the wound
Wet dressing: it is used if wounds
are infected and if there is lot of pus, to soften the discharge and to promote
drainage
Pressure dressing: this is done when
there is bleeding or oozing from the wound
EQUIPMENT NEEDED
Instruments: artery forceps, thumb
forceps and scissors
Large bowl with lid (autoclaved) to
put all the articles to boil
Small bowl medications, K-basin/paper
bag
Dressing bandage/plaster to secure
the dressing
Spirit, betadine or any other
antiseptic solutions to apply in the wound
PROCEDURE
Select the working area, spread the
newspaper and place the community bag
Unbutton the lower compartment and
remove hand washing articles
Wash the hands thoroughly and remove
the articles needed for dressing and keep it in a sterile area
Remove the entire old dressing from
the wound and use sterile saline or hydrogen peroxide for cleaning the wound
Clean the wounded area from center to
the periphery by a cotton pieces and discard in paper bag
Use artery forceps for cleaning the
wound with antiseptic solution
Apply ointment as per standing order
with swab stick
Apply sterile dressing and fasten it
with a bandage or strip of plaster
Secure the surgical dressing with
adhesive plaster
Wash hands thoroughly and record it
the family folder
Replace the articles after cleaning
and boiling
Discard or dispose the used dressings
or burn it
WOUND DRESSING AT HOME – Purpose, Principle of Wound Dressing, Advantages of Dressing, Types of Dressing, Equipment Needed and Procedure (NURSING PROCEDURE)
IMMUNIZATION – Agents of Immunization
and Steps of Vaccine Administration (COMMUNITY HEALTH NURSING)
Immunization
is a process of protecting an individual from a disease through introduction of
a live, killed or partial component of the living organism into the individual
system
AGENTS OF IMMUNIZATION
Vaccines: it
is a preparation of an antigen for preventive inoculation which then
administered stimulates specific antibody formation in the body
Vaccines may
be prepared from live (generally attenuated) organisms, inactivated or killed
organisms, extracted cellular fractions
Live vaccines are more potent
immunizing agents than killed vaccines, live vaccines are prepared from
attenuated organisms, e.g. small pox, BCG, oral polio, yellow fever
Killed vaccines: organisms killed by
heat or chemicals, when injected stimulate active immunity, e.g. typhoid, cholera,
plague, whooping cough, poliomyelitis (Salk vaccine). Booster doses are needed
to keep up the immunity
Toxoid: certain organisms produce
exotoxins, e.g. diphtheria and tetanus bacilli. The toxins produced in these
organisms are detoxicated and used in the preparation of vaccines
Cellular fractions: some vaccines are
prepared from extracted cellular fractions, e.g. meningococcal vaccine from the
polysaccharide part of cell wall
Combinations: if more than one kind
of immunizing agent is included in the vaccine, it is called mixed or combined
vaccine. The well-known combinations are DPT, DT, DP and MMR
Immunoglobulin:
the human immunoglobulin system is composed of 5 major classes – IgG, IgA, IgM,
IgD, IgE and subclasses within them
STEPS OF VACCINE ADMINISTRATON
Administering
of DPT, DT, and TT:
check the label for correct dose
shake the vial to mix the content
well
remove the centre of the metal cap
use 2 ml syringe and 23 G needle to
aspirate 0.6 ml vaccine
prepare the baby for intramuscular injection
select the appropriate site and
inject quickly
administering
OPV:
OPV comes in two types of containers:
plastic and glass vial with cover
Let the mother hold the baby firmly
lying on his back
Open the child’s mouth by squeezing
his cheeks gently between your fingers
Administer correct number of drops
usually 2 drops. Also check manufacturer’s instructions
Make sure the dropper should not
touch the mouth
Make sure the child swallows. If he
spits it out, give another dose
Administration
of measles vaccine:
Position the baby with the help of
mother
Take 1 ml sterile syringe and 22 G
needle
Clean the exposed rubber cap of the
vial with spirit swab
Withdraw 0.6 ml of the reconstituted
vaccine into the syringe and expel any air bubbles and extra vaccine from the
syringe until there is exactly 0.5 ml
Select the upper part of child’s arm,
push needle into the pinched up skin and inject the vaccine
Administration
of BCG vaccination:
Let the mother hold the baby and free
its arm from the clothes
Prepare a tubercular syringe with
intradermal needle
Withdraw about 0.8 ml of vaccine and
expel the air bubble
Inject BCG vaccine in the left arm
hold the syringe by scale pointing upwards
Insert tip of the needle into the
sign and keep the needle flat along the skin
Hold the plunger end of the syringe
between the index and middle finger of your right hand and press the plunger
with your right thumb
Inject 0.1 ml vaccine and withdraw
the needle
IMMUNIZATION – Agents of Immunization and Steps of Vaccine Administration (COMMUNITY HEALTH NURSING)