Nurseinfo.in provides free Nursing Notes, Nursing Procedures, Medical MCQs, Nursing Calculators, Care Plans and exam preparation resources for BSc Nursing, GNM, P.B. BSc and MSc Nursing students. Browse subject-wise notes, previous year questions and study materials based on the latest nursing syllabus.
Nurseinfo.in provides free Nursing Notes, Nursing Procedures, Medical MCQs, Nursing Calculators, Care Plans and exam preparation resources for BSc Nursing, GNM, P.B. BSc and MSc Nursing students. Browse subject-wise notes, previous year questions and study materials based on the latest nursing syllabus.
IMMUNIZATION – Agents of Immunization
and Steps of Vaccine Administration (COMMUNITY HEALTH NURSING)
Immunization
is a process of protecting an individual from a disease through introduction of
a live, killed or partial component of the living organism into the individual
system
AGENTS OF IMMUNIZATION
Vaccines: it
is a preparation of an antigen for preventive inoculation which then
administered stimulates specific antibody formation in the body
Vaccines may
be prepared from live (generally attenuated) organisms, inactivated or killed
organisms, extracted cellular fractions
Live vaccines are more potent
immunizing agents than killed vaccines, live vaccines are prepared from
attenuated organisms, e.g. small pox, BCG, oral polio, yellow fever
Killed vaccines: organisms killed by
heat or chemicals, when injected stimulate active immunity, e.g. typhoid, cholera,
plague, whooping cough, poliomyelitis (Salk vaccine). Booster doses are needed
to keep up the immunity
Toxoid: certain organisms produce
exotoxins, e.g. diphtheria and tetanus bacilli. The toxins produced in these
organisms are detoxicated and used in the preparation of vaccines
Cellular fractions: some vaccines are
prepared from extracted cellular fractions, e.g. meningococcal vaccine from the
polysaccharide part of cell wall
Combinations: if more than one kind
of immunizing agent is included in the vaccine, it is called mixed or combined
vaccine. The well-known combinations are DPT, DT, DP and MMR
Immunoglobulin:
the human immunoglobulin system is composed of 5 major classes – IgG, IgA, IgM,
IgD, IgE and subclasses within them
STEPS OF VACCINE ADMINISTRATON
Administering
of DPT, DT, and TT:
check the label for correct dose
shake the vial to mix the content
well
remove the centre of the metal cap
use 2 ml syringe and 23 G needle to
aspirate 0.6 ml vaccine
prepare the baby for intramuscular injection
select the appropriate site and
inject quickly
administering
OPV:
OPV comes in two types of containers:
plastic and glass vial with cover
Let the mother hold the baby firmly
lying on his back
Open the child’s mouth by squeezing
his cheeks gently between your fingers
Administer correct number of drops
usually 2 drops. Also check manufacturer’s instructions
Make sure the dropper should not
touch the mouth
Make sure the child swallows. If he
spits it out, give another dose
Administration
of measles vaccine:
Position the baby with the help of
mother
Take 1 ml sterile syringe and 22 G
needle
Clean the exposed rubber cap of the
vial with spirit swab
Withdraw 0.6 ml of the reconstituted
vaccine into the syringe and expel any air bubbles and extra vaccine from the
syringe until there is exactly 0.5 ml
Select the upper part of child’s arm,
push needle into the pinched up skin and inject the vaccine
Administration
of BCG vaccination:
Let the mother hold the baby and free
its arm from the clothes
Prepare a tubercular syringe with
intradermal needle
Withdraw about 0.8 ml of vaccine and
expel the air bubble
Inject BCG vaccine in the left arm
hold the syringe by scale pointing upwards
Insert tip of the needle into the
sign and keep the needle flat along the skin
Hold the plunger end of the syringe
between the index and middle finger of your right hand and press the plunger
with your right thumb
Inject 0.1 ml vaccine and withdraw
the needle
IMMUNIZATION – Agents of Immunization and Steps of Vaccine Administration (COMMUNITY HEALTH NURSING)
BABY BATH – Purpose, Types of Bath, General Instructions, Equipment needed, and Articles near the Bed Side, Procedure and After Care (NURSING PROCEDURE)
Baby bath is
a hygienic care given to the newborn in the hospital or community setup
PURPOSE
To be baby’s skin clean
To maintain healthy skin
To stimulate circulation
To refresh the baby
To detect any physical abnormalities
To monitor the infants growth and
development
TYPES OF BATH
Lap bath: bathing the baby by keeping
him on the lap
Sponge bath: bathing the child in bed
Oil bath: applying oil all over the
baby’s body
Tub bath: small tub or basin is used
in giving bath to a baby
GENERAL INSTRUCTIONS
The newborn’s temperature regulating
mechanisms are under developed, so measures to avoid over heating mechanisms
are important
The nurse should use right judgment
in selecting the soap, and cloths
The ideal time of bath should be one
hour after feeding the baby
While giving baby bath, give
opportunity to the mother to participate
The clothing for baby should be
selected according to the environmental temperature
EQUIPMENT NEEDED
A tray
containing
Mackintosh and big towel – 1
Bath blanket – 1
Towels – 2 and small face bowel – 1
Soap in a dish
Oil in the bottle
Kidney tray and paper bag
Dresses for baby
Apron – 1 (rubber), cotton balls in a
bowl, buds in a container
Bath thermometer
ARTICLES NEAR THE BED SIDE
Bath basin – 2
Buckets – 1 or 2
Jugs – 2
PROCEDURE
Wash hands thoroughly and wear apron
Bring the baby to the bath table
Undress the baby and wrap in the big
towel
First wipe the eyes from medial to
lateral side, use separate swabs for each eye
If the crust is seen in nostrils, use
a lubricated swab to clean nose, rotate it and clean all sides
Clean the inside ears with rolled
wisp of cotton
Wipe the face with warm water and dry
gently, don’t use soap on the face
Obscene baby’s mouth for thrush, if
present applies gentian violet
Hold the baby securely by sliding
your hand until the baby’s head is well supported in your palm
Hold the baby’s head over the basin,
wet it, apply soap, rinse it with water and dry it thoroughly
Discard the water and take fresh
water to keep the water clean and at correct temperature
Unwrap the body, apply soap all over
the body, giving special attention to the neck, arms, axillae, grains fingers
and toes
The baby is held firmly and submerged
gradually into the water in the tub to rinse the soap completely
Take the baby from the water and dry
him by patting gently
AFTER CARE
Dress the cord stump, if any
Dress the baby as early as possible
Comb the hair
Give the baby to the mother for
feeding
Replace the articles after cleaning
Wash hands and record the procedure
BABY BATH – Purpose, Types of Bath, General Instructions, Equipment needed, and Articles near the Bed Side, Procedure and After Care (NURSING PROCEDURE)
MEASUREMENT OF HEIGHT AND WEIGHT – Principles, Equipment and Procedure (COMMUNITY HEALTH NURSING)
Weight and
height measurements are an index of a person continuing growth and developments
and may index to the maintenance of health. A person’s height and weight is
influenced by varying factors, such as inheritance, nutrition, incidence of
sickness, the endocrine system, etc
Measurement of
weight and height is the responsibility of the community health nurse and
health visitors to explain the significance of weight and height to the
person’s being weighed. Weight and measurement of the child at planned to
detect deviation in his own growth curve
PRINCIPLES
The weighing scales must be accurate
The baby scales platform must be safe
and secure to prevent the child from falling
The mother or nurse must stay with
the child when he is being weighed to prevent falling
Record of the weight as soon as the
scale is read. Adjust the scales each time
Emphasize importance of weighing
during the growth period
Keep the scale locked when not in
use, return bar to 0 after each weight has been read
To prevent cross infection, the nurse
should stand behind or to the side of the person being weighed to prevent
contact with the person’s face and mouth
EQUIPMENTS
Scales – with height rod
Weight balance
Tape measure
Records or pocket diary
PROCEDURE
Place the scales and measuring in a
well-lighted and ventilated area
Place a clean paper or clean plastic
on the scale
Look at the record and note the last
recorded weight
Place the child flat on weighing
scale
Record the present weight and remove
the baby gently
Record immediately on the chart
Height can be measured by place the
tape measure or measuring rod on a table or firm surface and place the infant
alongside the measure. Hold the head and heel firmly and read the measure
MEASUREMENT OF HEIGHT AND WEIGHT – Principles, Equipment and Procedure (COMMUNITY HEALTH NURSING)
HANDWASHING – Purpose, Articles
Needed and Procedure (COMMUNITY HEALTH NURSING)
Hand-washing
is most important and basic technique used in preventing and controlling,
transmission of pathogens. It is vigorous brief rubbing together of all
surfaces of hands lathered in soap and followed by rinsing under a stream of
water
PURPOSE
To remove soil and transient
microorganism
To reduce total microbial counts
overtime
To prevent cross infection
To protect herself from infection and
prevents the spread of infection to others
ARTICLES USED
Soap in a soap dish
Tap water or water in a container
Nail brush
Bucket to receive water
A mug or chamber for pouring water
Towel to wipe wet hands
PROCEDURE
Place the community bag on newspaper
Remove watch, bangles, rings in a
safe place or place it in the pocket
Open unsterile compartment and remove
hand washing set
Place newspaper and keep hand washing
things near the washing area
Turn on the tap or ask family member
to pour water
Scrub for 2-3 minutes with nail
brush, wash soap and hands with water
Hold hands up to prevent water from
coming back down
Dry hands with hand towel
HANDWASHING – Purpose, Articles Needed and Procedure (COMMUNITY HEALTH NURSING)
WATER SEAL CHEST DRAINAGE – Indications, Objectives, Mechanism, Factors Affecting the Chest Drainage, Water Seal Drainage System, Types of Chest Drainage, Commercially Prepared disposal Drainage Systems, Preparation of the Equipment, Setting Up a Commercially Prepared Disposable System, Managing Closed Chest Underwater-Seal Drainage, Assessment of Proper Functioning, Precautions to be Taken while Replacing Chest Drainage Bottles, Chest Catheter Removal, Discharge Teaching and Common Problems and Suggested Actions (NURSING PROCEDURE)
Water seal
chest drainage means that a column of water in a bottle seals off the
atmospheric air preventing from entering the chest drainage tube and thereby in
the pleural sac
Water seal
drainage system or so called “closed chest drainage” is indented to allow air
and flew to escape from the pleural space with each exhalation and to prevent
that return flow with each inhalation
Water seal
acts as a one way valve, permitting the unit directional flow of air and fluid
out of the pleural space, but permitting none to enter from the drainage system
INDICATIONS
After thoracic or thoracoabdominal
surgeries
Chest injuries involving the pleura
Spontaneous pneumothorax
OBJECTIVES
To remove air and fluid from the
pleural space
To re-establish normal negative
pressure in the pleural space
To promote re-expansion of the lungs
which apposition and cohesion of the parietal and visceral pleura
To restore the normal pulmonary
ventilation
To prevent the reflex (return flow)
of air and fluid back into the pleural space from the drainage apparatus
To prevent shifting of the
mediastinum and collapse of the lung tissue by equalizing pressure on both
sides
MECHANISM
In a thoracic surgery the parietal
pleura is incised and pleural space is opened
Atmospheric air rushes into the
pleural space and the lungs collapse
When the chest wall is closed, the
air is enclosed in the pleural space thus causing to have a pneumothorax in the
operated site
Additional air may continue to leak
into the pleural space through the openings in the pulmonary pleural incision
Trauma of surgery causes
serosanguineous fluid to collect in the patient’s chest until healing occurs
Negative pressure has been lost
inside the space owing to pneumothorax
The body’s ability to absorb air from
the pleural cavity is limited
Therefore, a closed drainage must be
established to remove the collecting fluid and air from the pleural cavity and
to prevent additional air and fluid entering the pleural cavity
A closed drainage system is used
postoperatively to remove air and serosanguineous fluid form the pleural cavity
FACTOR AFFECTING THE CHEST DRAINAGE
Proper placement of chest catheters –
usually two catheters are placed in the chest, one of them is placed anteriorly
through the second intercostals space to permit the escape of air rising in the
pleural space. The lower catheter is placed posteriorly through the eighth or
ninth intercostals space in the maxillary line to drain off serosanguineous
fluid accumulating in the lower portion of the pleural space
Proper placement of drainage
apparatus – the drainage apparatus for closed chest drainage must always locate
at a level lower than the patient’s chest. Thus, this helps drainage by
gravity. At the same it prevents backflow of air and fluid in pleural space
Length of the drainage tubing –
drainage tubing which connect the chest catheters to the drainage apparatus
should be neither too long nor too short. It should fall in a straight line to
the drainage apparatus with no dependent loops. Dependent loops of the tubing,
that contain fluids obstruct the flow of air and water into the drainage bottle
and create back pressure thus impairing the drainage of air or fluid
WATER SEAL DRAINAGE SYSTEM
Maintaining the patency of the
drainage tubing: patency of the drainage tubing and the chest catheter are
checked frequently. Kinks and pressure on the tubing will cause obstruction in
the flow of drainage. Observe the amount of drainage per hour to make sure that
the tube is not internally plugged with pus or blood clots. Milking the tube
helps to dislodge any clot that is formed in the drainage tubes
Maintenance of an air tight drainage
system. Closed drainage system must be maintained air-tight. The bottles are
sealed with tight stoppers and all connection of the tubes is taped to ensure
its air tightness
Position of the patient: the patient
is placed in a Fowler’s position. This position helps to locate the fluid in
the lower portion of the pleural space and drainage thorough the chest tubes,
which are placed in the lower chest
Activity of the patient: the movement
of the patient in bed helps to drain the chest. Coughing and deep breathing
exercises help the patient to promote lung expansion and expulsion of air and
fluid from the pleural space by increasing the intrapulmonic and intrapleural
pressure.
Application of mechanical suction on
the water and drainage system
Continuous and gentle cough and respirations are too weak to
force the air and fluid out of the pleural space through the chest catheters
In the treatment of empyema thoracic in which the drainage is
too thick to drain
In those patients where air is leaking into the pleural space
faster than it can be removing by a water seal apparatus and or to speed up the
removal of air or fluid out of the pleural space
TYPES OF CHEST DRAINAGE
The
One-Bottle Water-Seal System
The end of
the drainage tube from the patient’s chest is covered by a layer of water which
permits drainage and prevents lung collapse by sealing out the atmosphere.
Functionally, drainage depends on gravity, on the mechanics of respiration and,
if desired, on suction by the addition of controlled vacuum
The tube
from the patient extends approximately 2.5 cm below the level of the water in
the container. There is a vent for the escape of any air that might be leaking
from the lung. The water level fluctuates as the patient exhales. At the end of
the drainage tube, bubbling may or may not be visible. Bubbling can mean either
persistent leakage of air from the lung or other tissues or a leak in the
system
The
Two-Bottle Water-seal System
The two
bottle system consists of the same water seal chamber plus a fluid-collection
bottle. Drainage is similar to that of a single unit, except that when pleural
fluid drains, the underwater seal system in not affected by the volume of
drainage
Effective
drainage depends on gravity or on the amount of suction added to the system.
When vacuum is added to the system from a vacuum source, such as wall suction,
the connection is made at the vent stem of the underwater-seal bottle. The
amount of suction applied to the system is regulated to the wall gauge
The
Three-Bottle Water-seal System
This system
is similar in all respect to the two-bottle system, except for the addition of
a third bottle to control the amount of suction applied. The amount of suction
is determined by the depth to which the tip of the venting glass tube is
submerged. In the three-bottle system, drainage depends on gravity or the
amount of suction applied. The amount of suction in the system is controlled by
the manometer bottle. The mechanical suction motor or wall suction creates and
maintains a negative pressure throughout the entire closed drainage system
The
manometer bottle regulates the amount of the vacuum in the system. This bottle
contains three tubes:
A short tube above the water level
comes from the water seal bottle
Another short tube leads to the
vacuum or suction motor or wall suction
The third tube is a long tube which
extends below the water level in the bottle and which is open to the atmosphere
outside the bottle. This is in the tube that regulates the amount of vacuum in
the system. This is regulated by the depth to which this tube is submerged the
usual depth is 20 cm
When the vacuum in the system becomes greater than the depth
to which the tube is submerged, outside air is sucked into the system. This
result in constant bubbling in the manometer bottle, which indicates that the systems
is functioning properly
COMMMERCIALLY PREPARED DISPOSAL DRAINAGE SYSTEMS
Combine drainage collection, water seal and suction control
in one unit. These systems ensure patient safety with positive and negative
pressure relief valves and have a prominent air leak indicator. Some systems
produce no bubbling sound. System allows air and fluid to escape from the
pleural cavity but does not allow the air to re-enter. The system may include
one, two or three bottles to collect drainage, create a water seal, and control
suction. Or it may be a self-contained disposable system. That combines the
features of a multi bottle system in a compact, one piece unit
Equipment: thoracic drainage system which can function as
gravity drainage systems to be connected to suction to enhance chest drainage
PREPARATION OF THE EQUIPMENT
Check the doctor’s order to determine the type of drainage
system to be used and specific procedural details. If appropriate, request the
drainage system and suction system from the central supply department. Collect
the appropriate equipment and take it to the patient’s bedside
Implementation
Explain the procedure to the patient
and wash your hands
Maintain sterile technique throughout
the entire procedure and whenever you make changes in the system or alter any
of the connections to avoid introducing pathogens into the pleural space
SETTING UP A COMMERCIALLY PREPARED DISPOSABLE SYSTEM
Open the packaged system and place it
on the floor in the rack supplied by the manufacture to avoid accidental
knocking it over or dislodging the components. After the system is prepared, it
may be hung from the side of the patient’s bed
Remove the plastic connector from the
short tube that is attached to the water-seal chamber. Using a 50 ml catheter
tip syringe instill sterile distilled water into the water-seal chamber
If suction is ordered, remove the cap
on the suction-control chamber to open the vent. Next instill sterile distilled
water until it reaches the 20 cm mark or the ordered level and recap the
suction-control chamber
Using the long tubes connect the
patient’s chest tube to the closed drainage system to the suction source, and
turn on the suction. Gentle bubbling should begin in the suction chamber,
indicating that the correct suction level has been reached
MANAGING CLOSED CHEST UNDERWATER-SEAL DRAINAGE
Repeatedly note the character,
consistency and amount of drainage collection chamber
Mark the drainage level in the
drainage collection chamber by noting the time and date at the drainage level
on the chamber every 8 hours
Check the water level in the
water-seal chamber every 8 hours, if necessary, carefully add sterile distilled
water until level reaches the 2 cm mark indicated on the water-seal chamber of
the commercial system
Check for fluctuation in the
water-seal chamber as the patient breathes. To check for fluctuation when a
suction system is being used, momentary disconnect the suction system
Check the water level in the
suction-control chamber. Detach the chamber from the suction chamber when the
bubbling ceases, observe the water level. If necessary add sterile distilled
water to bring the level to the 20 cm line or as ordered
Check the gentle bubbling in the
suction control chamber because it indicates that the proper suction level has
been reached
Periodically check that the air vent
in the system is working properly. Occlusion of the air vent results in a
build-up of pressure in the system that could cause the patient to develop a
tension pneumothorax
Coil the systems tubing and secure it
to the edge of the bed with a rubber band or tape and a safety pin. Avoid
creating dependent loops, kinks or pressure on the tubing
Be sure to keep two rubbers tipped
clamps at the bedside to clamp the chest tube if a bottle breaks or the
commercially prepared system cracks or to locate an air leak in the system
Encourage the patient to cough
frequently and breathe deeply to help drain the pleural space and expand the
lungs
Check the rate and quality of the
patient’s respirations and auscultate his lungs periodically to assess air
exchange in the affected lung
Tell the patient to report any
breathing difficulty immediately. Notify the doctor immediately if the patient
develops cyanosis rapid or shallow breathing, sub-cutaneous emphysema chest
pain or excessive bleeding
When clots are visible you may be
able to strip the tubing depending on your facility policy. This is a
controversial procedure because it creates high negative pressure that could
suck viable lung tissue into the drainage
Check the chest tube dressing at
least every 8 hours. Palpate the area surrounding that dressing for crepitus or
subcutaneous emphysema, which indicates that air is leaking into the
subcutaneous tissue surrounding the insertion site
Encourage active or passive range of
motion (ROM) exercises for the patient’s arm or the affected side if he has
been splint his arm to decrease his discomfort
Remind the ambulatory patient to keep
the drainage system below chest level and to be careful not to disconnect the
tubing to maintain the water seal
ASSESSMENT OF PROPER FUNCTIONING
Observing the oscillating movements
of the fluid up and down in the water-sealed tube
Observing the intermittent bubbling
in the water seal bottle
Observing the collection of drainage
in the water seal or drainage bottles
Observing the periodic emptying of
the suction control tube and bubbling in the suction control bottle when a
mechanical suction is attached to the under-water seal drainage system
Ascertain the status of the patient
by assessing vital signs and the appearance frequently
PRECAUTIONS TO BE TAKEN WHILE REPLACING CHEST DRAINAGE BOTTLES
Assemble the bottle with tight
stopper and tubes and check for their proper functioning
Double clamp the chest catheters
close to the patient’s chest to prevent entry of air into the pleural cavity
Clamps are applied at the end of a
full inspiration to prevent the air being sucked into the pleural space
Disconnect the bottle to be replaced
along with the drainage tubing and attach to new set, taking care not to
contaminate the end of the chest catheters
Be certain that the bottle is placed
well before the chest level and is fixed safely to prevent falling or being
kicked over accidentally
Unclamp the patient’s chest catheter
and make certain that the system is functioning properly before leaving the
patient
Watch the patient’s vital signs for
few minutes to see any changes in the general conditions
CHEST CATHETER REMOVAL
The chest catheter is removed only on
the return order of the physician, and is removed by the physician
Usually the chest catheters are
removed in two or three days, provided the remaining lung tissue is well
expanded, the air leaks are absent and fluid drainage is less than 75 ml per
day
A chest X-ray may be taken before the
chest catheters are removed to make sure that the lungs are fully expanded
After removal of the chest catheters,
the wound is covered with sterile petrolatum gauze and a firm dressing is
applied over the wound which is secured with wide strips of adhesive tapes
After removal of the catheters the
patient is observed closely for the development of respiratory distress
DISCHARGE TEACHING
The
following advice is given to these patients on discharge from the hospital
To have deep breathing and coughing
exercise
To maintain good nutrition
To maintain good hygiene especially
oral hygiene
To avoid activities or environment
that can cause irritation of trachea bronchial tree
They are advised not to smoke, to
avoid dusty place and to avoid exposure to the persons having respiratory
infections
To consult the physician if symptoms
of upper respiratory infections or other ailments develop
To obtain a fitness certificate
before they join their duty
COMMON PROBLEMS AND SUGGESTED ACTIONS
Lack of drainage
Causes: kinking, looping or pressure on the tubing may cause reflux of
fluid into the intrapleural space or may impede drainage, causing blocking of
the intrapleural drain
Nursing action: check the system and straighten tubing as required.
Secure the tubing to prevent a recurrence of the problem
No fluctuation of fluid in tubing
from the underwater seal
Causes – re-expansion of the lung, tubing is obstructed by blood clots
fibrin, failure of the suction apparatus
Nursing action: ask medical staff if the drain may be removed following
chest X-ray. The purpose of the drain has been fulfilled. Keeping the drain in
any longer than necessary may lead to hazards from infection or air re-entry. “milk”
the tubing towards the drainage bottle to try to dislodge the obstruction and
re-establish potency. Straighten tubing as required. Secure the tubing to
prevent a recurrence. Disconnect the suction apparatus and ensure drain is
patent
Constant bubbling of fluid in the
drainage
Causes: an air leak in the system
Nursing action: clamp the intrapleural drain momentarily close to the
chest wall and establish whether there is a leak in the rest of the system.
Clamping the tubing shows whether the leak is below the level of the clamp
Patient shows signs of rapid shallow
breathing, cyanosis, pressure in the chest, subcutaneous emphysema or
hemorrhage
Causes: tension pneumothorax, mediastinal shift, postoperative
hemorrhage, severe incision pain, pulmonary embolus or cardiac temponade
Nursing action: observe record and report, any of these signs to a doctor
immediately
Incision pain:
Nursing actions: provide analgesia as prescribed to reduce the patient’s
discomfort and to enable deep breathing exercises to be performed and
mobilization to ensure adequate drainage and to avoid complications
Accidental disconnection of the
drainage tubing from the intrapleural drain:
Nursing action: apply an artery clamp to the drain immediately in order
to avoid air entering the pleural space. Re-establish the connection as soon as
possible in order to re-establish drainage. If necessary use cleans sterile
drainage tube tubing may have been contaminated when it became disconnected
Patient needs to be moved to another
area:
Nursing action: place the drainage bottle below the level of the
intrapleural drain as close to the floor as possible in order to prevent reflux
of fluid into the pleural space. Do not clamp the drain unless the doctor has
ordered it
Intrapleural brain falls out
Nursing action: pull the purse string suture immediately to close the wound. Cover the wound with an occlusive sterile dressing. Inform a doctor. The objective is to minimize the amount of air entering the pleural space. The drain will probably need reinserting. Reassure the patient with appropriate explanations.
WATER SEAL CHEST DRAINAGE – Indications, Objectives, Mechanism, Factors Affecting the Chest Drainage, Water Seal Drainage System, Types of Chest Drainage, Commercially Prepared disposal Drainage Systems, Preparation of the Equipment, Setting Up a Commercially Prepared Disposable System, Managing Closed Chest Underwater-Seal Drainage, Assessment of Proper Functioning, Precautions to be Taken while Replacing Chest Drainage Bottles, Chest Catheter Removal, Discharge Teaching and Common Problems and Suggested Actions (NURSING PROCEDURE)
TRANSESOPHAGEAL ECHOCARDIOGRAPHY – Purpose, Interfering Factors, Client Preparation, Procedure, After Care, Advantages and Complication (NURSING PROCEDURE)
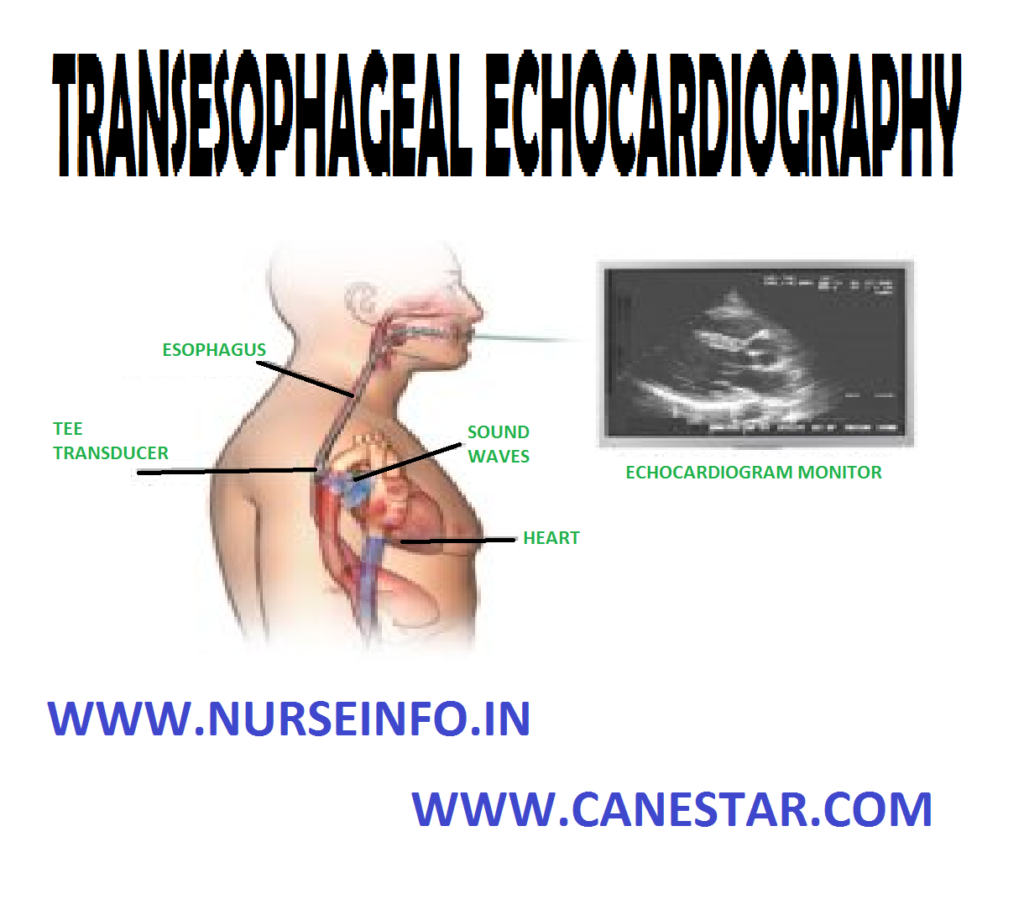
A transesophageal echocardiography is
an invasive procedure that uses ultrasound technique to detect enlargement of
cardiac chambers and variations in chamber size during the cardiac cycle. It
also assesses vascular function, septal defects and pericardial effusion. Although
these accomplished with a transesophageal echocardiogram
A transesophageal echocardiography
permits a better view on the position atrium and aorta. Transesophageal
echocardiography is also indicated when a transthoracic approach is inadequate,
such as when the client is obese or has chest wall structure abnormalities
PURPOSE
Indications
of transesophageal echocardiography include diagnosis of:
A thoracic aortic pathological
condition, including suspected aneurysm
Mitral valve disease
Suspected endocarditis
Congenital heart diseases for example
atrial septal defect
Left atrial intracranial thrombi
Cardiac tumors
It is also used to assess cardiac
function during minimally invasive cardiac surgery (MICS) and to assess
prosthetic valves
INTERFERING FACTORS
Transesophageal
echocardiography should not be performed if the client has a history of
irradiation of the mediastinum, esophaged, dysphagia or structural
abnormalities
CLIENT PREPARATION
Ensure that a signed informed consent
form has been obtained
Ask the client about any disorder of
the esophagus, stomach, throat or vocal cord
Inquire if the client has dentures,
bridges or plates
Report to the physician any history
of arthritis of the neck, respiratory problems of anticoagulants therapy
Maintain the client on a nothing by
mouth starts for 6-8 hours
Describe the procedure to the client,
especially the need for a mouth guard, positioning and the need to swallow when
asked
If the client has prosthetic heart
valves, prophylactic antibiotics may be prescribed
Report any indications in the mouth
or throat
Administer antianxiety medication as
prescribed
PROCEDURE
The procedure may also be used
intraoperatively where conventional echocardiography is ineffective
The client needs to be in bed or on
table with ECG leads attached. ECG and BP are monitored
The throat is anesthetized and
sedation is given
Instruct the client to gargle with
various lidocaine and then to swallow
Warn the client that it will make the
tongue and throat feel swollen
A mouth guard is placed to prevent
the client from biting down on the endoscope
The client is positioned on the left
side in the chin-chest position. The head may be supported with a small pillow
The probe is lubricated with
lidocaine jelly and slowly inserted as the client swallows
Monitor the client for a vasovagal
response from the medication given to dry up secretions
Check the client for gagging and
observe the oximeter for oxygen saturation is reading
AFTER CARE
Assess the client for return of the
gag reflex before resuming oral intake
Instruct the client to avoid hot
liquids or foods for 2 hours
If an outpatient, the client should
be accompanied home by another person
Give lozenges for relief of throat
discomfort
ADVANTAGES
Transesophageal echocardiography
(TEE) gives a higher quality picture of the heart than does a regular
echocardiogram
It is especially useful in clients
who have thickened lung tissue or thick chest walls or are obese
TEE allows clear visibility of the
heart and its structures it is most useful in diagnosis of cardiac masses,
prosthetic valve function and aneurysm
COMPLICATION
TEE has several complications that
are related to the placement of the probe in the esophagus, including esophageal
perforation, transient hypoxia, dysrthythmias and vasovagal response
TRANSESOPHAGEAL ECHOCARDIOGRAPHY – Purpose, Interfering Factors, Client Preparation, Procedure, After Care, Advantages and Complication (NURSING PROCEDURE)
THALLIUM TESTING – Purpose, Thallium 201, Findings, Client Preparation, Procedure, After Care and Complication (NURSING PROCEDURE)
Thallium is
a radioactive analog of potassium, which is readily taken up myocardial cells.
After thallium 201 is given, almost 90% of it is extracted by the myocardium
within seconds. For this to occur, two factors are essential: (i) adequate
perfusion and (ii) cellular extraction efficiency. Since cellular ischemia does
not seem to affect thallium uptake in myocardium, its lack of uptake is an
indication of an infraction
PURPOSE
Thallium imaging is used to assess
coronary blood flow to determine areas of infarction and ischemia
To diagnose CAD and assess
revascularization following coronary artery bypass surgery
THALLIUM 201
Thallium 201 is the most widely used
isotope for myocardial perfusion due to its short (73 hours), half-life and low
total body radiation dose
Thallium 201 is a radioactive
analogue of potassium, which is easily extracted by smooth skeletal and cardiac
muscle fiber that possess the potassium active transport system
A 80% of blood-borne thallium 201 is
taken up on its first pass through the heart
The amount of thallium 201 found in
the myocardium after an intravenous injection depends on the regional
myocardial perfusion and the efficiency of cellular extraction
FINDINGS
Cold spots indicate and distinguish
areas of infarction and ischemia. High concentration of thallium 201 is present
in well-perfused cells, and a lower concentration remains in the blood, setting
up a concentration gradient for the diffusion on thallium 201
Infarcted or scarred myocardium does
not extract any thallium 201 showing up as cold spots. If the defective area is
ischemic, the cold spots fill in or become warm on the delayed images
CLIENT PREPARATION
Ask female clients if they are
pregnant or suspected pregnancy, because these studies involve radiation
exposure
Explain the purpose of the procedure
to the client and tell him or what to expect during the procedure
Explain that electrodes will be
placed on the client and an intravenous line will be inserted for the
administration of the radioisotope
Generally, total exposure to
radiation during these scan is less than or equal to that of one chest X-ray
study
Instruct the client to wear walking
shoes if exercise on the treadmill or bicycle is anticipated
Encourage the client to notify the
nurse or technologist of any signs of ischemia (chest pain) during or after the
procedure
Keep the patient NPO for 4-6 hours
before the test but may drink water
An infusion is started for
intravenous access
Inform the client, of the need to go
to the nuclear medicine department twice
If a SPECT scan is planned, check if
the client is claustrophobic
PROCEDURE
Thallium or adenosine is given
intravenously about a minute before the completion of the stress test
After the completion of the stress
test, the client is placed supine on the table and multiple scintigraphic
images are taken
The perfusion scanning is performed
with a special camera that is capable of showing the source of emitted camera
that is capable of showing the source of emitted low-energy photons on a screen
Each photon detected by the camera is
recorded on film and a computer screen over a half-hour period
The computer refines and enhances the
images and then provides qualitative information about the myocardial walls
Two sets of images are taken 3 hours
apart and compared
Thallium can be given under a state
of no physical demand, which is known as a resting thallium study, or it can be
part of a stress test, in which case it is called exercise thallium imaging
Exercise thallium imaging
distinguishes ischemic sites from infarcted areas
Thallium scans are repeated, once
during stress testing and then 3-4 hours after thallium was given and the
stress test was completed
With the second imaging, if a cold
spot disappears, it is recognized as an ischemic area
AFTER CARE
Assess the client’s response
Three to four hours later, the client
returns for repeat films
COMPLICATIONS
Dysrhythmias
Myocardial ischemia
THALLIUM TESTING – Purpose, Thallium 201, Findings, Client Preparation, Procedure, After Care and Complication (NURSING PROCEDURE)
Telemetry
permits the nurse to keep a watch on the client’s heart rate and rhythm during
this period of early ambulation. As soon as the client’s condition permits, he
may be allowed ambulation. Battery powered and portable, telemetry frees the
client from cumbersome wires and cables and lets him be comfortably mobile and
safely isolated from the electrical leakage and accidental shock occasionally
associated with hardwire monitoring
DEFINITION
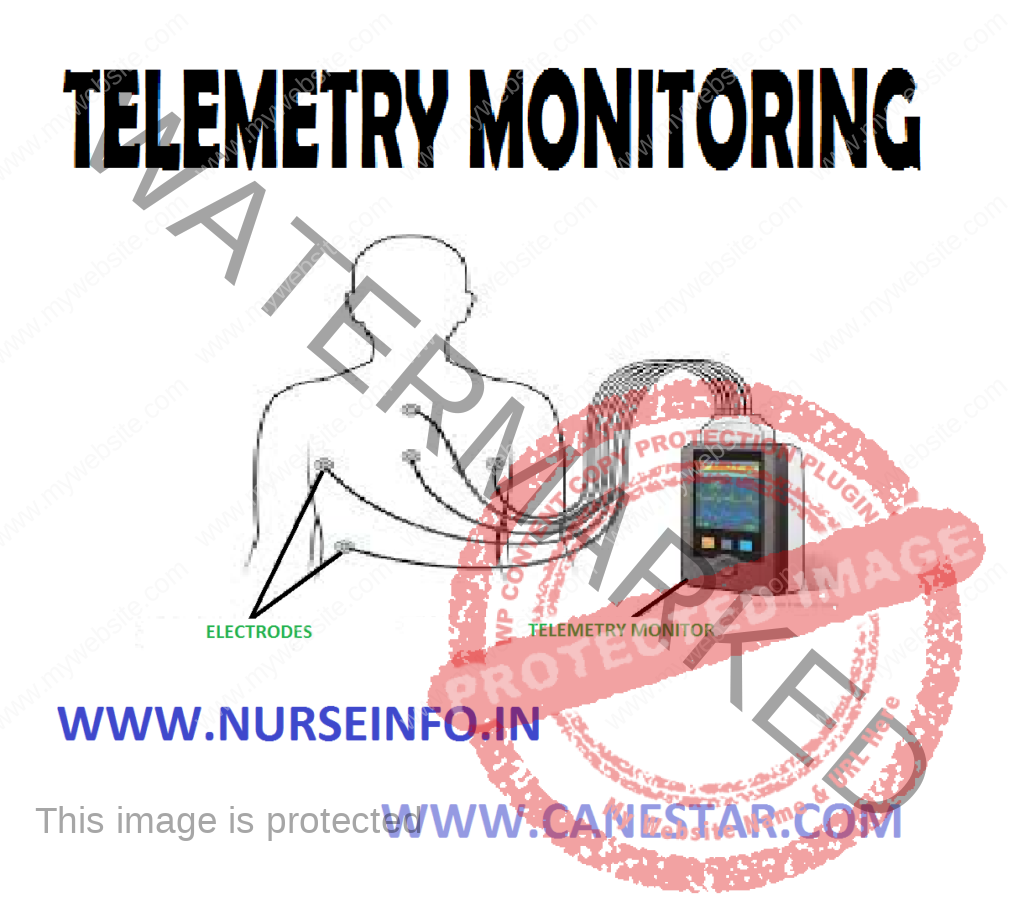
Telemetry
uses a small transmitter connected to the ambulatory client to send electrical
signals to another location, where they are displayed on a monitor screen
ADVANTAGES
Telemetry is especially useful for
monitoring arrhythmias that occur during sleep, rest, exercise or stressful
situation
Telemetry can monitor cardiac rate
and rhythm during ambulation
Telemetry system gives complete
mobility as well as freedom from the hardware of the coronary care unit
COMPONENTS
Electrodes to be fixed on the
client’s chest
Telemetry transmitter attached to
client’s body
Monitoring system in the nurse’s
station
DISADVANTAGES
This system lies in the frequency of
false alarms caused by the client going out of range of telemetry system and by
disconnection of electrodes
CLIENT PREPARATION
Explain the procedure to the client
and provide privacy
Expose the client’s chest and select
the lead arrangement
Remove the backing from one of the
gelled electrodes. Check the gel for motions. If it is dry, discard the
electrode and obtain a new one
PROCEDURE
Apply the electrode to the
appropriate site by pressing one side of the electrode against the client’s
skin, pulling gently and then pressing the other side against the skin
Press your fingers in a circular
motion around the electrode to fix properly on the skin
SELECTIVE CARDIOGRAPHY – Definition, Purpose, Client Preparation, Special Equipment Needed, Procedure and After Care (NURSING PROCEDURE)
DEFINITION
Selective cardiography implies
injection of contrast medium through a catheter directly into one of the heart
chambers, coronary arteries or great vessels in order to obtain the contours of
the heart chambers (angiocardiography), coronary arteries (coronary
angiography) or aorta (aortography)
An angiogram is recorded by means of
rapid film changer (cineangiogram) or motion picture camera. Selective
angiocardiography requires either right-sided or left-sided cardiac
catheterization
PURPOSE
To find out the occlusion in the coronary
arteries
To assess potency of coronary
arteries
To obtain clear picture of cardiac
anatomy prior to heart surgery
CLIENT PREPARATION
Prepare the client psychologically
for cardiac catheterization
Instruct the client that he will be
conscious during the procedure and he will experience no pain but some
sensation, when the catheter enters the heart
Explain the entire procedure
including its risks and get a written consent for the procedure
Make sure the client has not suffered
from any of allergy, the sensitivity test for iodine should be carried out
before angiography is done
Instruct the client fast 6-8 hours
before the procedure
Antibiotics are administered to the
client just prior the procedure and for a few days after to prevent possibility
of infection
Administer premeditations as ordered
in order to relax the client
Keep the IV line patent
Mark the site of peripheral pulse
with skin pencil; this will help locate the pulse during the procedure
Prepare the site (usually femoral
site) as for a surgical procedure
Follow strict aseptic technique
throughout the procedure
Keep ready all emergency equipment
and drugs for the immediate resuscitation of the client
SPECIAL EQUIPMENT NEEDED
Defibrillator
Cardiac monitoring
External pacemaker
Mechanical ventilator
Articles for endotracheal intubation
Intravenous fluids and administration
set
Cardiac drugs, antiallergic drugs and
anticoagulants
PROCEDURE
Explain the procedure to the client
Place the client in comfortable
position in the treatment table
A radiopaque catheter is passed into
the arch of the aorta through the femoral artery and is directed to the base of
the coronary arteries under fluoroscopic control
Small amount of dye is injected
repeatedly in each coronary artery till these are clearly outlined as seen on a
closed circuit TV screen
The whole study is recorded on a film
and reveals complete picture of the coronary arteries
AFTER CARE
On completion of the procedure, when
the catheter is removed, a sterile sponge is placed on the site and firm
pressure is applied for 10-15 minutes to prevent bleeding from the puncture
site and formation of hematoma
Continue cardiac monitoring till the
vital signs have stabilized
Instruct the client to take complete
bed rest for 12-24 hours
Watch for the skin color, temperature
and peripheral pulses to detect early signs of complication
Keep the effected extremity straight
to prevent clot formation in the vessel. The extremity may be immobilized on an
arm board
The puncture site is checked for
bleeding, swelling or hematoma formation
Watch for allergic reactions to the
dye injected. These may include flushing, nausea, vomiting, numbness, tingling,
diaphoresis, urticaria, fall in blood pressure, etc
SELECTIVE CARDIOGRAPHY – Definition, Purpose, Client Preparation, Special Equipment Needed, Procedure and After Care (NURSING PROCEDURE)