Nurseinfo.in provides free Nursing Notes, Nursing Procedures, Medical MCQs, Nursing Calculators, Care Plans and exam preparation resources for BSc Nursing, GNM, P.B. BSc and MSc Nursing students. Browse subject-wise notes, previous year questions and study materials based on the latest nursing syllabus.
Nurseinfo.in provides free Nursing Notes, Nursing Procedures, Medical MCQs, Nursing Calculators, Care Plans and exam preparation resources for BSc Nursing, GNM, P.B. BSc and MSc Nursing students. Browse subject-wise notes, previous year questions and study materials based on the latest nursing syllabus.
How Foreign Nurse can go to Singapore
for Nurse Job?
Singapore is
officially called the Republic of Singapore located in Southeast Asia. The
average salary for nurses is SGD 2,650 per month. Nurse can earn more depending
upon their position and years of experience. Salary differs for foreign Nurse
and citizen nurse in Singapore, Citizen Nurse earn higher than Foreign Nurse.
In
Singapore, there is a Registered Nurse or Enrolled Nurse. Enrolled nurse will
have 2 years study to obtain the NITEC in Nursing and to become Registered
Nurse, nurse need to have diploma in Nursing or Bachelor of Nursing (BSN). Enrolled
Nurse will work under the Registered Nurse Supervision.
Steps to Enter Singapore for Nurse
Job for Foreign Nurses
Look up advertisement for nurse job in Singapore (Newspaper or Internet). Call for Nurse Jobs in Singapore by Agents (Find Trustworthy and Singapore Government Approved Agents)
Apply for nurse job position with your resume
Agent will arrange Interview for selected Candidates
Candidates need to take screening written test, oral interview and SNB Licensure Examination
Once candidate clear test, especially SNB Licensure Examination, they can enroll as Registered Nurse in Singapore.
SNB Licensure Examination offer SNB Practicing Certificate, without this certificate, nurse can’t work in Singapore. Each year nurse need to renew this certificate (Need to pay 45 or 30 Dollar depending upon their Nursing position)
After clearing exam, candidate needs to apply “Singapore Work Pass”. Without Work Pass, Foreign Nurse can’t work in Singapore.
Candidate can get offer letter from Hospital in Singapore
After getting “Singapore Work Pass”, candidate can apply Visa (visa processing can take one to two months)
During Visa Verification, they check Original Certificate (Nursing Degree Certificate and Genuine Work Experience)
Visa Application is over, Candidate can migrate to Singapore
With years of experience, nurse can apply for Singapore Citizenship
Foreign
Nurse has to follow Newspaper and Job sites, to find nurse job position in
Singapore. These advertisements are given by job recruiting agencies (Singapore
and Home Country Approved).
Candidate
need to apply for Nurse Job Position, agencies will select candidate and call
for interview. Several tests will be conducted before giving offer letter to
the candidates. Written test, Oral Interview and SNB Licensure Examination will
be conducted, after passing this entire test, offer letter will given to
candidates.
Now, candidate
can apply “Singapore Work Pass”, work pass is very important to work in
Singapore for Foreign Nurses. Once Singapore Government given passes, candidate
can apply for Visa. During Visa processing, original certificates will be
verified mainly Nursing Degree Certificate and Working Experience Certificate.
After this verification, candidate will be offered work visa to work in
Singapore.
Now
candidate can get ready to start migrating to Singapore.
(Note: Find genuine Job Recruiting Agencies which is approved by Singapore Government)
How Foreign Nurse can go to Singapore for Nurse Job?
How to Join in Commissioned Corps of
the U.S. Public Health Service as a Nurse
Commissioned Corps of the U.S. Public Health Service or USPHS Commissioned Corps.
USPHS
Commissioned Corps are the front line workers of public health. They work under
different fields like medical, health and engineering and they contribute to
fight disease, research, and care for patients in underserved communities
across the country (USA) and throughout the world.
It’s one of
the nation’s uniformed services who serve in agencies across the government, as
physicians, nurses, dentists, veterinarians, scientists, engineers and other
professionals. These professionals works in CDC, FDA, Indian Health Service
(PHS), NIH, Department of Justice (Federal Bureau of Prisons) and Department of
Defense (USA)
TYPES OF PROFESSION OPPORTUNITIES FOR
NURSES
Nurse
Practitioner
Registered
Nurse
NURSE PRACTITIONER AND REGISTERED
NURSE
QUALIFICATION
Master’s
of science in nursing from a program accredited by the National League for
Nursing Accrediting Commission or the Commission on Collegiate Nursing
Passing
score on the National Council Licensure Examination (NCLEX)
Nurse
need to have Current, unrestricted and valid Registered Nurse (RN) license from
any U.S. state, Washington D.C., Puerto Rico, U.S. Virgin Islands, or Guam
QUALIFICATION TO BECOME
PUBLIC HEALTH SERVICE OFFICER
A
Public Health Service officer must be a U.S. native or naturalized citizen
Public
Health Service Officers are adults with college degree (Minimum Age 18 and
above)
Educational
Qualification (minimum) – Nursing (B.S. or higher)
HOW TO APPLY
PHASE ONE:
Nurse
need to submit their application.
Application
will be reviewed by a board of officers
If
application passes all criteria the nurse will be called for interview
Along
with board review, nurse need to pass a medical exam to be accepted in USPHS.
PHASE TWO:
Nurse
need to apply for job opportunities at any one of the partner agencies. There
are 20+ partner agencies in USA.
Security
clearance has to be done by the nurse during job search and interview.
If
selected, nurse will be offered a position within an agency to begin his/her
journey as an active duty officer.
WHERE NURSE CAN WORK
Nurse can
work at one of 20+ partner agencies. List of agencies are
Agency for Healthcare Research and
Quality
Agency for Toxic Substances and
Disease Registry
Centers for Disease Control and
Prevention
Food and Drug Administration
Centers for Medicare and Medicaid
Services
Indian Health Services
National Institutes of Health
Health Resources and Services
Administration
Office of the Assistant Secretary of
Health
Office of the Secretary
Program Support Center
Substance Abuse and Mental Health
Services Administration
Office of the Assistant Secretary for
Preparedness and Response
Environmental Protection Agency
Federal Bureau of Prisons
National Oceanic and Atmospheric
Administration
National Park Service
U.S. Department of Agriculture
U.S. Department of Defense
U.S. Department of Homeland Security
Division of Immigration Health
Services
U.S. Coast Guard
U.S. Marshals Service
BENEFITS TO PUBLIC HEALTH OFFICER
(NURSE OFFICER)
College Loan Repayment
The Indian
Health Service awards up to $40,000 in loan repayment to health Professionals
in exchange for at least two years of service in health facilities serving
American Indian and Alaska Native communities
The National
Health Service Corps (NHSC) offers select medical professionals $60,000 in loan
repayment in exchange for two years of service at a community-based site in a
high-need health professional shortage area. The recipients must apply to and
accept a position at an NHSC website
The CDC
Epidemic Intelligence Service (EIS) Program provides federal loan repayment in
exchange for two years of service practicing epidemiology in CDC or state/local
health departments.
Career Advancement and Payroll
increases with years of service
Nursing
Officers are grow professionally within their agencies, with pay increases
based on promotions and years of service
Health and dental care at low or no
cost
Nursing
officers and their families receive medical and dental care at little or no
cost through TRICARE insurance. Coverage begins on the first day of service
Mobility between government agencies
Nursing
officers are encouraged to expand their knowledge base and pursue professional
opportunities across agencies throughout their tenure in USPHS Commissioned Corps
Tax-free housing and meal allowances
The USPHS
Commissioned Corps offers a Basic Allowance for Housing, a tax-free amount to
cover rent or mortgage that is calculated by rank/grade, duty station location,
and dependent status
Retirement pension plan
Public
Health Service officers are enrolled in a Thrift Savings Plan, a retirement
plan similar to a 401 (k), and a retirement pension plan with benefits
eligibility beginning after 20 years of service
Flexibility to work in a variety of
settings
The USPHS
Commissioned Corps offers a variety of jobs in rural, urban, tribal and
international communities. Nurse Officers serve in 800 different locations
across all 50 states and numerous foreign duty stations
Long Term Care and Insurance
Nurses have
the maximum of $40,000 of life coverage through Service Members Group Life
Insurance (SGLI) plans. Nurses can access to low cost life insurance options
for their family
Vacation and Leave Benefits
Nurse will receive thirty days of paid vacation per – beginning the first years. Nurse will be paid for federal holidays. Nurse can have paid sick leave as needed
How to Join in Commissioned Corps of the U.S. Public Health Service as a Nurse
U.S. Visa Information for Foreign or
Non-citizen Nurses
Every nurse
has a dream to work and settle in U.S. Increase in disease conditions and the
need for healthcare centers has created plenty of opportunities for nurses in
United States. It’s a complex and challenging process for every non citizen
nurse to get entry in U.S healthcare industry.
Immigrant and non-migrant Visa
Before we get
into full details, non citizen or foreign nurse (nurse come from outside U.S.)
need to know the kind of visa offered for them. Here are two types of U.S.
visa, namely immigrant visa and non-migrant visa. Only immigrant visa is given
to noncitizens nurses, non-migrant visa isn’t available for foreign nurse.
Physician
can obtain either non-migrant or immigrant visa to work in U.S healthcare, but
nurse has to submit certificate from USCIS – approved Credentialing
Organization.
What is USCIS? – United States Citizenship and
Immigration Services (USCIS)
An
organization verifying that nurse has met the minimum requirements for
education, training, licensure, experience and English Proficiency.
Certification
verifies the following details of noncitizen:
education,
training, licensing and experience
the
necessary level of competence in oral and written English, ability to speak and
write
passed
either: A predictor test or occupation’s
actual licensing or certification examination
TEMPORARY VISAS AND PERMANENT
RESIDENCE (GREEN CARD)
U.S.
Immigration law gives temporary work visas and permanent residence (green
card). To work in United States, foreign nurse need to apply for either
temporary visa or permanent residence (Green Card).
Non-immigrant Visas for Nurses
Two visa is
available = O-1 Visa and H-1B Visa
O-1 Visa
To obtain an
O-1 visa, a person must demonstrate extraordinary ability in education,
business or science. An O-1 visa can be a good option for medical institutions
looking to hire nurses. O-1 Visa requires a significant amount of top-level
credentials. Nurse must demonstrate outstanding achievements through awards or
publications in medical field
TEMPORARY BASIS – H-1B Visa
Temporary
basis is given for foreign nurses to work in United States for 2 to 3 years.
H-1B visa is temporary visa issued by U.S. Immigration, to get temporary work
visa, foreign nurse need to have job offer from a U.S. employer to work in a
“Specialty Occupation”
Flow Chart to Obtain H-1B Visa
Foreign Nurse needs minimum
educational qualification recognized by United States Institution (BSC or MSC
in Nursing)
Need to pass exams (NCLEX-RN)
(English proficiency Test)
Need to apply for job in U.S.
U.S. employer (hospital) conducts
interview and Select foreign Nurse for work
U.S. employer (hospital or medical
clinic) would file an I-129 petition with USCIS. (USCIS – agency decides
whether or not to approve the employer’s request for H-1B status for the worker
U.S. employer apply and get H-1 B
Visa for worker
Foreign nurse need to attend
interview in U.S. Embassy, embassy verify documents and certification to
approve H-1 B visa
Once approval of H-1 B visa, foreign
nurse can work in United States
(Note: U.S.
Immigration issues limited number of H-1B visa every year)
U.S.
employer would need to demonstrate that nursing position is in a specialty
occupation
USCIS use a
four-pronged test for selection of H-1B visa
A bachelor’s or higher degree or its
equivalent is normally the minimum entry requirement for the position
The degree requirement for the job is
common to the industry or the job is so complex or unique that it can be
performed only by an individual with a degree
The employer normally requires a
degree or its equivalent for the position
The nature of the specific duties is
so specialized and complex that the knowledge required to perform the duties is
usually associated with the attainment of a bachelor’s or higher degree
DOCUMENT TO BE VERIFIED DURING
APPOINTMENT FOR AN IMMIGRANT VISA FOR NURSES
Applications for Immigrant
Visas
Police Clearances
Birth Certificates
Marriage Certificate, if any
Divorce or Death Certificate of
Spouse, if any
Valid Passports
Medical Examinations
Photographs
Recent job offer letter (or
employment contract)
Financial information regarding
employer
Government filing fees
Visa Screen Certificate
U.S. Green Card (Permanent Residence)
Every
foreign nurse has dream to get U.S. Green Card (Permanent Residence).
Advantage of
being U.S. Green Card Holder
High Salary equivalent to U.S.
Citizens
Avail benefits offered by U.S.
Government
FLOW CHART TO GET U.S. GREEN CARD FOR
FOREIGN NURSE
Employer need to offer permanent
nursing position
U.S. employer needs to complete
“labor certification” called PERM
Nurse Jobs Comes under “Schedule A”
position (Green Card)
Employer file ETA Form 9089 and I-140
Petition to USCIS
USCIS approve I-140 petition
Foreign nurse can apply for green
card by filing I-485
Employer has
to offer full time permanent nursing position as it will aid to reduce the
difficulty to obtain the U.S Green card. After providing full time permanent
position the employer needs to complete “labor certification” on behalf of the
nurse. This is called as PERM.
“SCHEDULE A” POSITION
Health care
workers especially nurse position is classified as a “Schedule A” position.
What is “Schedule A” Position?
U.S.
government has recognized that U.S. needs more workers to fill (shortage of
workers). Foreign nurse is eligible to apply for “Schedule A” position, as
there is shortage of nurses.
Filing PERM, ETA Form 9089 and I-140
Petition to USCIS
U.S.
employer will file PERM for a foreign nurse, complete ETA Form 9089, along with
an I-140 petition, to USCIS. After approval of I-140 petition by USCIS, the
foreign nurse can apply for the U.S. green card by filing the I-485.
CERTIFICATION SUBMISSION FOR U.S.
VISA AND GREEN CARD BY FOREIGN NURSE
Foreign
nurse needs to get approval from USCIS that nurse are certified to work in the
medical field in the U.S. For this procedure, foreign nurse first need to
certify by the CGFNS. Nurse need to submit all of their qualifications and
educational credentials to CGFNS. After submission, CGFNS will certify
credentials are true and genuine.
What is CGFNS? – Commission on Graduates of Foreign
Nursing Schools (CGFNS) will look up documents, verify and certify educational
credentials.
CGFNS
certificate is very important and need to be included in every visa or green
card petition filed on the nurse’s behalf by the U.S. employer. If employer
forgets to include CGFNS, USCIS will remind the employer to submit them before
approving the petition.
After
reviewing these, the CGFNS will issue a certified statement confirming:
The
nurse has a valid and unrestricted license in the U.S. state in which he or she
will work and the state has certified that the nurse’s foreign license is
authentic
The
nurse has passed the NCLEX, which is the U.S. licensing examination for nurses
The
nurse is a graduate of an English-language nursing program
The
nurse’s program was located in a country designated by the U.S. as acceptable
for medical training, and
The
nursing program was in operation on or before November 12, 1999
“Schedule A” position – nurse does not require
to obtain a labor certification because “Schedule A” come under shortage of
nurses category
For
Permanent Residency, the nurse must pass the TOEFL or IELTS exam, which
evaluates the nurse’s English skills
TYPES OF GREEN CARD
U.S.
Immigration issues three categories of employment based green cards such as the
EB-1, EB-2 and EB-3. The EB-2 and EB-3 green cards generally require a PERM
labor certification. U.S. Immigration law has special “Schedule A” category
specially designed for Healthcare Practitioners (nurses). Schedule A is split
into Group I and II.
Schedule A Group I Occupations
This occupation
is specifically for the following health professionals:
Professional nurses who are licensed
and possess certain educational qualifications
EB-1 Green Card
The EB-1 A
category for those person with extraordinary achievement. People need to
possess special skills mainly two skills. One with presenting qualification or
by presenting an internationally recognized award (e.g., MacArthur Foundation
Fellowship, Oscar, Nobel Prize etc)
A person who
get EB-1 Green Card, need to continue to work in their area of expertise.
EB-2 NIW GREEN CARD
To get EB-2
NIW Green Card, nurse need to possess a graduate degree, special qualification
and achievements.
Evidence that you command a salary or
other compensation
Official transcript showing diploma,
degree, certificate or similar award from school, university and college
Recognition of outstanding
achievements and significant contributions
License to practice or certification
for the medical specialty
Membership of professional
associations
GREEN CARD FOR FIANCE OF U.S. CITIZEN
Flow Chart to Obtain Green Card for
Fiancé of U.S. Citizen
Fiancé of
U.S. citizen apply for K-1 nonimmigrant visa to the United States and seek
admission to U.S.
Within 90
days, alien fiancé need to get marry with U.S. Citizen
U.S. citizen
need to file the Form I-129F, petition for Alien Fiancé, on his or her behalf
After that, Alien
spouse can apply for lawful permanent resident status in U.S.
Finally
Alien spouse get Green Card
To get Green Card for Fiancé of U.S. citizen, U.S. immigration law allows a U.S. citizen to petition for an alien fiancé to obtain a K-1 nonimmigrant visa to the United States and seek admission. Within 90 days of admission as K-1 nonimmigrant, the alien must enter into a bona fide marriage with the U.S. citizen who filed the Form I-129F, petition for Alien Fiancé, on his or her behalf. After that, the alien spouse can apply for lawful permanent resident status in the United States, finally get Green Card.
U.S. Visa Information for Foreign or Non-citizen Nurses
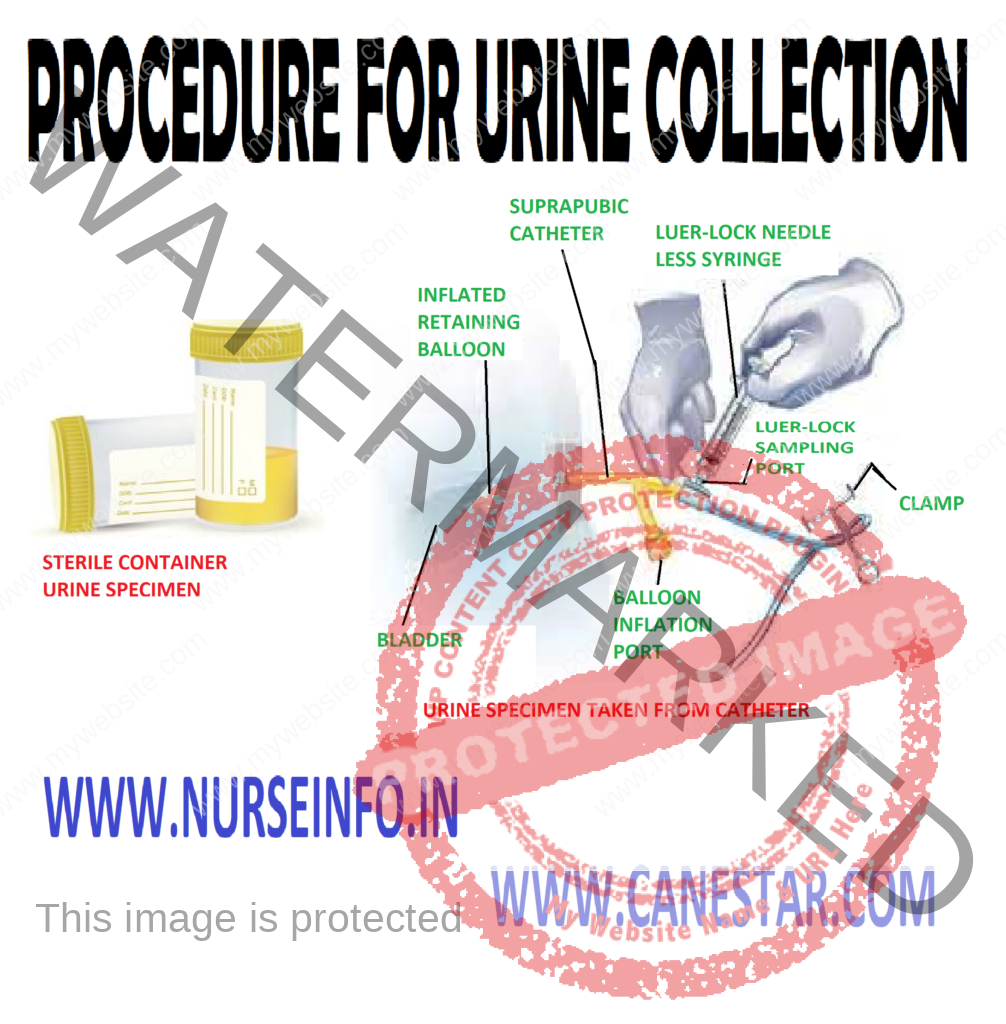
Collecting a urine specimen is a common medical procedure used for diagnostic testing and monitoring various health conditions.
PROCEDURE FOR URINE COLLECTION
Instruct patient to wash perineum
Instruct to avoid directly into
clean, dry container or into bedpan and then transfer
Instruct not be contaminate outside
of container
Instruct to collect 3/4th
of container
Wear gloves while handling urine
Urine Collects from Catheter
Clamp tubing for about 15 to 30
minutes before obtaining sample
Wash hands thoroughly
Disconnect bladder drainage tubing
Cover distal end of drainage tube
with sterile gauze till procedure is over
Clean tip of urinary catheter with
antiseptic
Release clamp and collect urine in
container
Remove gauze and discard in K-Basin
Reconnect tubing
Wear glove while handling urine
After Care
Clean the outer part of the container
Label the container
Send immediately to laboratory with laboratory request
Wash hands thoroughly
Record the procedure in nurse’s record sheet
24 Hours Urine Collection
Collection
of 24 hours urine specimen means the collection of all the time voided in 24
hours, without any spillage of wastage
Purpose
To detect kidney and cardiac
conditions
To measure total urine protein and
creatinine
To measure total urine electrolytes, ketogenic
steroid, oxalate, porphyrins, drugs and vitamins
Normal Characteristics of Urine
Volume: 1000-2000 ml excreted in 24 hours
Appearance – clear
Odor – aromatic color, if kept for some time, ammonia smell
Color – straw or amber in color
Reaction – acidic
Specific gravity – 1.010 to 1.020
Constituents of urine – 96 % water, 2% urea, and 2% uric acid. Urates, creatine chlorides, phosphates, sulfates and oxalates also may be present in minute’s quantities
Preliminary Assessment
Check
Doctor order for any specific
instructions
General condition and diagnosis of
the patient
Self care ability of the patient
Mental status to follow directions
Articles available in the unit
Preparation of the Patient and Environment
Explain the sequence of the procedure
Provide privacy
Keep the articles at the bedside
Obtain laboratory request and
container
Equipment
Bedpan or urinal
Dry container (24 hours collection
bottle)
Clean pouring (measuring) jar
Funnel
Procedure
Before beginning 24 hours urine
collection, patient is asked to void
Discard the sample and note the time
Document the starting time of urine
collection in the nurses record
Advise not to spill urine
All urine passed over next 24 hours
is collected in large container
Exactly 24 hours after, patient is
instructed to void and specimen is included
After Care
Send the sample immediately to the
laboratory with laboratory request
Replace the articles after cleaning
Record the procedure in the nurse’s
record sheet
General Instructions
The entire collected urine should be
stored in a covered container in a cool place
Add preservatives to the urine to
prevent decomposition and multiplication of bacteria, e.g. boric acid,
formalin, chloroform, etc
The urine should be thoroughly mixed
and all or part sent to the laboratory in a clean bottle
Requisition form must be duly filled
and signed
PROCEDURE FOR URINE COLLECTION – Purpose, Normal Characteristics of Urine, Urine Collects from Catheter , Preliminary Assessment, Preparation of the Patient and Environment, Equipment, Procedure, After Care, Instructions
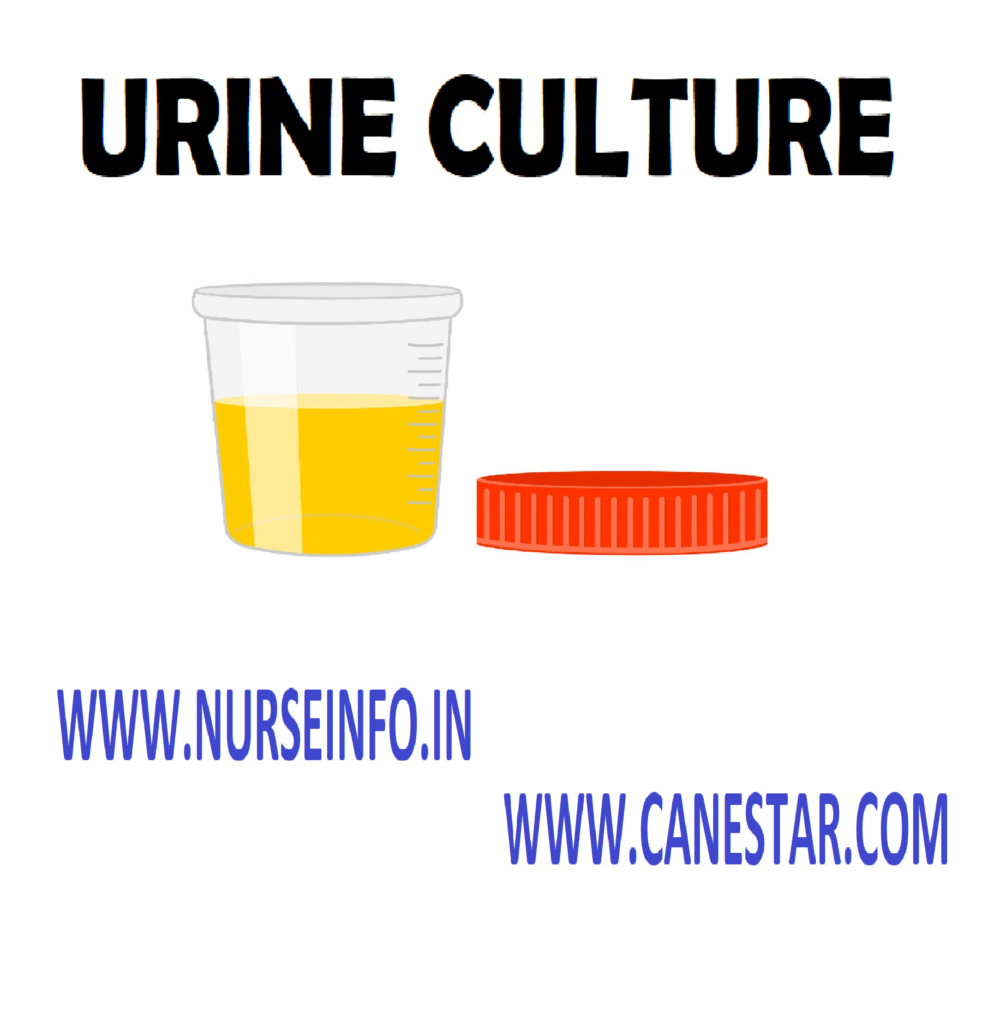
Collection of midstream specimen of urine without contaminating container and urine specimen. A urine culture is a laboratory test used to detect and identify the presence of bacteria or other microorganisms in a urine sample. It is commonly ordered when a urinary tract infection (UTI) is suspected or to monitor the effectiveness of treatment.
Purpose
To collect uncontaminated urine specimen
for culture and sensitivity test
To detect the microorganism causes
urinary tract infection (UTI)
To diagnose and treat with specific
antibiotic
General Instructions
Urine should be collected in sterile
containers
Urine specimens for culture should be
collected in the morning
After washing the perineal area and
drying collect a midstream specimen of urine in a sterile bottle
For bedridden patients cauterized
specimen of urine is taken
Preliminary Assessment
Check
The doctors order for specific
instruction
The general condition and diagnoses
of the patient
Self-care ability of the patient
Mental status to follow instructions
Articles available in the unit
Preparation of the Patient and Environment
Explain the procedure to the patient
Provide privacy
Arrange the articles at the bedside
Collect and arrange the culture
bottle – from the laboratory
Keep the laboratory request ready
Equipment
Basin and soap
Towel and sterile gloves
Gauze pads 2-3 (if present on strict
bed rest)
Sterile culture bottle
Laboratory request form
Sterile K-Basin
Procedure
Instruct patient to clean perineum
with soap and water
Open container and leave cover facing
inside up
Instruct patient to void into sterile
K-Basin. If patient is unable to get out of bed
Instruct patient to void directly
into sterile container
Collect 30-50 ml (1/2 – 3/4 of container) at mid-stream point of voiding
Emphasize first and last portions of
voiding to the discarded
Cap container securely without
touching inside of lid
After Care
Label container with patients name,
hospital number and date
Send container to laboratory
immediately with lab request
Record the procedure in nurse record
sheet and register in microbiology laboratory notebook
URINE CULTURE – Purpose, Instructions, Preliminary Assessment, Preparation of the Patient and Environment, Equipment, Procedure, After Care
Collecting a stool specimen is a common diagnostic procedure used to analyze fecal matter for various reasons, such as detecting infections, parasites, or gastrointestinal disorders.
Here’s a general guide on collecting a stool specimen:
Gathering Materials:
Use a clean, dry container with a tight-fitting lid. Healthcare providers often provide specific containers for stool collection.
Consider using disposable gloves to maintain hygiene during the collection process.
Timing:
Collect the stool sample as soon as possible after it is produced to ensure the accuracy of the results.
Avoid Contamination:
Make sure the stool does not come into contact with urine or toilet bowl water.
Some healthcare providers may recommend using a plastic wrap or disposable plastic container placed in the toilet bowl to catch the stool.
Collection:
Using a clean plastic or wooden spatula, tongue depressor, or a similar device, collect a small amount of stool (about the size of a walnut) from different areas of the stool sample.
Place the sample into the container, ensuring that it is well-sealed to prevent leakage and contamination.
Labeling:
Label the container with your name, date of collection, and any other information required by your healthcare provider.
Transport to the Laboratory:
Deliver the stool specimen to the laboratory as soon as possible after collection. Some tests may require the sample to be delivered within a specific timeframe.
Storage:
If immediate delivery is not possible, store the specimen in the refrigerator until you can transport it to the laboratory.
Special Instructions:
Some tests may require additional instructions, such as collecting multiple samples over consecutive days or following a specific diet before collection. Follow any guidelines provided by your healthcare provider.
Preservation Solutions:
In some cases, the healthcare provider may provide a preservative solution to mix with the stool sample. Follow the instructions for using any provided solutions.
Documentation:
Document any relevant symptoms or information that may aid in the interpretation of the test results.
STOOL-ROUTINE TEST AND CULTURE
Collection
of stool specimen for specific or routine tests (stool culture to detect
abnormal characteristics)
Purpose
To identify specific pathogens
To determine presence of blood, ova
and parasites
To determine presence of fat
To do gross examination of stool
characteristics such as color, consistency and color
Normal Characteristics of Feces
Color: light to dark brown
Odor: pungent smell
Frequency: 1-2 times per day
Quantity: 4-5 ounces per day
Composition: 30% water, shed epithelium from the intestine, a considerable quantity of bacteria and a small quantity of nitrogenous matter
Stool of infants: at birth, the stool of infants is dark green and it is called “meconium”
Abnormal Characteristics of Feces
Color
Tarry black stools – bleeding in the upper gastro-intestinal tract
Black color stool – melena, administration of iron or charcoal
Clay colored stool – obstruction to the flow of bile
White colored stool – presence of barium salts after barium tests
Odor
Melana and
dysentery – foul smell
Frequency
Diarrhea – increased frequency
Constipation – decreased in frequency
and low residue diet
Consistency and Form
Watery stools – diarrhea
Rice water stools – cholera
Pea soup stools – typical of typhoid
fever
Appearance
Fresh blood in large amounts –
bleeding piles
Blood and mucus stool – amoebic or
bacillary dysentery
Worm or segments or worms in stool –
parasitic cysts, ova or larvae
General Instructions
Fecal specimens are collected for
chemical bacteriological or parasitological analysis
Fecal specimens should be collected
in the early stages of disease preferably before antibiotic treatment is given
Stool specimens should be collected
in a sterile container (making use of the scoop provided in the container) with
a tight-fitting leak proof lid
After collection, the lid should be
immediately replaced tightly
After proper labeling, the collected
stool should be handed over to the laboratory without delay
Preliminary Assessment
Check
The doctors order for any specific
instructions
General condition and diagnosis of
the patient
Assess the self-care ability
Mental status to follow instructions
Articles available in the unit
Preparation of the Patient and Environment
Explain the procedure to the patient
Provide privacy
Arrange the articles at bedside
Obtain laboratory request and
container
Equipment
Appropriate specimen container
Spatula (clean for routine, sterile
for culture)
Bedpan or portable commode
Gloves
Waste paper
Procedure
Instruct patient to defecate into
clean dry bedpan or commode
Instruct not to contaminate specimen
with urine
Nurse to wear gloves while collecting
specimen
Collect stool specimen with clean
spatula for routine stool test and with sterile spatula into culture container
Cover the container tightly
After Care
Remove the gloves
Wrap spatula in waste paper and
discard appropriately
Label specimen container with name,
hospital number, and date
Send to laboratory immediately (fresh
specimen provides more accurate results)
Replace equipment and after cleaning
Record the procedure in nurse’s
record sheet
STOOL-ROUTINE TEST AND CULTURE – Purpose, Normal And Abnormal Characteristics of Feces, Instructions, Preliminary Assessment, Preparation of the Patient and Environment, Equipment, Procedure, After Care
Collecting a sputum specimen involves obtaining a sample of mucus and other respiratory secretions from the lower respiratory tract. This type of specimen is often used to diagnose respiratory infections, identify the presence of bacteria or fungi, and assess the effectiveness of treatment.
Here’s a general guide on collecting a sputum specimen:
Timing:
Collect the sputum sample in the morning, if possible, as the respiratory secretions are usually more concentrated at this time.
Patient Preparation:
Rinse your mouth with water to reduce contamination of the specimen with oral bacteria.
Take deep breaths to help bring up sputum from the lower respiratory tract.
Collection Technique:
Cough deeply to produce sputum from the lungs.
Spit the sputum directly into a sterile, screw-capped container provided by the healthcare facility.
If the sputum is difficult to produce, inhaling steam or using a nebulizer with a saline solution may help.
Avoid Contamination:
Minimize saliva contamination by making sure the sputum comes from the lungs, not the oral cavity.
Quantity:
Collect an adequate amount of sputum (usually about 5-10 mL) to ensure accurate testing.
Labeling:
Label the container with your name, date of collection, and any other information required by your healthcare provider.
Transport to the Laboratory:
Deliver the sputum specimen to the laboratory as soon as possible after collection.
If immediate delivery is not possible, store the specimen in the refrigerator to prevent bacterial overgrowth.
Documentation:
Document any relevant symptoms, such as coughing, shortness of breath, or fever, that may assist in the interpretation of test results.
Special Instructions:
Some tests may require additional instructions, such as collecting multiple samples over consecutive days or following specific treatment protocols. Follow any guidelines provided by your healthcare provider.
Preservation Solutions:
Your healthcare provider may provide a preservative solution to mix with the sputum sample. Follow the instructions for using any provided solutions.
SPUTUM CULTURE
Collection
of coughed out sputum for culture studies to identify respiratory pathogens
Purpose
To detect abnormalities
To diagnose disease condition
To detect the microorganisms causes
respiratory tract infections
To treat with specific antibiotics
Characteristics of Sputum
Quantity: normally, no sputum is expectorated the amount of sputum coughed up in 24 hours varies with the diseases
Consistency: the sputum may be classified into various types according to its consistency and appearances, e.g. serous, frothy, mucoid, purulent, seropurulent and hemorrhagic
Odor: normally the sputum is odorless in case of lung abscess; carcinoma and bronchiectasis the sputum will bed foul smelling
Color: sputum consists of mucus it may be:
Colorless and translucent
Yellowish color – presence of pus
Blackish sputum – excessive smoking
Blood – hemoptysis
Red and frothy sputum – freshly bleeding from lungs
Rusty color – altered hemoglobin as seen in pneumonia
Greenish color – bronchiectasis
Brown color – gangrenous condition of the lungs
If sputum examined microscopically, a
few WBC and epithelial cells may be seen. Eosinophils are found in such
conditions as asthma. RBC is found only when there is hemoptysis. The main
organism that is looked for in stained sputum is tubercle bacilli (AFB)
General Instructions
Give water proof disposal sputum mug
on the previous evening and instruct to raise the material from the lungs by
coughing and not the saliva
Collect the sputum in the morning
Ask the patient to rinse the mouth
with plain water. Do not use any antiseptic mouth washes
If sterile specimens are required
sterile bottle with cover is given to the patient
Preliminary Assessment
Check
The doctors order for specific
instructions
General condition and diagnosis of
the patient
Self-care ability
Mental status to follow instructions
Articles available in the unit
Preparation of the Patient and Environment
Explain the procedure to the patient
Arrange the articles at the bedside
Provide privacy if needed
Equipment
Sterile sputum container
Sputum mug or cup
Tissue paper
K-basin
Procedure
Instruct to collect specimen early
morning before brushing teeth, to obtain overnight accumulated secretions
Instruct to remove and place lid
facing upward
Instruct not to contaminate inside of
lid and container, as well as outside of container
Instruct to cough deeply and
expectorate directly into specimen container
Collect at least 10 ml of sputum
Close the container immediately
sputum is collected
After Care
Label the container with patients
name date and hospital number
Send specimen to laboratory
immediately along with request
Replace the equipment after cleaning
Wash hands thoroughly
Record the procedure in nurse’s
sheets
SPUTUM CULTURE – Purpose, Characteristics of Sputum, General Instructions, Preliminary Assessment, Preparation of the Patient and Environment, Equipment, Procedure, After Care
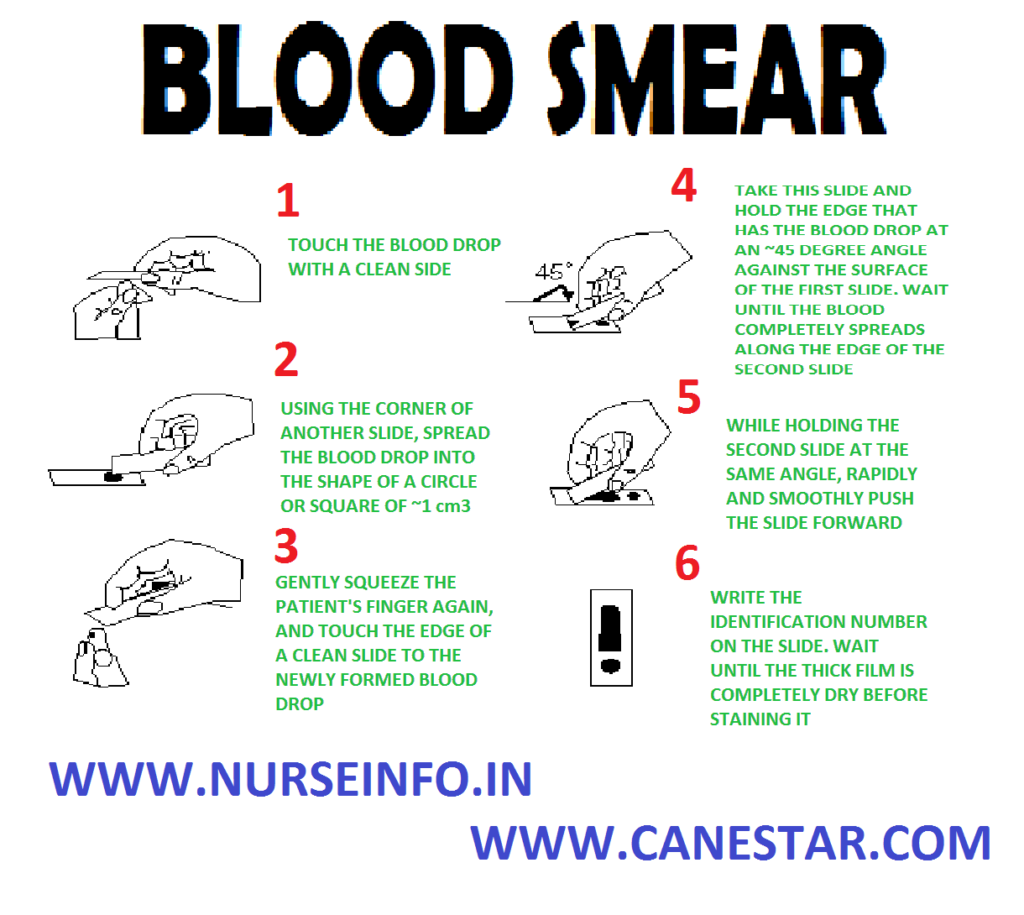
A blood smear, also known as a peripheral blood smear or peripheral blood film, is a diagnostic test used to examine the different types of blood cells under a microscope. It provides detailed information about the size, shape, and relative abundance of red blood cells, white blood cells, and platelets.
BLOOD SMEAR
It is a process
of taking two to three drops of blood by pricking the fingertip by using a
lancet. Thereby smearing the expressed drop of blood on the slide
Purpose
To diagnose blood-borne disease such
as filarial and malaria
To detect carcinogenic cells
To detect abnormal blood cell counts
General Instructions
The lancet (needle) used for
communicable disease, e.g. HIV. Patients discard after use
The slides should be clean and fresh
The procedure should do in an aseptic
manner
The person doing blood smear should
wear clean gloves
Preliminary Assessment
Check
Doctors order for specific
instructions
General condition and diagnosis
Mental status to follow instructions
Articles available in the unit
Preparation of the Patient and Environment
Explain the procedure to the patient
Provide privacy if needed
Arrange articles at bedside
Obtain request from the doctor
Obtain slide from the laboratory or
arrange technician from the laboratory
Make the patient to sit or lie in the
bed comfortable
Equipment
A clean tray
containing:
Clean slides – 2
Sterile needle in a container
(lancet)
Methylated spirit in a bottle
Paper bag
Cotton swab
Procedure
Wear clean gloves
Clean the patient’s fingertip with
spirit opposite side away from you
Press the fingertip and give a prick
with the sterile needle
Allow a drop of blood to fall on each
slide
Make the smear by taking one slide on
your left hand and another with the right hand
Make the smear with the edge of the
slide by spreading the blood. Make 2 or 3 slides
Provide spirit swab to apply gentle
pressure
Wrap the dry slide in the patient’s
record form and dispatch it to the laboratory as soon as possible
The second slide used for spreading
the blood films may now be used for the next patient and another clean slide
from the pack will be used as a spreader
After Care
Dry and send the slide to the
laboratory for examination
Replace the articles after cleaning
Remove the gloves
Wash hands thoroughly
Record the procedure in the nurse’s
record sheet
Blood Smear Collection Procedure
Holding the patient’s left hand, palm
upwards, select the third finger from the thumb. (the big toe can be used with
infants. The thumb should never be used for adults or children)
Puncture the ball of the finger with
a sterile lancet, using a quick rolling action. Apply gentle pressure to the
finger to express the first drop of blood and wipe it away with a dry piece of
cotton wool. Make sure that no strands of cotton remain on the finger to be
later mixed with the blood
Working quickly and handling clean
slides only by the edges, collect the blood as follows
Apply gentle pressure to the finger
and collect a single small drop of blood, about this size, on the middle of the
slide. This is for the thin film
Apply further pressure to express
more blood and collect two or three larger drops, about this size, on the
slide, about 1 cm from the drop intended for the thin film (see illustration).
Wipe the remaining blood away from the finger with a piece of cotton wool
Thin film. Using a second clean slide
as a “spreader” and, with the slide with the blood drops resting on a flat,
firm surface, touch the small drop with the spreader and allow the blood to run
along its edge. Firmly push the spreader along the slide, keeping the spreader
at an angle of 45 degree. Make sure that the spreader; is in even contact with
the surface of the slide all the time the blood is being spread
Thick film. Always handle slides by the
edges or by a corner to make the thick film as follows. Using the corner of the
spreader, quickly join the drops of blood and spread them to make an even,
thick film. The blood stirred but can be spread in circular or rectangular form
with 3 to 6 movements. The circular thick film should be about 1 cm (inch) in
diameter
Label the dry thin film with a soft
lead pencil by writing across the thicker portion of the film the patient’s
name or number and the date. Do not use a ballpoint pen for labeling the slide.
Allow the thick film to dry with the slide in a flat, level position, protected
from flies, dust and extreme heat
BLOOD SMEAR – Purpose, Instructions, Preliminary Assessment, Preparation of the Patient and Environment, Equipment, Procedure, After Care, Blood Smear Collection Procedure
A blood culture is a diagnostic test performed to detect the presence of bacteria, fungi, or other microorganisms in the bloodstream. It is a crucial tool in diagnosing bloodstream infections (bacteremia or fungemia), sepsis, and other systemic infections.
BLOOD CULTURE
Collection
of blood for blood culture is a sterile procedure. Surgical (scrub) preparation
and techniques are used in collection, storage, transport of blood sample
Purpose
To detect the microorganisms
To treat the disease condition with
correct antibiotics
To detect the right antibiotic to
kill the particular microorganism
When the patient has chills or a
temperature hike
General Instructions
Special type of culture bottles are
used for blood culture sample collection
All blood culture bottles should be
carefully examined for clarity of media, any medium showing turbidity should
not be used
Only disposable syringes and needles
should be used for collection of blood
The top of the bottle must be
carefully disinfected (with 70% alcohol) just before the bottle is inoculated
Blood should never be taken from an
IV line or above the IV line
If blood culture bottles are
available, blood should be immediately added to the culture medium (broth)
If blood culture bottles are not
available blood may be transported in a sterile tube containing a sterile
anticoagulant solution
The amount of blood collected is 10
ml for adult, 2-5 ml for children and 1-2 ml for infants and neonates
Blood for culture should be taken
before antibiotics are administered
Preliminary Assessment
Check
The doctors order for specific
instructions
General condition and diagnosis of
the patient
Mental status to follow instruction
Self-care ability of the patient
Articles available in the unit such
as culture bottles, etc
Preparation of the Patient and Environment
Explain the procedure to the patient
Arrange the articles at the bedside
Obtain laboratory request and culture
bottles
Arrange extra help (if needed any)
Label and number the container in
order wise
Equipment
Mackintosh and towel
Surgical gloves
Surgical dressing packs to clean the
skin over the vein
Surgical spirit and betadine solution
Disposable syringe 10 ml with needles
Culture bottles – 3
Cotton swabs
Paper bag and K-basin
Tourniquet
Blood Sample Collection for Culture
The area of blood culture sample is
cleaned with anti-microbial agent
Tourniquet applied for bleed sample
collection and needle inserted
Blood culture sample collected in
aseptic technique
Blood culture sample placed in the
culture bottle
Procedure
Choose the vein to be drawn by
touching the skin before it has been disinfected
Cleanse the skin over the
venipuncture site in a circle approximately 5 cm in diameter with 70 % alcohol,
rubbing vigorously
Starting in the center of the circle,
apply 2% iodine (or povidone iodine)
Allow the iodine to remain on the
skin for at least 1 minute
Insert the needle into the vein and
withdraw blood
After the needle has been removed,
the site should be cleaned with 70% alcohol again
Apply gentle pressure with cotton
ball over the punctured site
Transfer the blood in the syringe in
to the culture bottles
After Care
Clean the culture bottle led with
spirit swab
Insert the needle and pour blood into
culture bottle
Mix the solution and blood gently by
moving sideways
Label the culture bottles and send
immediately to the laboratories
Replace the articles after cleaning
Remove the gloves and wash hands
thoroughly
Record the procedure in the nurse’s
record sheet
BLOOD CULTURE – Purpose, Instructions, Preliminary Assessment, Preparation of the Patient and Environment, Equipment, Blood Sample Collection for Culture, Procedure, After Care
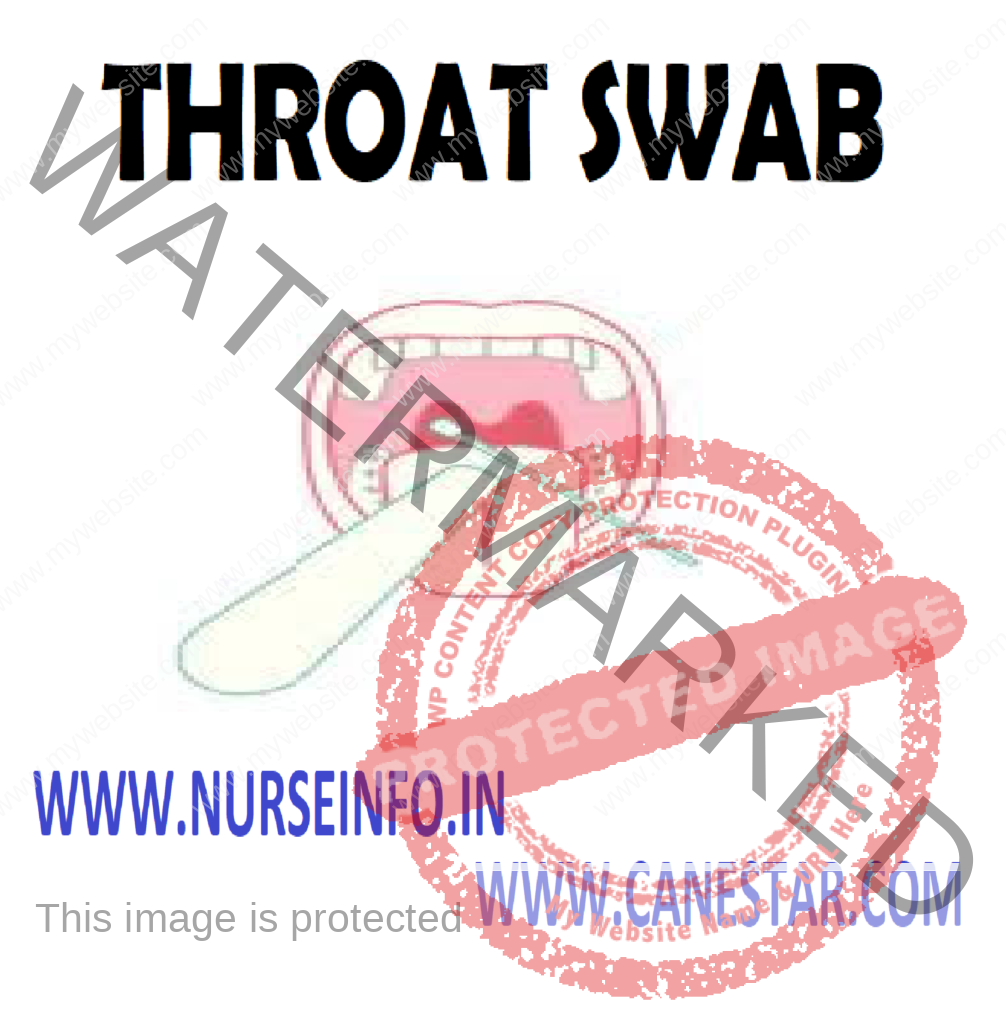
A throat swab, also known as a pharyngeal swab, is a common diagnostic test used to collect samples from the back of the throat for microbiological analysis. This procedure is often performed to identify the presence of bacteria or viruses causing throat infections, such as streptococcal bacteria (Streptococcus pyogenes) or respiratory viruses.
THROAT SWAB
The specimen
is collected from the patients with upper respiratory tract infection. The
upper respiratory tract can be the site of several types of infection
Purpose
To detect the causative microorganism
To diagnose the disease condition
To detect the correct antibiotics for
effective treatment
Indications
Pharyngitis sometimes involving
tonsillitis and giving rise to a “sore throat”
Nasopharyngitis
Otitis media
Sinusitis
Epiglottis
General Instructions
Pharyngitis is by far the most
frequent one most cases of pharyngitis have a viral etiology and follow a
self-limiting course
Approximately 20% are caused by bacteria and usually require
treatment with appropriate antibiotics
Specimen should be collect by a
physician or other trained personnel
Swab can be collected after asking
the patient to gargle with sterile saline
Preliminary Assessment
Check
The doctors order for any specific
instructions
General condition and diagnosis
Mental status to follow instructions
Self-care ability of the patient
Articles available in the unit
Preparation of the Patient and Environment
Explain the procedure to the patient
Arrange the articles at the bedside
Provide privacy if needed
Obtain laboratory request and
specimen container
Place the patient comfortably in
sitting or semi-sitting position
Equipment
Sterile or clean gloves
Specimen container
Gauze pieces
Paper bag and K-basin
Torch light (if needed)
Tongue depressor
Procedure
The patient should sit in from of a
light source
Tongue should be kept down with a
tongue depressor and a cotton wool swab is rubber vigorously over each tonsil,
over the back wall of the pharynx and over any other inflamed area
Care should be taken not to touch the
tongue or buccal surfaces
It is preferable to take 2 swabs from
the same area
One can be used to prepare a smear,
while the other is placed into glass or plastic sterile container
After Care
Label and send the container
immediately to the laboratory
Discard the disposable items used
Replace the articles after cleaning
Wash hands thoroughly
Record the procedure in the nurse’s
record sheet
THROAT SWAB – Purpose, Indications, Instructions, Preliminary Assessment, Preparation of the Patient and Environment, Equipment, Procedure, After Care