A blood smear, also known as a peripheral blood smear or peripheral blood film, is a diagnostic test used to examine the different types of blood cells under a microscope. It provides detailed information about the size, shape, and relative abundance of red blood cells, white blood cells, and platelets.
BLOOD SMEAR
It is a process of taking two to three drops of blood by pricking the fingertip by using a lancet. Thereby smearing the expressed drop of blood on the slide
Purpose
- To diagnose blood-borne disease such as filarial and malaria
- To detect carcinogenic cells
- To detect abnormal blood cell counts
General Instructions
- The lancet (needle) used for communicable disease, e.g. HIV. Patients discard after use
- The slides should be clean and fresh
- The procedure should do in an aseptic manner
- The person doing blood smear should wear clean gloves
Preliminary Assessment
Check
- Doctors order for specific instructions
- General condition and diagnosis
- Mental status to follow instructions
- Articles available in the unit
Preparation of the Patient and Environment
- Explain the procedure to the patient
- Provide privacy if needed
- Arrange articles at bedside
- Obtain request from the doctor
- Obtain slide from the laboratory or arrange technician from the laboratory
- Make the patient to sit or lie in the bed comfortable
Equipment
A clean tray containing:
- Clean slides – 2
- Sterile needle in a container (lancet)
- Methylated spirit in a bottle
- Paper bag
- Cotton swab
Procedure
- Wear clean gloves
- Clean the patient’s fingertip with spirit opposite side away from you
- Press the fingertip and give a prick with the sterile needle
- Allow a drop of blood to fall on each slide
- Make the smear by taking one slide on your left hand and another with the right hand
- Make the smear with the edge of the slide by spreading the blood. Make 2 or 3 slides
- Provide spirit swab to apply gentle pressure
- Wrap the dry slide in the patient’s record form and dispatch it to the laboratory as soon as possible
- The second slide used for spreading the blood films may now be used for the next patient and another clean slide from the pack will be used as a spreader
After Care
- Dry and send the slide to the laboratory for examination
- Replace the articles after cleaning
- Remove the gloves
- Wash hands thoroughly
- Record the procedure in the nurse’s record sheet
Blood Smear Collection Procedure
- Holding the patient’s left hand, palm upwards, select the third finger from the thumb. (the big toe can be used with infants. The thumb should never be used for adults or children)
- Puncture the ball of the finger with a sterile lancet, using a quick rolling action. Apply gentle pressure to the finger to express the first drop of blood and wipe it away with a dry piece of cotton wool. Make sure that no strands of cotton remain on the finger to be later mixed with the blood
- Working quickly and handling clean slides only by the edges, collect the blood as follows
- Apply gentle pressure to the finger and collect a single small drop of blood, about this size, on the middle of the slide. This is for the thin film
- Apply further pressure to express more blood and collect two or three larger drops, about this size, on the slide, about 1 cm from the drop intended for the thin film (see illustration). Wipe the remaining blood away from the finger with a piece of cotton wool
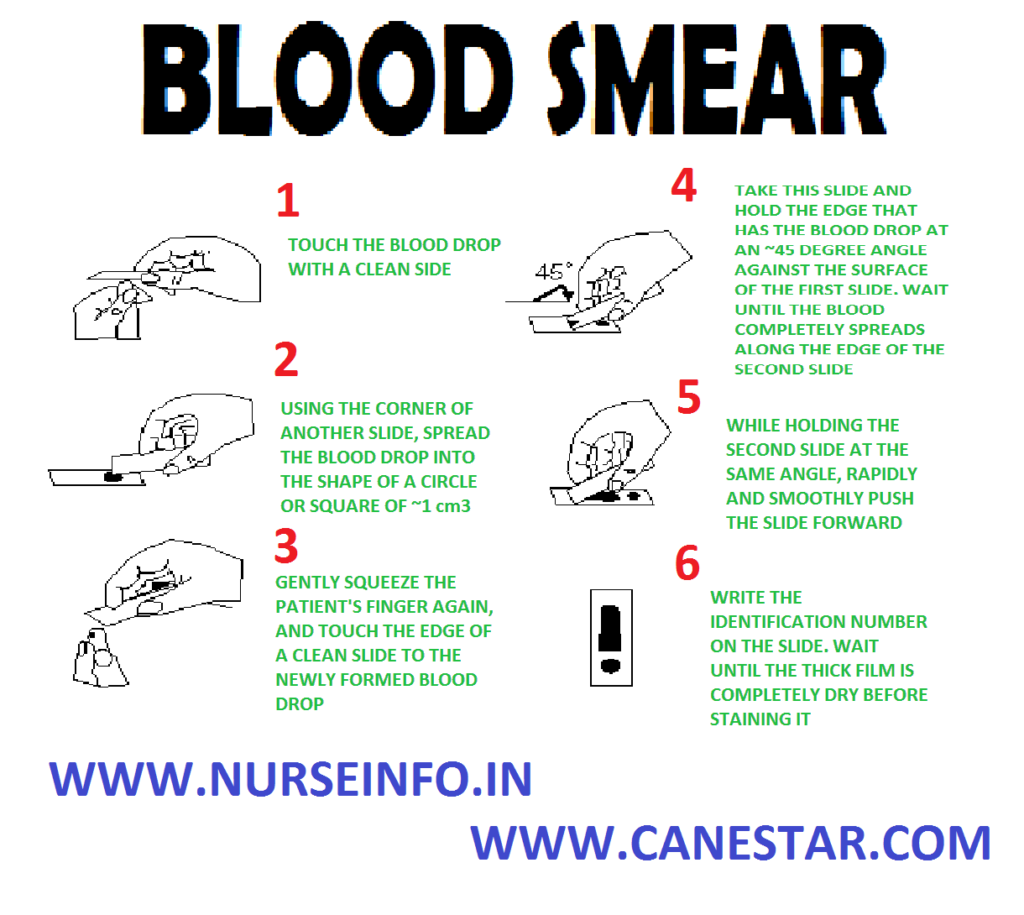
- Thin film. Using a second clean slide as a “spreader” and, with the slide with the blood drops resting on a flat, firm surface, touch the small drop with the spreader and allow the blood to run along its edge. Firmly push the spreader along the slide, keeping the spreader at an angle of 45 degree. Make sure that the spreader; is in even contact with the surface of the slide all the time the blood is being spread
- Thick film. Always handle slides by the edges or by a corner to make the thick film as follows. Using the corner of the spreader, quickly join the drops of blood and spread them to make an even, thick film. The blood stirred but can be spread in circular or rectangular form with 3 to 6 movements. The circular thick film should be about 1 cm (inch) in diameter
- Label the dry thin film with a soft lead pencil by writing across the thicker portion of the film the patient’s name or number and the date. Do not use a ballpoint pen for labeling the slide. Allow the thick film to dry with the slide in a flat, level position, protected from flies, dust and extreme heat