The temperature is sometimes taken by axilla when it cannot be taken by mouth or contraindicated to check oral temperature. Measuring axillary (underarm) temperature is another common method to assess body temperature, especially in infants, young children, or individuals who cannot easily use other methods.
Purpose
To determine the body temperature of
the patient
To aid in making diagnosis
General Instructions
Position the patient with the axilla
exposed
Gently pat the axilla dry with a
facial tissue because moisture conducts heat. Avoid harsh rubbing, which
generates heat
Ask the patient to reach across his
chest and grasp his opposite shoulder and to lower his elbow and hold it
against his chest. This promotes skin contact with the thermometer
Remove a mercury thermometer after 10
minutes; remove an electronic thermometer when it displays the maximum temperature.
Axillary temperature takes longer to register than oral or rectal temperature
because the thermometer is not closed in a body cavity
Grasp the end of the thermometer and
remove it from the axilla
Preliminary Assessment
Determine the need to measure
client’s body temperature
Assemble equipment
Identify the patient, greet the
patient and explain the procedure
Place the client in comfortable
position, assess site most appropriate for temperature measurement
Wait 20 to 30 minutes before
measuring oral temperature if client has ingested hot or cold liquid or foods
Hold the color coded end or system
glass thermometer with finger tips
If thermometer stored in disinfectant
solution, rinse in cold water before using
Take swab and wipe thermometer bulb end
towards fingers in rotating fashion. Dispose of tissue
Read mercury level while holding
thermometer horizontally and gently rotating at eye level. If mercury is above desired
level, grasp at the tip of thermometer securely and sharply flick wrist downward.
Continue shaking until reading is below 35.5 degree celcius
Equipment
Oral clinical thermometer
Swab in a container
Kidney basin or thermometer container
Blue pen
Watch with second hand
Graphic TPR chart
Paper bag
Procedure
Dry the axilla
Insert thermometer into center of
axilla, low arm over thermometer, and place arm across client’s chest.
Leave the thermometer in place for
three minutes
Remove the thermometer from the
axilla
Wipe the thermometer using a spirit
swab from stem to bulb use a firm twisting motion
After Care
Discard the used swab into the paper
bag
Read the thermometer holding it
horizontally at the eye level, rotate it until the mercury column is seen
Place thermometer in the kidney basin
Record the temperature on the chart
using blue pen and mention axillary
Wash hands
Report any unusual variations to the
charge nurse
Recording and reporting
Record temperature on vital sign flow sheet’s or nurse’s notes. Also record any signs or symptoms of temperature alterations.
AXILLARY TEMPERATURE – Purpose, Instructions, Assessment, Equipment, Procedure, After care
Rectal temperature measurement is a technique used to measure body temperature by placing a thermometer in the rectum. Measuring rectal temperature is a common method, especially for infants and young children, as it is considered one of the most accurate ways to assess core body temperature.
Purpose
To determine body temperature mainly
for infants, young children, adult unconscious patients and postoperative
patients
To aid in making diagnosis
Indication
Unconscious patients
Neonates
Malignant – hyperthermia
General Instructions
Position the patient on his side with
his top leg flexed and drape him to provide privacy. Then fold back the bed
linens to expose the anus
Squeeze the lubricant onto a facial
tissue to prevent contamination of the lubricant supply
Lubricate about half inches of the
thermometer tip for an infant, one inch for a child or about for an adult. Lubrication
reduces friction and thus eases insertion. This step may be unnecessary when
using disposable rectal sheaths because they reprelubricated
Lift the patient’s upper buttock, and
insert the thermometer about 1.3 cm for an infant 3.8 cm for an adult. Gently direct
the thermometer along the rectal wall towards the umbilicus. This will avoid
perforating the anus or rectum or breaking the thermometer. It will also help
ensure an accurate reading because the thermometer will register hemorrhoid
artery temperature instead of fecal temperature.
Hold the mercury thermometer in place
for 2 to 3 minutes or the electronic thermometer until the maximum temperature
is displayed. Holding the thermometer prevents damage to rectal tissues caused
by displacement or loss of the thermometer, wiping it as necessary. Then wipe
the patient’s anal area to remove any lubricant or feces.
Preliminary Assessment
Determine the need to measure client’s
body temperature
Assemble equipment
Identify the patient, greet the
patient and explain the procedure
Place the client in comfortable
position, assess site most appropriate for temperature measurement
Wait 20 to 30 minutes before
measuring oral temperature if client has indigested hot or cold liquid or foods
Hold the color coded end or system
glass thermometer with fingertips
If thermometer stored in disinfectant
solution, rinse in cold water before using
Take swab and wipe thermometer bulb
end towards fingers in rotating fashion. Dispose off tissue
Read mercury level while holding
thermometer horizontally and gently rotating at eye level. If mercury is above
desired level, grasp at the tip of thermometer securely and sharply flick wrist
downward. Continue shaking until reading is below 35.5 degree Celsius.
Equipment
Oral clinical thermometer
Swab in a container
Kidney basin or thermometer container
Blue pen
Watch with second hand
Graphic TPR chart
Paper bag
Procedure
Draw curtain around client’s bed or
close room door. Assist client to sims position with upper leg flexed. Move
aside bed linen to expose only anal area
Squeeze liberal portion of lubricant
on tissue. Dip thermometer’s bulb end into lubricant, covering 2.5 to 3.5 cm (1
to 1.5 inches) for adult or 1.2 to 2.5 cm (0.5 to 1.5 inch) for infant
With non-dominant hand, separate
client’s buttocks to expose anus. Ask client to breathe slowly and relax
Gently insert thermometer into anus
in direction of umbilicus. Insert 1.2 cm (0.5 inch) for infant and 3.5 cm (1.5
inches) for adult. Do not force thermometer
If resistance is felt during
insertion withdraw thermometer immediately
Hold thermometer in place for 2 minutes
or according to agency policy
Carefully remove thermometer and wipe
off secretions with tissue. Wipe in rotating fashion from fingers towards bulb.
Dispose the tissue
Read thermometer at eye level rotate
until scale appears
Wipe client’s anal area to remove
lubricant or feces and discard tissue. Help client return to comfortable
position
After Care
Wipe secretions from thermometer with
soft tissue. Wipe in rotating fashion from fingers towards bulb. Dispose of
tissue
Wash thermometer in lukewarm water,
rinse in cold water, dry and replace in container
Record the temperature on the chart
Wash hands
Report any unusual variation to the
charge nurse
Contraindication
Injury, inflammation and surgeries of
rectum
Fecal impaction
Chronic diarrhea
Patients requiring bowel wash/enema
RECTAL TEMPERATURE – Purpose, Indications, Instructions, Equipment, Procedure, Contradictions
Pulse is the
wave of expansion and recoil occurring in an artery is response to the pumping
action of the heart
Pulse is the
heart beat, conveniently felt at the wrist and at any point where an artery
passes superficially over the bone
Pulse is
defined ad checking rate, rhythm and volume of throbbing of an artery against
abony prominence
Purpose
To determine number of heart beats
acquiring per minutes create
To evaluate amplitude (strength) of
pulse
To assess the vascular status of
limbs
To assess response of heart to
cardiac medications, activity, blood volume and gas exchange
To asses heart ability to deliver
blood to distant area of the body
To obtain information about heart
rhythm and patterns of beat
Normal Rate
Newborn – 140 beats/minute
Infant – 120 beats/minute
2-3 year – 100 beats/minute
5-10 year – 90 beats/minute
Adults – 70-80 beats/minute (average
72 per minute)
Old age – may be slower
Extremely old age – may be more rapid
Sites of Taking Pulse
Radial artery – in front of the wrist
Brachial artery – above the elbow
Carotid artery – sides of the neck
Temporal artery – over the temporal
bone
Facial artery – above the lower jaw
Femoral artery – in the groin
Tibial artery – behind the medical
Milhous
Dorsalis pedis artery – on the foot
Factors Affect the Pulse
Age: very old have slow pulse rate
and children will have faster beat
Sex: it is slower in men than in
women
Stature: it is slower in tall people
than in short people
Position: the pulse rate is slower
than at rest or asleep than in standing position
Emotions: anger or excitement
increases the pulse rate temporarily
Exercise: it is much faster during
exercise
Common Sites for Checking Pulse
Radial
Location: inner aspect of the waist on thumb side
Reasons for use: easily accessible
Temporal
Location: site superior (above) and lateral to (away from the midline)
the eye
Reasons for use: it’s used when radial pulse is not accessible. Easily
accessible pulse in children
Carotid
Location: at the side of the trachea where the carotid artery runs
between the trachea and the sternocleidomastoid muscle
Reasons for use: to assess cerebral perfusion
Apical
Location: left side of the chest in the fourth, fifth or sixth
intercostals space in the midclavicular line
Reasons for use: used to find out discrepancies with radial pulse
Brachial
Location: medially in the antecubital space
Reasons for use: used to monitor blood pressure and assess for lower arm
circulation
Femoral
Location: below inguinal ligament, midway between symphysis pubis and
anterosuperior iliac space
Reasons for use: to assess circulation to lower hip
Popliteal
Location: medial or lateral to the popliteal fossa with knees slightly
flexed
Reasons for use: used to determine circulation to the leg. To take blood
pressure in the lower limb
Posterior tibial
Location: on the medial surface of the ankle behind the medial malleolus
Reasons for use: to assess circulation to the foot
Dorsalis pedis
Location: along dorsum of foot between extensor tendons of great and
first toe
Reasons for use: to assess circulation to the foot
Ulnar pulse
Location: on the little finger side, outer aspect of the wrist
Reasons for use: to assess circulation to ulnar side of hand. To perform
Allen’s test
Characteristics of Pulse
Rate: number of beats/minute,
corresponds with age (above 100 tachycardia, below 60 – bradycardia)
Rhythm: it is the regularity of
beats. The distance between beats (regular)
Volume: it is the fullness of artery.
It is the force of blood felt at each beat (full/large/small)
Tension: it is the degree of
compressibility (high/low)
Abnormal Pulse
Rate: tachycardia: pulse rate more than 100 beats/minute. It commonly found in patients with fevers. Thyotoxicosis, organic heart diseases, nervous disorders and intake of drugs like belladorma and alcoholism cause tachycardia
Bradycardia: pulse rate less than 60 beats per minute. Caused by opium poisoning heart muscle disorder, cerebral tumors and myxedema
Abnormal volume causes pulsus alternans, full bounding pulse and feeble pulse
Dicrotic pulse: there is a one heart and two arterial pulsations giving the sensation of a double beat, it is due to flabby weak arterial pulse
Water hammer pulse or Corrigan’s pulse: it is a full volume pulse. This type of pulse found in aortic regurgitation. When the blood is forced into the artery, then leaks back into the ventricle due to the nonclosure of the aortic valve
General Instruction for Taking Pulse
Count the pulse for one full minute.
Especially when there is irregularity
Observe rate, rhythm, volume and
tension of pulse
Pulse should not be taken immediately
after exercise, in emotional stress or after a painful treatment
Record pulse immediately
Choose suitable site for taking pulse
Nurse to be aware if patient is on
any medication that can interfere with heart rate
To check pulse after 10-15 minutes,
after strenuous physical exercise
Notify physician if pulse rate is
below <60/mt or above >100/mt, normal and abnormal patterns (missing beats).
Record in TPR record
Equipment
Watch with second hand
Red pen
TPR sheet
Procedure
Wash hands
If supine, place client’s forearm
across lower chest with wrist extended straight. If sitting, bend client’s
elbow 90 degrees and support lower arm on chains or on nurse’s arm. Slightly
extend wrist with palm down
Place tips of the first two or middle
three fingers of dominant hand over groove along radial or thumb side of client
Lightly compress against radius obliterates
pulse initially, and then releases pressure so pulse becomes easily palpable
When pulse is easily palpable, look
at watch’s second hand and begin to count rate: when sweep hand hits number on
dial, start counting with zero, then one two and so on
If pulse is regular count rate for 30
seconds and multiply total by 2
If pulse is irregular count for full
minute
Assess regularity and frequency of
any dysarrhythmia
Determine strength of pulse. Note
whether thrust of vessel against fingertips is bounding, strong weak or thread
Assist client in returning to
comfortable position
After Care
Wash hands
If pulse is assessed for first time establish
as baseline
Assess pulse again by having another
nurse conduct measurement, if pulse character is abnormal or irregular
Record characteristic of pulse in
nursing progress sheet or vital sign flow sheet. Also record any accompanying
signs and symptoms of pulse alternations
Report abnormal findings to the nurse
in charge or physician
PULSE – Purpose, Normal rates, Common Sites, Characteristics, General Instructions, Equipment, Procedure, After care
Respiration
monitoring is an involuntary process of inspiration (inhalation), expiration
(exhalation) in a patient
Respiration
is the act of breathing in and breathing out. It includes inspiration and
expiration. The exchange of gases between the blood and lungs is called
external or pulmonary respiration. The exchange of gases between the blood and
cell is called internal respiration
Respiration
is the act of breathing. It includes the intake of oxygen and the amount of
carbon dioxide, i.e. respiration consists of inspiration and expiration
Purpose
To determine the respiratory status
of the patient
To determine number of respiration
occurring per minute
To gather information about rhythm
and depth
To assess response of patient to any
related therapy/medication
Types of Respiration
External respiration: the exchange of gases between the blood and the air in the lungs is called as external or pulmonary respiration
Internal respiration: the exchange of gases between the blood and the tissue cells is called as internal or tissue respiration
Regulation of respiration: it is a rhythmical movement’s respiration is regulated by respiratory center in the brain called medulla oblongata, nerve fibers of the autonomic nervous system and the chemical composition of the blood
Normal Rates
At birth 30 to 40 breaths/minute
One year 26 to 30 breaths/minute
2 to 5 years 20 to 26 breaths/minute
Adolescence 20 breaths/minute
Adults 16 to 20 breaths/minute
Old age 10 to 24 breaths/minute
Characteristics of commonly Observed Respiratory Patterns
Factors Influences Respiration
Sex: female has slightly rapid respiration than the male
Exercise: exercise of any type increase the metabolic rate and stimulate respiration
Rest and sleep: during rest and sleep metabolism is decreased so respiration rate is normal or decreased
Emotions: sudden stressful condition such as fear and anxiety influences the respiratory rate
Changes in atmospheric pressure: in high altitudes, the content of oxygen in the atmosphere is very low. So rate of respiration is increased and the increased demand of oxygen is fulfilled
Characteristics of Respiration
Normal breathing is effortless
It is painless, quiet and automatic
Normal respiration consists of
rhythmical rising and falling of the chest wall
Respiratory rate is resting adult is
16 to 18 breaths/minute
Eupnea – it is regular, even and
produces no noise.
Range of Respiratory Rates
Group – age – breaths/min
Newborn to 6 weeks – newborn to weeks
– 30-60
Infant – 6 weeks to 6 months – 25-40
Toddler – 1 to 3 years – 20-30
Young children – 3 to 6 years – 20-25
Older children – 10-14 years – 15 -20
Adults – adults – 12-20
Abnormal Respirations
Normal respiration: 16-20 per minute, regular rhythm, ratio of respiration and pulse rate is 1:4
Hyperventilation or Kussmaul’s breathing: increased in depth and rate hyperpnea – increases (↑) in depth only
Periodic respiration: alternating hypernea, shallow respiration and apnea – some time called Cheyne-Strokes respiration frequently occur in severely ill
Sighing respiration: deep and audible; audible portion sounds like a sign
Air trapping: present in obstructive pulmonary disease – air is trapped in the lungs; respiration rate rise and breathing becomes shallow
Biot’s respiration: shallow breathing – interrupted by apnea found in CNS disorders and sometimes in healthy persons
Strider respiration: it is noisy shrill and vibrating respiration. It is due to obstruction in the upper airway. It is commonly seen in laryngitis and foreign body in the respiratory tract
Wheezing: expiration is difficult and louder. It is due to partial obstruction of the smaller bronchi and bronchioles. It is seen in asthma and emphysema
Apnea: this is a temporary cessation of breathing due to excessive oxygen and lack of carbon dioxide
Dyspnea: this is forced, difficult or labored breathing. It may be accompanied by pain and cyanosis; it is seen in heart diseases, respiratory diseases, convulsions, etc
Orthopnea: the patient can breathe only in upright position. Commonly found in congestive cardiac failure
Cheyne-Stokes respiration: this is respiration which gradually increases in rate and volume until it reaches a climax. Then slowly pause occurs and breathing stops for 5 to 30 seconds and then cycle begins again. It is a periodic breathing usually found in the patients who are near death
Asphyxia: It is a state of suffocation when the lungs do not get a sufficient supply of fresh air to the vital organs and they are deprived of oxygen
Cyanosis: it is the blueness or discoloration of the skin and mucous membrane due to lack of oxygen in the tissues
Rale: an abnormal rattling or bubbling sound caused by the mucus in the air passages in seen in the bronchitis of pneumonia
Kussmaul’s respiration: respiration is abnormally deep but regular, rate is increased. It is seen in diabetic ketoacidosis
Blot’s respiration: it is shallow breathing interrupted by irregular periods of apnea, seen in central nervous system disorders
General Instruction
Patient to be unaware of the nurse
counting respiration
Inform to physician in case of
bradypnea, tachypnea or other abnormal respiratory patterns noticed
Maintain half hourly checking of
respiration and pulse when indicated
Preliminary Assessment
Determine the need to assess client’s
respiration
If client has been active, wait 5 or
10 minutes before assessing respiration
Assess respirations as first vital
sign in infant or child
Assess respiration after pulse
measurement in adult
Be sure client is in a comfortable
position, preferably sitting
Be sure client’s chest movement is
visible. If necessary remove bed lines or gown
Equipment
Wrist watch with second hand or
digital display
Pen and flow sheet or record form
TPR chart
Procedure
Place client’s arm in a relaxed
position across the abdomen or lower chest
Observe complete respiratory cycle
(one inspiration and one expiration)
After cycle is observed, look at
watch’s second hand and begin to count rate, when sweep hand hits number on
dial, begins time frame, counting one with first full respiratory cycle. If
rhythm is regular in adult, count number of respirations in 30 seconds and
multiply by 2. In infant or young child count respirations for full minute. If
adult has irregular rhythm or abnormality slow or fast rate, count for one full
minute.
Note depth of respirations. This can
be assessed subjectively by observing degree of chest wall movement while
counting rate
Note rhythm of ventilatory cycle.
Normal breathing is regular and uninterrupted. Infants breathe less regularly.
Young child may breathe slowly and then suddenly breath fastens
Replace client’s gown and covers
Normal Breath Sounds Types
Vesicular Sound
Description: soft, low pitched gentle sighing
Location: over bronchioles and alveoli best heard at base of lungs
Characteristics: best heard on inspiration
Bronchial Sound
Description: moderately high pitched harsh
Location: over trachea, not normally heard over lung tissue
Characteristics: best heard on expiration
Bronchovesicular Sound
Description: moderate intensity
Location: over bronchioles lateral to the sternum at the first and second intercostals spaces and between the scapulae
Adventitious Breath Sounds
Rales Sound
Description: fine cracking sounds, alveolar rales are high pitched, bronchial rales are lower pitched
Characteristics: best heard on inspiration
Rhonchi Sound
Description: course gurgling, harsh, louder sounds as air passes through bronchi filled with fluid
Characteristics: best beard on expiration
Wheeze Sound
Description: squeaky musical sounds often indicative of bronchial constriction
Characteristics: best heard on expiration
Friction
Description: rubbing of the pulmonary and visceral pleura, grating sound
Characteristics: best heard over the lower anterior and lateral chest
After Care
Wash hands
Compare client’s respirations with
previous baseline and normal respiratory rate for age groups
Record any accompanying signs and
symptoms of respiratory alternations in nurse’s notes or flow sheet
RESPIRATION – Purpose, Types, Normal rates, Characteristics, Abnormal Respirations, General Instructions, Assessments, Equipment, Procedure, Breath Sound Types, After care
Blood pressure is the pressure blood exerts against the walls of the vessels in which it is contained.
Blood pressure may be defined as the force exerted by blood against the walls of the vessels in which it is contained. Differences in blood pressure between different areas of the circulation provide the driving force that keeps the blood moving through the body
Purpose
To obtain baseline date for diagnosis
and treatment
To compare with subsequent changes
that may occur during care of patient
To assist in evaluating status of
patients blood volume. Cardiac output and vascular system
To evaluate patients response to change
in physical condition as a result of treatment with fluids or medications
Indications
To determine baseline, blood pressure
recording and monitor fluctuation
To aid in the diagnostic disease
To aid in the assessment of
cardiovascular system
Type of pressure
Systolic pressure: it is the highest degree of pressure exerted by the blood against the arterial wall as the left ventricle contracts and forces the blood from it into the aorta
Diastolic pressure: it is the lowest degree if pressure when the pressure is in its resting period just before contraction of the left ventricle
Pulse pressure: it is the difference between systolic and diastolic pressure for the health, adult is usually about 120/180 (systolic pressure 12 mm Hg and diastolic pressure 80 mm Hg with pulse pressure of 40 mm Hg)
Normal venous pressure on an average person in a recumbent position is 40 to 110 mm of water. Venous pressure is a valuable index in determining the efficiency of heart muscles
Scientific Principles
Exercise, emotion, anxiety, fear,
tension and worry cause a temporary rise in blood pressure
The brachial artery in the
antecubital area which is convenient place for taking BP
A noisy environment and parallex
error interfere with correct reading on manometer
A twisted cuff may produce unequal
pressure and can cause inaccurate reading
Accurate reading is possible only
when the stethoscope is directly over the artery
Airtight system of cuff and tubing
facilitates accurate reading
Sufficient pressure in the cuff obliterates
the flow of blood through the brachial artery
Factors Influencing Blood Pressure
Age: adult’s blood pressure tends to increase with advancing age. The older adult’s blood pressure is 140-160/80-90 mm Hg
Stress: anxiety, fear and pain and emotional stress increase blood pressure
Medication: narcotic and analgesics lower blood pressure
Diurnal variation: it is lowest in early morning and higher in later evening
Sex: in men, it is higher than in female
Exercise: it will increase blood pressure
Bleeding: it causes low blood pressure
Blood pressure – (systolic) – (Diastolic)
Newborn – 30-50 mm hg – 10 mm Hg
Infant – 70-90 mm Hg – 50 mm Hg
Preliminary Assessment
Identify the patient
Check the diagnosis, reason for
taking BP schedule frequency of obtaining blood pressure
Previous measurement and range of
blood pressure
Physical and mental state of the
patient. Avoid blood pressure taking, on a patient who is angry, anxious or in
pain or a crying child
Assess the arm on which the blood
pressure can be taken. Do not take blood pressure reading on a patient’s arm
if:
The arm has an intravenous infusion on it
The arm is injured or diseased
The arm has a shunt or fistula for the renal dialysis
On the same side of the body where a female patient had a radical
mastectomy
Preparation of the Article
Sphygmomanometer
Stethoscope
Piece of paper
Preparation of the Article
Explain the procedure to the patient to gain the confidence and cooperation of the patient
Place the patient in a comfortable position either lying down with the arm resting on the bed or sitting with the arm supported on the table at heart level to ensure accurate reading
Patient should be resting at least 5 to 10 minutes prior to taking blood pressure
Guidelines
The sphygmomanometers generally used
in clinical setting are mercury type and aneroid type. The mercury type
sphygmomanometer is more reliable than the aneroid type sphygmomanometers. The
aneroid sphygmomanometers give blood pressure reading on dial indicator
Systolic pressure is increased in
pressure induced by systolic contraction and diastolic pressure is decrease in
pressure induced by diastolic relaxation of the left ventricle of heart
Never take blood pressure when the
patient is excited, exhausted and just after exercise, smoking or meals
Allow the patient to rest for five
minutes before taking blood pressure
Do not use the extremity that is
injured, diseased, paralyzed, receiving intravenous infusion or when a female
patient is with radical mastectomy on the same side
When the arm cannot be used to
measure the blood pressure, the thigh can be used being a good alternative site
Always take the blood pressure
reading on the same side and in the same position to maintain consistency
Place the site (arm or leg) about the
level of heart while taking blood pressure
The apparatus should be in working
order. The cuff should be of appropriate size (12-14 cm for arm and 18-20 cm
for thigh) and deflated before wrapping around the patient’s site
While taking blood pressure, certain
sounds are heard in sequence. These are called as Korotkoff sounds and are
described as under:
Tapping: the faint clear sounds that gradually become louder, the first tapping sound may be followed by an absence of sound (auscultatory gap) and indicates systolic pressure reading
Murmuring: the low swishing sounds that increase with cuff deflation
Knocking: the crisp, clear sounds that occur with each heart beat
Muffling: abrupt change of sound indicates first diastolic pressure reading
No sounds: the sound disappears and indicates second diastolic pressure reading
When deflating the cuff to take the
readings, deflate the cuff to 0. Do not stop in between and start inflating
again as this gives a false reading
Note the variations in blood pressure
Procedure
Wash hands
Take the equipment to the bedside
Apply deflated cuff evenly with
rubber bladder over the brachial artery, the lower edge being “2” inch above
the antecubital fossa. The two tubes turning towards the palm
Palpate the brachial artery with the
finger tips. Place the bell of the stethoscope on the brachial pulse. The
stethoscope must hang freely from the ears
Close the valve on the pump by
turning the knob clockwise. Pump up air in the cuff until the sphygmomanometer
registers about 20 mm above the point at which the radial pulsation disappears
Open the valve slowly by turning the
knob anti-clockwise. Permit the air to escape very slowly. Note the number on
the manometer where sound first begins. This is the systolic pressure
Continue to release the pressure
slowly. The sound become louder and clearer. Note the point on the manometer
where the sound ceases. This is the diastolic pressure
Allow the air to escape and the
mercury to fall zero. Wait for one minute with the cuff deflated
Repeat the procedure if there is any
doubts about the reading
Do not take blood pressure more than
three times in succession on reading the same arm
After Care
Remove the cuff by rolling it and
replace it in the box
Assist the patient to cover the arm
which was exposed
Take the apparatus to the duty room
and keep it safely in the cupboard
Wash hands and record the readings
immediately, with the date and time
Variations in Blood Pressure
Hypertension
Elevated or high blood pressure is known as hypertension. Hypertension is a major factor causing deaths from strokes and myocardial infarction (heart arrest)
Causes of Hypertension
Family history of hypertension
Obesity
Cigarette smoking
Alcohol consumption
High blood cholesterol level
Continued exposure to stress
Old age
Treatment
Early diagnosis
Long-term follow up care and therapy
Hypotension
When the
systolic pressure falls to 90 mm Hg or below, that condition is known as hypotension
Causes of Hypotension
Dilatation of the arteries
Loss of blood, due to hemorrhage
Failure of heart muscle to pump
adequately (heart attack)
Sign and Symptoms of Hypotension
Pallor
Skin mottling
Cold and clammy skin
Increased heart rate
Decreased urine output
BLOOD PRESSURE – Purpose, Principles, Assessment, Preparation, Guidelines, Procedure, After care, Hypertension, Hypotension
Pain is
often considered a fifth vital sign, assessed along with temperature, pulse,
respiration, and blood pressure. Pain can affect patient’s physical, emotional,
and mental well-being. It must be managed immediately and effectively so that
they can perform daily activities
Pain can be
acute or chronic. Acute pain is often severe with a rapid onset and a short
duration. It generally resolves with healing. Chronic pain continues beyond the
point of healing, often for more than 6 months. Cancer pain is in a category of
its own. It can be acute, chronic, or intermittent and is caused by tumor
growth and tissue necrosis
Principles of Pain Assessment and Management
Patients have the right to appropriate
assessment and management of pain (JCAHO Standard). Pain (should be) is
assessed in all patients
Pain is always subjective. Therefore,
the patient’s self report of pain is the single most reliable indicator of
pain. A clinician needs to accept and respect this self-report, absent clear
reasons for doubt
Physiological and behavioral
(objective) signs of pain (e.g. tachycardia, grimacing) are neither sensitive
nor specific for pain. Such observations should not replace patient self-report
unless the patient is unable to communicate
Assessment approaches, including
tools, must be appropriate for the patient population. Special considerations
are needed for patients with difficulty communicating. Family members should be
included in the assessment process, when possible
Pain can exist even when no physical
cause can be found. Thus, pain without an identifiable cause should not be
routinely attributed to psychological causes. Different patients experience
different levels of pain in response to comparable stimuli. This is, uniform
pain threshold does not exist
Pain intolerance varies among and within individuals depending on factors
including heredity, energy level, coping skills, and prior experiences with
pain
Patients with chronic pain may be
more sensitive to pain and other stimuli. Unrelieved pain has adverse physical
and psychological consequences. Therefore, clinicians should encourage the
reporting of pain by patients who are reluctant to discuss pain, deny pain when
it is likely present, or fail to follow through on prescribed treatments (JCAHO
standard)
Pain is an unpleasant sensory and
emotional experience, so assessment should address physical and psychological aspects
of pain
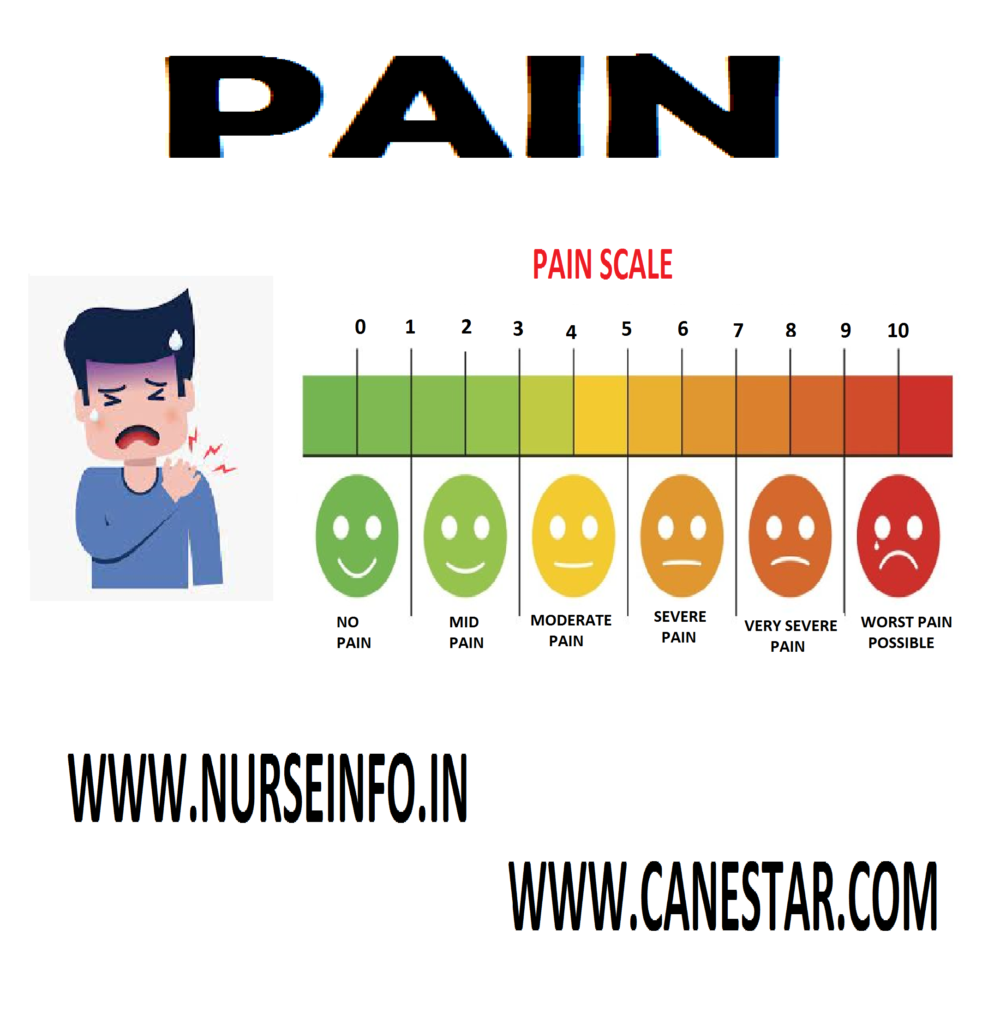
Characteristics of Pain
Severity: ranges from no pain to excruciating pain
Timing: duration and onset of pain
Location: body area involved
Quality: what the patient feels the pain is
Personal meaning: how affects the persons daily life
Factors
increasing and decreasing pain: age, gender, activity, rest, sleep, diet,
culture, home remedies, drugs, alcohol, diversion activities like listening to
music, watching TV, yoga, meditation, etc
Assessment of pain: assessment of pain can be done by under following headings:
Location of pain
Mode of onset (acute or chronic)
Any precipitating factors
Quality of pain (dull, moderate,
shooting, spasms)
Duration
Any change in quality
Any measures taken after pain
started, if so
What measures?
Whether it is effective?
Clinical observation
Client’s appearance
Motor behavior (facial expression, gait, posture)
Affective behavior
Local “observation” if pain is external
Monitoring of vital signs like BP,
pulse, temperature
Pain assessment: pain intensity scale
Faces pain
scale revised: this instrument has 6 faces depicting expressions that range
from contented to obvious distress. The patient is asked to point to the face
that most closely resembles the intensity of his or her pain
Management of pain: techniques used for management of pain
Few
techniques are used to produce analgesia in the individuals. The common
techniques used in the skin are:
TENS (transcutenous electrical nerve stimulation) – using electrical current through electrodes applied to the skin surface of the painful region
The mechanism involved in all above said techniques is according to pain theories available. Some of these techniques produce exogenous opiates to control the pain. Others block the endogenous pain inducing substances. There are few deep structures
Therapies used in pain management are:
Acupuncture: it is a procedure, where needles are inserted at specific cutaneous sites. The effect is not immediate but opiates will be produced to control the pain
Deep brain stimulation: here electrical stimulation is done to the certain areas of brain including frontal lobes, midbrain, caudate nucleus, etc
Drugs used in Pain Management
Analgesics: may interfere with the pain transmission from periphery to center (cortex or thalamine). Some drugs alter the perception and response to pain
Narcotic analgesics: these drugs alter the perception of pain experience and behavioral response to the pain
Nonsteroidal anti-inflammatory drugs: may usually act at the periphery inhibiting the transmitting substance which cause pain
Serotonin blockers: they act on serotonin by blocking its receptors. This analgesia is produced
Anesthesia: the functional part of the nervous system is temporarily or permanently destroyed to interrupt pain transmission from periphery to the spinal cord and cerebral cortex or thalamus
Nerve blocks: for this local anesthetics are used. The effect may be for few hours. Usually used before any short surgical procedures
Nursing management of pain:
Pain is considered as complex phenomena to understand and to assess as well. Pain has different components such as sensory, affective and cognitive
Accept the patient as he is
Accept and acknowledge the pain as
what the patient feels or expresses
Assist the individual to identify the
situation when or where the pain started
Assist the individual to identify the
situation which intensifies the pain
Do the assessment using the performa
available
Administer the drugs accordingly
Give the individual to ventilate the
feelings
Give emotional support
Give altered lifestyle to prevent
situations which trigger the pain
Family members can be involved in
sessions
Family members can be kept aware of
the situation which can avoid the triggering of pain
Family members can be taught some
physical measures which can comfort the patient
Most important nursing measure is to
have a very good personal relationship to keep the patient physically and
psychologically supported
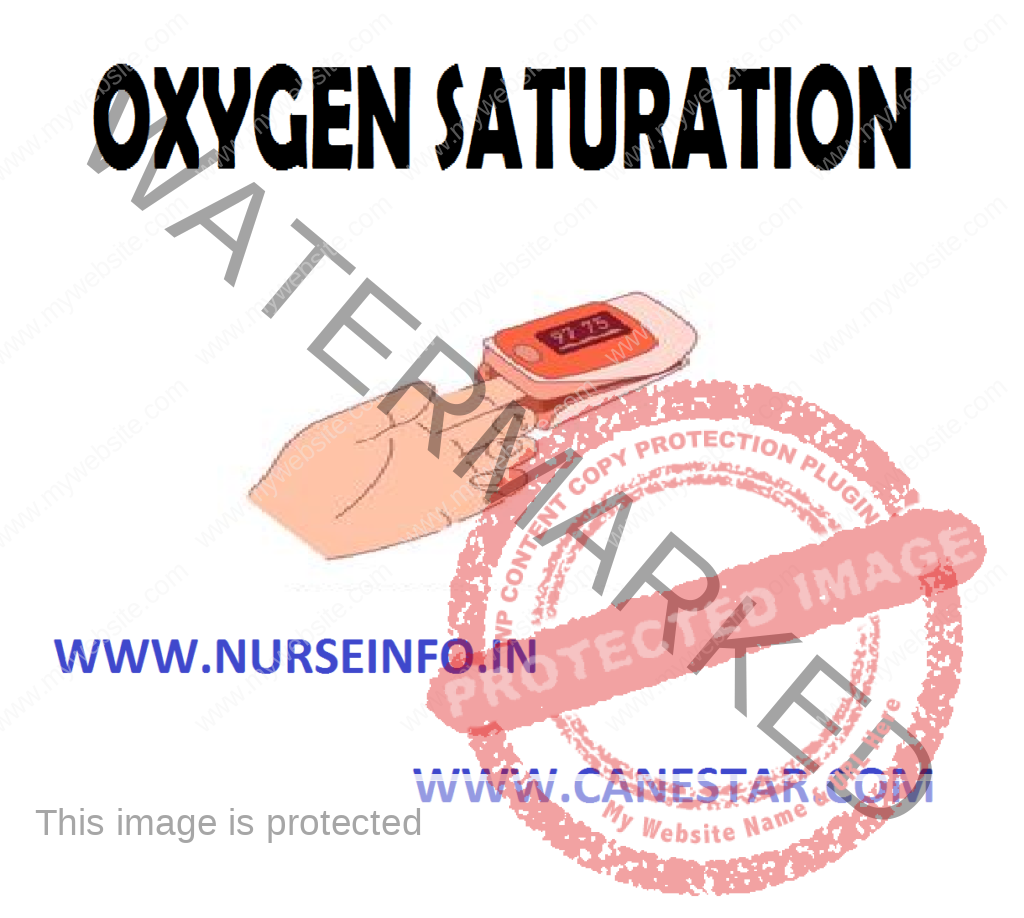
Pulse oximetry is a vital tool in patient assessment. Nurses must use the correct procedure and be aware of situations where accuracy of reading may be compromised. Detecting low oxygen levels in patient’s is important but not always easy; central cyanosis – when a patient’s lips, tongue and mucous membranes acquire a blue tinge – can be missed, even by skilled observers, until significant hypoxemia is present. Pulse oximetry can be undertaken to measure a patient’s oxygen levels and help identify earlier when action must be taken.
Pulse oximetry: pulse oximetry is a simple, non-invasive method of measuring oxygen levels and can be useful in a variety of clinical settings to continuously or intermittently monitor oxygenation. An oximeter is a device that emits red and infrared light, shone through a capillary bed (usually in a fingertip or earlobe) onto a sensor. Multiple measurements are made every second and the ratio of red to infrared light is calculated to determine the peripheral oxygen saturation (SpO2). Deoxygenated hemoglobin absorbs more red light and oxygenated hemoglobin absorbs more infrared light
Pulse oximetry is a non-invasive
procedure that is used to assess patients oxygen levels
It should be available in all
clinical settings where hypoxemia may occur
Pulse oximetry enables early
identification of hypoxia
It requires good pulsatile blood flow
Nurses should record whether the
patient is breathing room air or oxygen when the reading is taken, along with
other factors that may affect accuracy.
Oxygen Saturation Measurement
Pulse oximetry should be available for use in all clinical settings where hypoxemia may occur and is used to:
Assess breathless patients or those
who are acutely ill, including those who have acute confusion
Provide an objective indication of
the severity of an acute respiratory episode and need for hospital admission –
for example, exacerbation of chronic obstructive pulmonary disease, asthma
Determine the need for emergency
oxygen therapy in acute illness
Provide a continuous oxygen
saturation recording, for example, during anesthesia or sedation, or in the
assessment of oxygenation during sleep studies
Undertake routine monitoring in
chronic respiratory disease to screen for suitability for assessment for
domiciliary oxygen therapy
Pulse oximetry does not give a measure of arterial blood oxygen content or ventilation; oxygen delivery to the tissues is dependent on adequate ventilation and circulation. However, oximetry can add to the clinical picture to aid diagnostic and treatment decisions
Procedure
Ensure oximeter is in good condition
and probe sensor is cleaned according to local infection control
policy/manufacturer’s guidance
Explain procedure to the patient and
gain consent where possible
Select the most appropriate probe for
the site chosen; in adult patients, the most common sites are the fingertip and
earlobe. Using the incorrect probe will lead to inaccuracies in the readings
obtained
Consider choice of device:
Fingertip devices with integrated sensor and display may be appropriate
for spot checks of SpO2
Handheld devices with detachable sensor allow the most appropriate probe
to be selected
Wrist-worn devices have a sensor attached by a short cable and are useful
for overnight oximetry and exercise testing
Desktop/bedside devices may be more
appropriate in the acute setting for continuous monitoring
Ensure the chosen site is warm and
well perfused
Apply the probe to the site, ensuring
the sensor is correctly positioned
Ask the patient to rest the hand with
the sensor on it down gently to reduce interference of motion
Check the pulse strength signal and
ensure the pulse-rate reading correlates with the manual pulse
Allow the pulse oximetry to remain in
situ for at least five minutes to ensure it equilibrates
Document the reading, noting whether
the patient is breathing room air or oxygen, then record the oxygen delivery
device used and flow rate or percentage. Note any other factors that may
influence accuracy, such as movement, cold hands, etc
In acute illness, resting saturations
are usually most useful, but in non-acute settings, oximetry may be used during
exercise testing to determine exertional desaturation. Record whether the
readings have been taken at rest or during/after activity in addition to
inspired oxygen/air
Competencies
A range of
competencies relate to the safe undertaking of pulse oximetry:
Be aware of, and understand, local
infection control policy/guidelines in relation to monitoring equipment
Demonstrate a basic understanding of
how oxygen saturations are derived
Be able to discuss the indications
for, and limitations of, pulse oximetry
Demonstrate an ability to use a pulse
oximeter safely and effectively, selecting the appropriate probe and device for
the clinical situation
Demonstrate accurate documentation of
results
Limitations
Pulse
oximetry requires a good pulsatile blood flow and no interference with
measurement of light absorption and detection. Pulse strength can be checked by
ensuring the recorded heart rate correlates with a manual pulse rate; some
devices have a pulse amplitude indicator in addition to pulse detector. Where a
good signal is obtained, pulse oximetry readings are accurate within saturation
range of 70-100% but cannot be relied on outside of this range
Common Causes of Inaccuracy
Poor peripheral circulation
Cold peripheries
Constriction, e.g. from blood
pressure cuff, tight clothing or tight oximeter probe
Poor perfusion due to hypovolemia,
marked hypotension or cardiac arrhythmias, peripheral vascular disease
Raynaud’s syndrome
Motion artefact
Gross movement may cause loss of
signal
Fine vibration may interfere with
accuracy
Carbon monoxide/smoke
inhalation/intravenous dyes (e.g. methylene blue) used in diagnostic tests
Carboxyhemoglobin (from carbon
monoxide) is detected as oxyhemoglobin and will overestimate true oxygen
saturation
Ambient light interference
Light emitters and detectors must be
directly opposite each other and light should only reach the detector via
tissues. Inappropriately sized probes or excessive ambient light may result in
inaccuracies
Interference with
transmission/detection of light signals
Dirty probe sensors
Nail varnish/synthetic nails
Anemia/skin discoloration (very dark
skin/jaundice) may affect readings, but is rarely clinically significant
Documentation
The patient’s oxygen saturation
The site where you measured oxygen saturation
Any signs or symptoms of abnormal oxygen saturation
Type of oxygen therapy (nasal cannula, mask) and flow rate
MECHANICAL VENTILATION – Definition,
Purpose, Indications for Ventilatory Support, Equipment, Positive Pressure
Ventilation, Types of Positive Pressure Ventilators, Pressure Cycled, Modes of
Mechanical Ventilation, Uses of IMV, Synchronized Intermittent Mandatory
Ventilation (SIMV), Special Positive Pressure Ventilation Technique, Newer
Modes of Mechanical Ventilation, Pressure Support Ventilation, High Frequency
Ventilation and Procedure
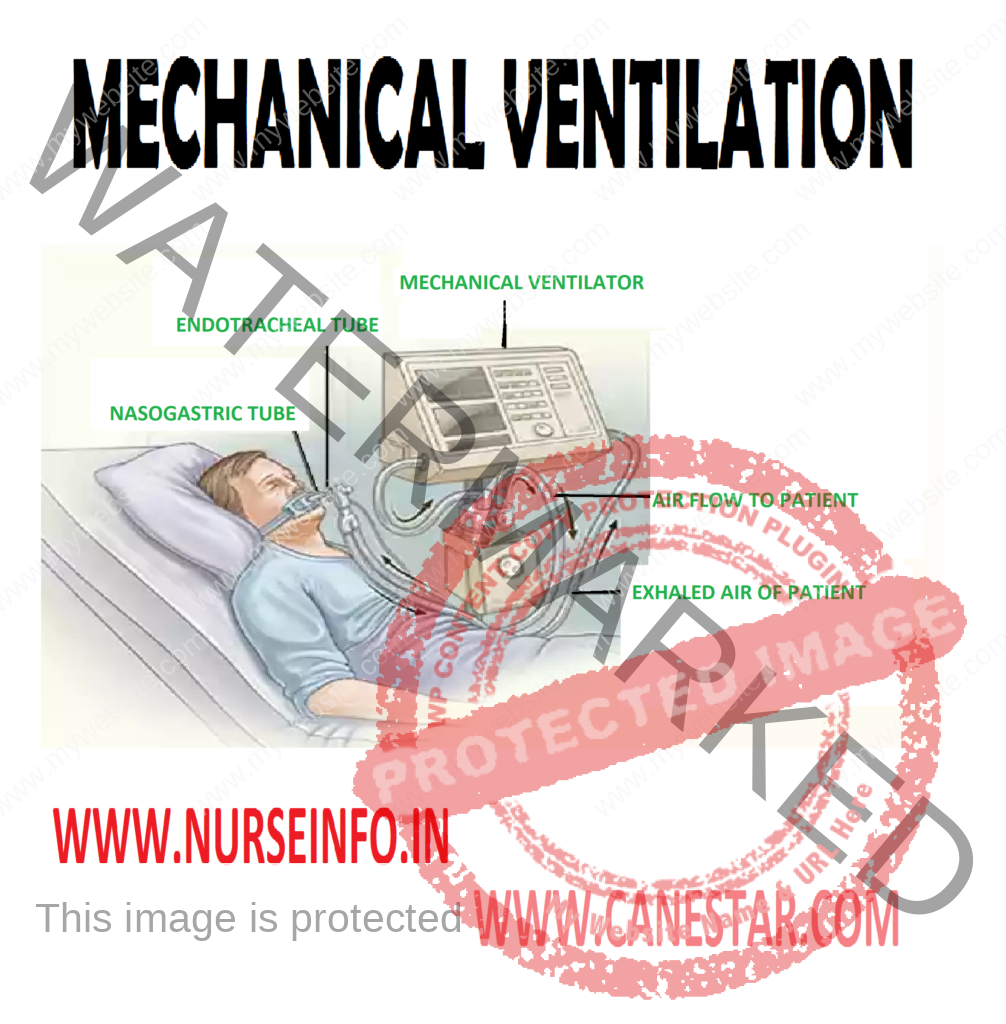
Mechanical
ventilation has been used for decades to support the respiratory function of
patients with various degrees of respiratory distress of failure. Patients who
have weak or absent spontaneous respirations usually require mechanical support
to assist in ventilation and oxygenation. Because the ventilator is integral
life support equipment in the critical care, it is important for the
practitioner to know the basic concepts and applications of mechanical
ventilation.
HISTORY OF VENTILATOR
The history
of artificial ventilation dates back to biblical times where Elisha restored
the life of a young boy by supporting respiratory function artificially.
Paracelsus in sixteenth century placed a tube in the mouth of a patient and
used a fire place bellows to inflate lungs. Successful techniques for
artificial ventilation were first developed in 1920s for the administration of
anesthetic gases. Endotracheal intubation made the use of ventilator easier.
Negative pressure ventilator gained popularity for the use of polio victims.
Use of positive pressure ventilation during Scandinavian polio epidemic of 1950s
showed that survival rate was better. From 1955 era of modern pressure
ventilator started. Mechanical ventilators have come a long way since the days
of iron lung machine. Most modern ventilators are capable of carrying out all
functions and they are the result of a modification of basic techniques and
modalities rather than new ideas.
DEFINITION
Mechanical
ventilation is a device that inflates the lungs by positive pressure which is
able to carry out alveolar ventilation and maintain lung mechanics.
PURPOSE
To establish and maintain effective
ventilation
To prevent complications associated
with artificial ventilation
To ensure position and patency of
endotracheal and tracheostomy tube
To clear and remove secretions from
airway
INDICATIONS FOR VENTILATORY SUPPORT
In upper airway obstruction like if
the patient has a paralyzing disease or unconsciousness owing to severe head
injury
In lower airway obstruction
respiratory impairment is the result of blockage caused by blood or pus. Other
reasons are bronchospasm and edema
Neuromuscular ventilatory muscle
inadequacy occurs when muscles of ventilation are diseased as in myasthenia
gravis, poliomyelitis, Guillain-Barre syndrome, snake bite and inadequate
reversal of anesthesia. Nerve supply to the intercostals muscles can be
interrupted by spinal injury
Lung disease which prevents proper
exchange of oxygen and carbon dioxide as in chest injuries pneumothorax.
Infections of lungs, infiltrative lung disease, chronic obstructive lung
disease and adult respiratory distress syndrome
High-risks patients who are potential
for developing respiratory failure are given ventilatory support which would
help in lessening the work of breathing as in post-operative cardiac surgery,
any other major surgery, shock and trauma
Respiratory arrest respiratory
depression to the point of apnea can be produced by changes such as muscle
relaxants, opiates, barbiturates, tranquilizers and anti-depressant drugs
Overdose of
these drugs and any other systemic condition resulting in respiratory arrest,
ventilatory support is indicated.
EQUIPMENT
Bed, locker
with necessary articles, ventilator, suction apparatus, continuous monitoring
apparatus, resuscitation crash cart with defibrillator
Oxygen giving
set and manual ventilation bag (Ambu bag)
Clinical
parameters indicating ventilatory support are:
Respiratory rate >40/minute
Tidal volume <5 ml/kg
Vital capacity <15 ml/kg
PaCO2 <50 mm of Hg with
FiO2 >0.60
PaCO2 >55 mm of Hg with
PH <7.25
POSITIVE PRESSURE VENTILATION
Unlike the
earlier models of negative pressure ventilators such as druncar and Shaw tank
type ventilator (iron lung) recent ventilators function on positive pressure
ventilation. Positive pressure is applied at the patient’s airway through an
endotracheal or tracheostomy tubes. Clinical use of positive pressure includes
intermittent positive pressure ventilation.
Positive
pressure brings about, complex change in the body. It may reduce the cardiac
output and hypoperfusion of the kidneys with an alternation in urine output. A
reduction in venous drainage secondary to increased intrathoracic positive
pressure could stimulate OSMO receptors in the hypothalamus to mediate
secretion of ADH which in turn will reduce the urine output
TYPES OF POSITIVE PRESSURE VENTILATORS
Commonly the ventilators are
classified by their method of cycling from the inspiratory phase to the
expiratory phase in the change over from inspiratory to expiratory phase
The term cycle is used to indicate a
terminating event
Volume cycled: this is the most common form of ventilator cycling. They terminate the inspiratory phase when a designed volume of the gas is delivered into the ventilator circuit (12-15 ml/kg body weight). They deliver the predetermined volume regardless of changing lung compliance. Airway pressure will increase as compliance decreases and it varies from patient to patient and breath to breath. As a safety device many ventilators have a pressure limiting value, fixed or adjustable which prevents excessive build up within the patient ventilator system on any given breath. Depending upon the type of pressure regulating device in use the breath may be terminated before the entire volume has been delivered to the patient. This, however, can be monitored with exhaled volume measuring devices available on most volume ventilators. These devices monitor for leaks in the patient circuit. The common volume cycled ventilators used are Bennet MA 1,2, Boums, LS 104-105, Bournas Bear 1, Ohio 560. Modern ventilators which are compact and computerized are available inn market now.
PRESSURE CYCLED
Terminates
the inspiratory phase when preselected airway pressure is reduced. The tidal
volume depends upon the patient’s airway resistance and lung compliance and on
the peak pressure that has been selected. Use of volume-based alarms are
recommended because any obstruction between the machine and lungs that allows a
buildup of pressure in the ventilator circuit will cause the ventilator to
cycle but the patient will not receive any volume, e.g. Bird mark 6,7,89, 14,
7, Barret PR1 and PR2
As opposed
to the old pressure limits ventilator the new machine maintain a predetermined
inspiratory pressure during the whole time of inspiration. The delivered tidal
volume is dependent on the compliance of the patient’s respiratory system,
achieved inspiratory flow and the allowed time for inspiration
Time cycled: the delivered breath is terminated when a preset time has been reached after a pressure limit also is reached and the remainder of the inspiratory phase is in the form of inspiratory pause. These ventilators allow pressure control of inspired fraction of O2 and adequate humidification systems, e.g. Siemens Serio Engstrom
MODES OF MECHANICAL VENTILATION
Control mode ventilation: the ventilator initiates and controls both the volume delivered and the frequency of breaths. In between, the machine breaths the patient is unable to breathe spontaneously or trigger a ventilator breath. This may result in increase in work of breathing for patients attempting to breathe spontaneously. It is indicated in patients with apnea, drug over dose, spinal cord injuries, central nervous system dysfunction, flail chest, paralysis from drugs and neuromuscular disease. In practice, control combined with other modes is widely used.
Assist mode: it is a mode of ventilation in which the patient is able to initiate inspiration and to control the frequency of breathing. No minimum level of minute ventilation is provided. The major disadvantage of assist mode was the backup rate if the patient becomes apneic. Once inspiration is initiated ventilation will deliver gas flow until desired volume, pressure or time lime is reached
Assist/control: it is a combination of assist and control modes. The tidal volume and the rate are preset when the patient’s makes an inspiratory effort the ventilator senses the effort and delivers the preset tidal volume. If the patient fail to initiate inspiration, the ventilator automatically goes into the backup mode and delivers the preset rate and tidal volume until it senses an inspiratory effort. This backup rate ensures minimum minute ventilation in the event of apnea. Assist/control methods are used in neuromuscular disease such as myasthenia gravis or Guillain-Barre syndrome, post-cardiac or respiratory arrest, pulmonary edema, adult respiratory distress syndrome
pH and PaCO2 may be normal and the patient is able to control
his respiratory rate and minute ventilation
cycling the ventilation’s normal ventilatory activity and therefore
prevents atrophy of the respiratory muscles
Intermittent mandatory ventilation (IMV): it allows patient to breath spontaneously with the ventilator providing mandatory breaths at a predetermined rate. Ventilator provides mandatory breaths at a predetermined rate at preset tidal volume. Gas provided for spontaneous breathing usually flows continuously through the ventilator circuit
Advantages
The iatrogenic effects of mechanical
ventilation such as barotrauma and decreased cardiac output are reduced
Higher levels of pulmonary end
expiratory pressure can be used because mean intrapleural pressure is lower
There is less chance for
hyperventilation
IMV can be used as a means of weaning
the patient from mechanical ventilation
Less need for sedation for paralysis
of patient on mechanical ventilation
More even distribution of ventilation
and lung blood flow
Disadvantages
Asynchronous breaths. Mandatory
breaths may be imposed on the patient’s spontaneous inspiration or expiration
Apnea or hypoventilation
USES OF IMV
Used as a primary means of mechanical
ventilation
Used in patients who have respiratory
patterns that use asynchronous with the control mode
Used in patients who hyperventilate
on the assist/control mode
Used in patients who require some
respiratory support but are able to breathe spontaneously
Used as a means of weaning patients
from mechanical ventilation
Allow
patient to breath spontaneously through the ventilator circuit. At a
preselected time, a mandatory breath is delivered. The patient may
initiate the mandatory breath with his
own inspiratory effort and the ventilator breath will be synchronized with the
patients effort will be assisted. If the patient does not provide inspiratory
effort the breath will be delivered as controlled. Gases provided for
spontaneous breathing is delivered through a demand regulate which is activated
by patient
It is comfortable
for the patient. Disadvantages and clinical uses are same as chart of IMV. In
addition, it is used whenever lack of synchronous breathing seems to affect
patient’s ability to be weaned
SPECIAL POSITIVE PRESSURE VENTILATION TECHNIQUE
Posture end expiratory pressure (PEEP): It is a mode of therapy used with mechanical ventilation where pressure during mechanical ventilation is maintained above atmosphere at the end of exhalation resulting in an increased functional residual capacity. Airway pressure is positive throughout the ventilator cycle. When use to treat patients with diffuse lung disease PEEP improves compliance, decreases dead space
Uses: used to increase the surface area to prevent collapse of alveoli and development of atelectasis. Used to decrease intrapulmonary shunt
Advantages
Lower level of FiO2
concentration of inspired oxygen is necessary with PEEP
It is helpful in reducing the
transudation of fluid from the pulmonary capillaries in situations where
pressure is increased as in left heart failure or when the alveolar capillary
membrane is damaged as in adult respiratory distress syndrome
Increased lung compliance resulting
in decreased work of breathing
Disadvantages
Due to the increased airway resulting
in over distension of alveoli can result in decreased cardiac output due to
decreased venous return
The increased airway pressure can
result in rupture of the alveoli which may cause pneumothorax or subcutaneous
emphysema
The decreased venous return
stimulates the production of antidiuretic hormone thereby the urine output is
reduced
Monitoring
of the patient on PEEP should include signs and symptoms of pneumothorax such
as increased pulmonary artery pressure, decreased lung movement, diminished
breath sounds, and signs and symptoms of decreased venous return which includes
decreased arterial pressure, decreased cardiac output and decreased urine
output.
Continuous positive airway pressure (CPAP): it has the same physiological characteristics of PEEP. It provides positive airway pressure during all parts of respiratory cycle but refers to spontaneous ventilation rather than mechanical ventilation. CPAP is delivered through ventilator circuit or through a separate CPAP circuit which does not require ventilator. It is indicated for patients who are capable of marinating adequate tidal volume but are not able to maintain tissue oxygenation
NEWER MODES OF MECHANICAL VENTILATION
Pressure control ventilation: a pressure limited time cycled ventilator is used. (Servo 900c or Puritan Bennet 7200a) The Servo controlled valves were the key to the development of the pressure control time cycled mode now available. Specific inspiratory pressure and inspiratory time is set. The ventilator delivers a flow of gas until the pressure is reached which is maintained within the lung for the set inspiratory time. As in assist control mode, the patient is able to initiate a breath and in the event of apnea a backup rate will support the patient’s respirations. But, with changes in airway resistance and lung compliance the delivered tidal volume varies. With pressure control ventilation the initial flow is high due to the maximum pressure difference between the inspiratory pressure delivered by the ventilator and the pressure present inside the lung at the beginning of the inspiratory cycle. With the subsequent increase in intrathoracic pressure, the pressure difference diminishes so also the inspiratory flow. The flow pattern is called decelerating inspiratory flow as against the constant flow pattern in traditional ventilation. The absolute rate of inspiratory flow is influenced by the resistance of the airways. If the resistance of high, the flow is reduced, if it is low, the flow is increased. Deceleratory flow leads to an early and sustained ultra-alveolar pressure whereas in the traditional ventilation with constant inspiratory flow intra-alveolar pressure is increased; thereby the pulmonary gas exchange in diseased lung is better with this mode.
The rapid introduction of gas into the airway may be uncomfortable for
patient and may require sedation/paralysis.
Pressure control ventilation is indicated in all clinical situations
requiring mechanical ventilation as this mode provides most efficient gas
exchange at the lowest inspiratory pressure
Inverse ratio ventilation: it is an alternative method of providing ventilatory support to a group of patients with refractory hypoxia. As against the conventional methods, the duration of inspiratory phase is revered. Inspiratory-expiratory ratio becomes 4:1 which result in a shortened expiratory time. The incomplete exhalation causes a PEEP like effect which in turn causes, the alveolar pressure to remain positive throughout the entire respiratory cycle. This constant pressure prevents the alveoli from collapsing at the end of exhalation
Indications
Diffuse lung injury
Refractory hypoxemia
Hemodynamic stability
Contraindications
A nondiffuse lung disease such as
lobar pneumonia
Obstructive pulmonary disease
Presence of copious secretions
A pressure
limit time cycled ventilator in the pressure control mode is used when
implementing TRV
Following
parameters are monitored when patient is on TRV
PRESSURE SUPPORT VENTILATION
Heart rate, blood pressure, cardiac
output
Hemodynamic measurements including
those obtained from pulmonary artery catheter
Pulse oximeter and capnography
Arterial blood gases
Airway pressure
All ventilator parameters
The patient
must meet the criteria for IRV and the staff should have proper understanding
of the technique, equipment and operation
Pressure
support ventilation is a mode of ventilation that provides augmentation of
spontaneous breaths with selected levels of positive pressure. As the patient
initiates a breath the preselected pressure is reached quickly. Unlike other
modes, PSV requires the patient to take a continuous effort in order for the
ventilator to deliver pressure support. It is similar to intermittent positive
pressure breathing
Indications
Patients who have difficulty in
weaning using conventional method
Anxious patients
Patients who have less than optimal
artificial airway
Patients with chronic obstructive
pulmonary disease
Weak patients
HIGH FREQUENCY VENTILATION
High frequency
ventilation refers to any form of mechanical ventilation that functions at a
frequency of at least four times the normal respiratory rate. It provides small
tidal volumes and less peak inspiratory pressure. To compensate for this, rate
is increased
High
Frequency Positive Pressure Ventilation
It is
positive pressure ventilation delivered at a rate of 60-100 breaths per minute
with tidal volume of 3-5 ml/kg through a system that does not involve gas
entrapment
Indications
Patients with pulmonary air link
Pneumomediastinum
Respiratory failure or ARDS
High frequency Jet ventilation
consists of intermittent delivery of high pressure gas about 140-2800 cm of 420
through a small bore injector cannula placed in the proximal end of
endotracheal tube
Suction tubing and catheter to be
transparent so that nature of aspirate can be observed
Ensure that vacuum pressure Is not
more than 120 mm Hg in adult and 100 mm Hg in children
Endotracheal tube to be rotated
daily, to prevent pressure ulcer on patient’s lip or tongue
Inflation of endotracheal/tracheotomy
tube to be monitored regularly
Positioning of
endotracheal/tracheotomy tube to be monitored regularly
Symptoms to be reported immediately
Aseptic technique to be used when
carrying out procedures involving tracheotomy or endotracheal tube
Functioning of ventilator alarms to
be checked at beginning of each shift
Ventilator settings to be checked and
recorded every hour
Tubing’s leadings from ventilator to
patient must be checked at least every hour and accumulated moisture to be
removed
Humidifier to be kept adequately
filled with sterile distilled water
Tuning and water in humidifier must
be kept scrupulously clean, including connections and adapters, which are to be
removed for sterilization every 24 hours
In presence of possible ventilator
fault, nurse must always first check clinical state of patient. If this is
satisfactory then proceed to detect fault
If patient shows signs of insufficient
ventilation, nurse must start manual ventilation whilst waiting for assistance
Avoid positioning ventilation tubes
above patient’s head to avoid water entering lungs
Humidifier to be changed daily and
sterile water to be used
Weaning is usually commenced in day
time rather than at night
PROCEDURE
Care of ETT/Tracheostomy
Secure positioning of
ETT/tracheostomy tube with tape or adhesive plaster
Inflate cuff once correct positioning
has been confirmed
Cuff is inflated with air using a
syringe until a “hiss” is heard on auscultation (minimum air leak technique)
Maintaining Ventilation
Effects of ventilation are assessed
by observing patient’s color, chest movement, blood pressure, pulse rate/oxygen
saturation and ventilatory measurements such as expired minute and tidal
volume, airway pressure and rate of ventilation
Ventilators make characteristics
sounds during inspiration and expiration which nurse must be capable of
identifying
Ensure patient has adequate fluid and
calorie intake
Administer sedation as prescribed to ensure adequate artificial
ventilation and promotion of rest
Signs of Adequate Ventilation
Improvement in skin color and oxygen
saturation more than 90%
Rhythmic expansion of chest with
expiratory phase longer than inspiratory phase
Normal pulse, change in pulse rate
may indicate decreased cardiac output due to increase in intra-thoracic
pressure
Steady blood pressure. A drop in
blood pressure may reflect decreased cardiac output
Audible respiratory rhythm
Absence of any abnormal neurological
signs
Absence of hyperventilation or
hypoventilation
Signs of Inadequate Ventilation
Breathing occurs out of sequence with
ventilation and patient is restless, perhaps diaphoretic, flushed or cyanosed
First signs of ventilatory inadequacy
and hypoxia may be tachycardia and hypertension
If change in recordings of
ventilatory volume occurs check airway pressure and rate of ventilation
If increase in minute volume, check
for leaks in cuff seal, connections and tubing
If decrease in airway pressure occur
check for leak in circuit
If increase in peak airway pressure
occur check for obstruction such as secretions, kinking, pooling of water,
patient bitting tube slipped into a main stem of bronchus, pneumothorax
Suctioning
Explain procedure to patient/family
Frequency of suction to be carried
out depending on patient’s pulmonary state
Tracheal suction is an aseptic
procedure. Sterile catheter and one sterile glove to be used for each
suctioning episode/session
Suction is applied while catheter is
being withdrawn using intermittent technique, not more than 10 to 15 seconds
When secretions are tenacious,
instill 1 to 3 ml. sterile normal saline 0.9 percent into endotracheal/tracheostomy
tube to liquefy and make removal easier
Weaning
Inform patient that this is a
progressive step in treatment
Repeatedly encourage and reassure
patient to avoid fear or exhaustion
Withhold sedation and muscle relaxant
as ordered by doctor
Watch for respiratory distress,
hypoxia, tachycardia, tachypnea, cyanosis, and hypotension and drop in oxygen
saturation
Routine Nursing Care
Give daily bed bath and change bed
linen, if soiled
Provide 2 hourly attentions to
pressure sites by turning and repositioning of patient
Four hourly oral hygiene and whenever
needed
Four hourly eyes care. Instill
artificial tears and cover with Jaconet gauze/plastic foil, to prevent corneal
abrasions
Check and record vital signs every
hour
Measure blood, intravenous
transfusion and fluid intake every hour
Measure blood loss, urine,
nasogastric, aspirate, etc. every hour
Change drainage bags, chest drainage
bottles and tubing’s as required
Maintain intake/output chart every
shift
Eight hourly aseptic urinary catheter
toilet
Assess bowel action every third-day
Eight hourly wound dressings
Change the tape anchoring ETT and
Ryles tube
Change intravenous administration
sets and dressing of puncture sites every day
Change suction bottle and connecting
tubing everyday
Change ventilator circuit tubing,
connections and adapters everyday
Record patient’s condition and events
that have occurred during each shift in nurse’s progress sheet
Give detailed hand over to nurse on
following shift
Psychological Aspects of Patient’s Care
Endeavor to allay patient’s and
relatives anxiety fears and clear doubts as necessary
Motivate patient and relatives to
participate in daily care activities
Promote good relationship with
patient/family and encourage them to express fears, stress factors/feelings
MECHANICAL VENTILATION – Definition, Purpose, Indications for Ventilatory Support, Equipment, Positive Pressure Ventilation, Types of Positive Pressure Ventilators, Pressure Cycled, Modes of Mechanical Ventilation, Uses of IMV, Synchronized Intermittent Mandatory Ventilation (SIMV), Special Positive Pressure Ventilation Technique, Newer Modes of Mechanical Ventilation, Pressure Support Ventilation, High Frequency Ventilation and Procedure
PERCUTANEOUS SUPRAPUBIC PUNCTURE –
Indication, Method and Complications
Suprapubic
bladder aspiration is the introduction of a needle through the anterior
abdominal wall and into the bladder to obtain a urine specimen under strict
sterile technique. It is performed primarily to diagnose urinary tract
infections. It is most commonly performed in children under the age of 2 years
as part of the septic work-up
The
procedure is quick, simple to perform, safe and has a low rate of
complications. The main advantage of suprapubic bladder aspiration is that it
bypasses the urethra and minimizes the risk of obtaining a contaminated urine
specimen. Urinary sampling remains the cornerstone for the diagnosis of many
disease processes including metabolic derangements, infectious processes,
catabolic states, and neoplastic conditions. In cases when the usual means of
voided urine collection or bladder drainage is not possible or preferable,
suprapubic bladder aspiration becomes a viable option both therapeutically and diagnostically.
If properly performed, this technique can yield an uncontaminated urine sample
without urethral or skin flora contamination
INDICATIONS
Acute retention of urine when
urethral catheterization and passage of filiforms bougies are unsuccessful
Urethral disruption due to pelvic
trauma
Bladder drainage required in the
presence of urethral or prostatic infection
METHOD
Confirmation
of distended bladder by palpation is crucial. After adequate shaving, painting
and draping of the suprapubic area
Infiltrate
local anesthetic in the middle about two-finger breadth above the pubis down to
and including the anterior bladder wall. Take a 14 – gauge intracatheter needle
and, with a 60 degrees caudal angle insert it through the skin with a short
firm thrust to penetrate fascia and enter the bladder; aspirate urine to
confirm. Advance intracatheter cannula through the needle into the bladder and
withdraw the needle from the bladder. Then lock the needle and cannula hubs
together. Ascertain cannula position by aspiration. Then suture catheter in
place and attach urosac (urine collection system). Apply sterile dressing.
COMPLICATIONS
Bleeding hematuria may occur due to
injury to submucosal vessels or rapid decompression of chronically distended
bladder. Do slow decompression in chronic urinary retention
Injury to surrounding viscera:
perforation of bowel due to incorrect site, improper position of the needle or
when the bladder is not distended. Do not puncture two-finger breadth away from
the symphysis pubis or in an undistended bladder
Pericatheter leakage
Blockage of catheter
Infection
PERCUTANEOUS SUPRAPUBIC PUNCTURE – Indication, Method and Complications
VENTILATOR WEANING – Respiratory
Parameters (Huba), Signs of Fatigue, Methods of Fatigue, Methods of Weaning,
Causes of Failure to Wean and Patient Who is Fighting the Ventilator
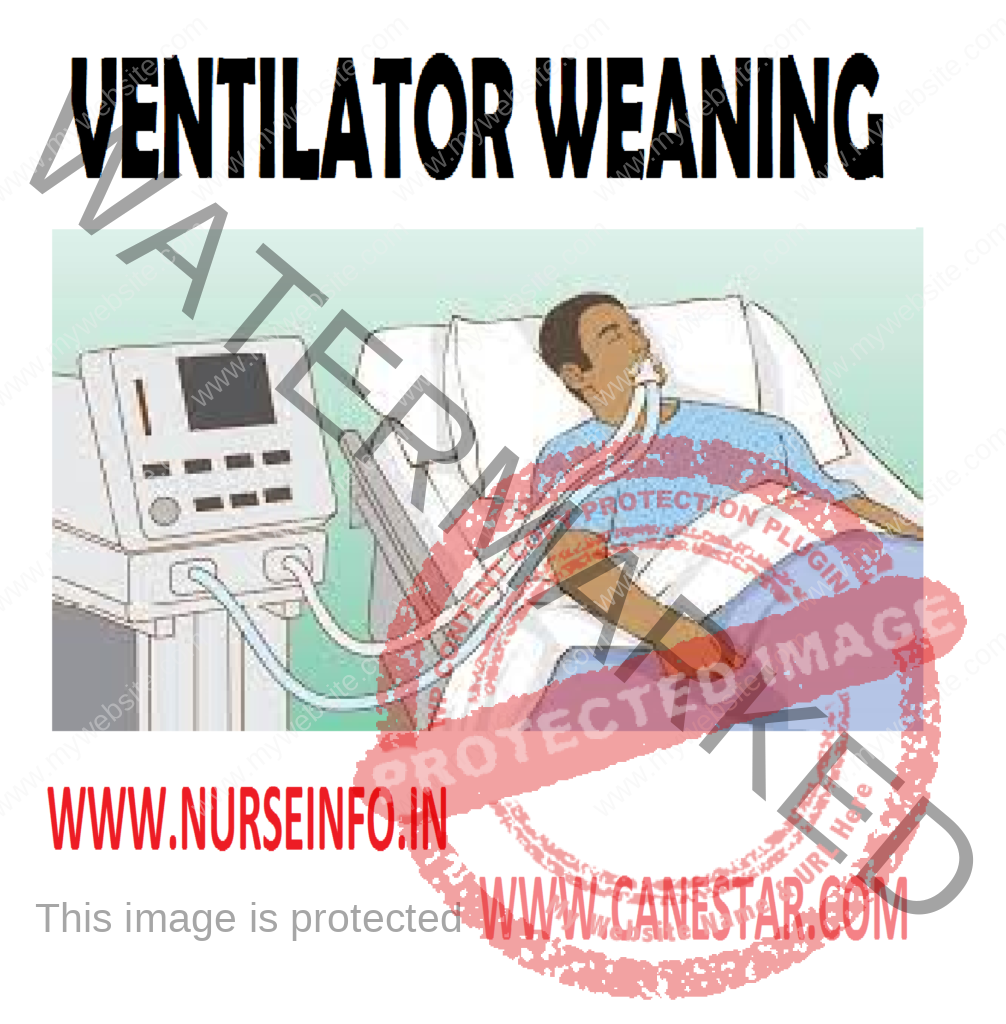
Weaning is
the process by which the patient is gradually allowed to assume responsibility
for regulating ad performing his own ventilation. There are many factors which
should be considered before attempting to wean the patient
The initial pulmonary pathology that
indicated intubation and mechanical ventilation should be resolving
Cardiovascular function should be
stable with minimal or no need for vasopressors
Fluid balance is maintained
Nutritional state maintained without
any nitrogen imbalance
Signs of
intolerance to spontaneous breathing (weaning failure)
PaO1
<50-60 mm Hg and FiO1 >0.5
SaO1
<88-90% and FiO1 >0.5
PaCO1
>50 mm Hg or increased by more than 8 mm Hg
pH <7.32
or reduced by more than 0.07
RR >35
breaths/min or increased by more than 50%
HR >140
bpm or increased by more than 20%
SBP >180
mm Hg or <90 mm Hg
Uncontrollable
psychomotor agitation
Reduced
level of consciousness
Excessive
sweating and cyanosis
Evidence of
increased respiratory muscle effort
RESPIRATORY PARAMETERS AS CRITERIA FOR WEANING (Huba)
Ability to oxygenate: the arterial tension during mechanical ventilation should be greater than 70 mm of Hg with a FiO2 of 40%. The above condition should exist with a level of PEEP that is less that 10 cm H2O. When PEEP is greater than 10 cm H2O weaning is contraindicated. Arterial blood gas PaO2 >55 mm Hg with FiO2 <0.4 and CPAP <5 cm H2O Oximetry – Hb. Saturation >90% corresponds to PaO2 >55mm of Hg
Spontaneous resting ventilatory needs: ventilation is a given amount of gas exchange required to eliminate carbon dioxide adequately
the necessary level of minute ventilation (VT multiply RR) is determined
by CO2 production and dead space ventilation. The dead space to
tidal volume ratio defines the percentage of tidal volume that does not
participate in CO2 elimination and can be considered as wasted
ventilation. This dead space ratio is increased in disease that affect the lung
parenchyma and distribution of gas flow as in adult respiratory distress
syndrome, pulmonary embolism, chronic obstructive pulmonary disease and
hypovolemia. If VD/VT is 0.6, i.e. 60% of tidal volume or more, the minute
volume required to eliminate CO2 is sufficient to allow total
wearning. Minute ventilation of 10 liters/minute or less during mechanical
ventilation indicates that patient can be safely weaned
Respiratory mechanical capability to
sustain spontaneous respiration, the patient’s mechanical function is assessed
by measuring the vital capacity, inspiratory force and the spontaneous rate.
The vital capacity should be 10-15 ml/kg of actual body weight to institute
weaning. Inspiratory force (the amount of negative pressure generated against
occluded airway) is the measurement of muscle strength. The respiratory rate
should not exceed 35 breaths/minute as it results in fatigue, CO2
retention and respiratory acidosis
SIGNS OF FATIGUE
Tachypnea – respiratory rate
>20/min
Hemodynamic – tachycardia,
hypotension
Minute ventilation <6 L/min or
>10 L/min
General appearance – restlessness,
sweating, cyanosis
Inability to generate inspiratory
force
Arterial blood gas – PaO2
<55 – 70 mm not maintained (7.35 – 7.45)
At each step
of weaning, these parameters are assessed
Psychological readiness: psychologically patient must be prepared to wean. The patient’s anxiety is from fear of ventilator malfunction, suffocation and loss of control. To overcome these nurses should explain the safety mechanism like alarm and keep the Ambu bag in patient’s vicinity and give verbal reassurance. Another problem, they face is the inability to communicate. Alternate method of communication available should be utilized
An important
aspect of successful weaning is the patients trust in the staff responsible for
care. A team effort by both medical and nursing staff can pave away for gaining
patients confidence. Added with related explanations this helps in achieving a
successful weaning
METHODS OF WEANING
There are
two methods of weaning.
The conventional method is the
episodic ventilator with T piece or CPAP. Briggs T piece technique is used. The
patient is disconnected from ventilator for a specific period of time and
allowed to breathe spontaneously using the Briggs T piece or CPAP. Weaning
starts with shorter intervals such as 5-10 minutes every hour or more. The
patient requires rest period. Weaning should not be attempted during night
until patient can maintain spontaneous breathing. The vital capacity and the
inspiratory force along with vital signs and signs of fatigue are monitored
closely during the weaning period
Intermittent mandatory ventilation –
weaning: intermittent mandatory ventilation is a technique by which patients
can breathe spontaneously and in addition receive mechanically ventilated
breaths at specific preselected rates. Set rate, interval and keep sensitivity
at maximum setting. If tolerance is not indicated disease mandatory rate.
Record at each weaning interval heart rate, blood pressure and respiratory rate
and arterial blood gas and pulse oxygenation while IMV is used. The spontaneous
rate should not exceed 30 breaths/minutes as these results in fatigue, CO2
retention and respiratory acidosis. Rates greater than 30 indicate a need to
reduce weaning time. Weaning can continue as long as patient’s condition is
stable and arterial pH is 7.32 – 7.35
Patient is
positioned in sitting or Fowler’s position during weaning. All respiratory and
other parameters are monitored. Patient is supported emotionally during weaning
process.
CAUSES OF FAILURE TO WEAN
Patient factors: inadequate spontaneous breathing, intrinsic pulmonary disease resulting in atelectasis, consolidation, edema, bronchospasm which can be managed with PEEP and chest physical therapy and bronchodilators
Another factor is derangement of chest wall function which include chest
wall trauma. Abdominal distension muscle weakness
Abnormal cardiac functioning can limit weaning
Starvation, protein loss cause break down of muscle mass resulting in
decreased respiratory muscle function which may affect weaning process
Ventilatory system factors: ventilatory design and PEEP devices are a major source of weaning problems, meticulous attention should be paid to be appropriate setting of flow and sensitivity when IMV is used. Continuous positive pressure should be produced with a system that provides a minimum of external work for patient
Airway factors: the artificial airway also may produce weaning problems. It is noticed that endotracheal tube of small inter-diameter requires increased patient effort during spontaneous ventilation obstruction of tube can be a cause of sudden and marked change in weaning ability
PATIENT WHO IS FIGHTING THE VENTILATOR
The major causes
of respiratory compensation in a ventilated patient are pneumothorax
endotracheal tube slipping into the main bronchus, mucus or hemorrhage plug
obstructing endotracheal tube, ventilator and aspirations systemic abnormality
such as sepsis, pulmonary embolus or congestive heart failure. In the patient
is in severe distress, he should be disconnected from ventilator and manually
ventilated with 100% oxygen. Patient is closely observed, suctioning done to
rule out obstruction. A chest X-ray and arterial blood gas taken and ventilator checked to ensure
adequate functioning
Once it is ensured that there is no serious life-threatening problem then fighting the ventilator can be managed. It means that the patient is out of phase with the machine. The patient will be exhaling while the machine is delivering the breath. Intermittent mandatory ventilation or synchronized intermittent mandatory ventilation is beneficial in handling patients who are fighting the ventilator. In some cases, patient has to be paralyzed with pancuronium to be ventilated effectively
VENTILATOR WEANING – Respiratory Parameters (Huba), Signs of Fatigue, Methods of Fatigue, Methods of Weaning, Causes of Failure to Wean and Patient Who is Fighting the Ventilator