FINE NEEDLE ASPIRATION
BIOPSY/CYTOLOGY – Technique, Equipment Needed, Procedure, Variation in
Technique and Indications
Fine needle
aspiration biopsy cytology (FNAB/FNAC) diagnosis has important applications in
surgical practice.
TECHNIQUE
Anesthesia:
usually anesthesia is not required, sometimes local anesthesia/general
anesthesia may be required for image intensification, e.g. renal and vertebral
puncture.
EQUIPMENT NEEDED
A 20 ml syringe
Long needle for deep aspiration
(spleen, liver or kidney)
Stronger needle (1-1.2 mm diameter)
with trocar for skeletal puncture
Fine (23 and 26 gauge) needles for
small breast cyst or for the puncture of abdominal organs
PROCEDURE
Explain the procedure to the patient
Cleanse the skin with an antiseptic
solution and drape
Insert the needle delicately into the
lesion by an oblique tract, perceiving the tissue texture on entry and the
piston and keep it steady. With suction in place pass the needle gently through
the lesion in three or four directions. Then release the piston gently to
release the suction, and withdraw the needle
Apply pressure over the puncture site
with a cotton wool ‘ball’ for 5 minutes
Detach the needle from the syringe
and draw the air into the syringe; contents of the needle bore are blown onto
dry and clean microscopic slide
Lightly spread the tissue juice and
tumor fragments with the needle point as for bone marrow
Staining
Immediate air-drying by waving the slide. This may be improved by hot air
from hair-dryer or hot light bulb. Then the smear is fixed in methanol for 5
minutes and stained with Romanovsky stain
Immediate wet fixation of smears with ethanol and staining by
Papanicolaou or hematoxylin and eosin ( H and E)
When immediate diagnosis is required preoperatively, dick quick staining
method is valuable
VARIATION IN TECHNIQUE
For splenic, hepatic and abdominal
puncture, the clotting factors must be normal and local anesthesia employed.
Aspiration is performed swiftly, with the patient holding breath after deep
inspiration
For skeletal puncture, it is not
necessary to penetrate cortex. Primary and secondary bone tumor tissues may lie
periosteally. A glancing aspiration on a skeletal surface frequently gives
cells
INDICATIONS
Breast
Carcinoma breast to confirm the diagnosis
Treatment of breast cyst
Inflammatory breast lesion
Impalpable mammographic abnormality
Lymph node: lymphadenopathy
Salivary swellings
Thyroid swelling (goiter)
For liver pathology in place of the
needle biopsy
Abdominal and retroperitoneal mass
Pancreas: to distinguish carcinoma
from chronic pancratitis, FNAB/C may be done preoperative as a guided procedure
using endoscopic retrograde cholangiopancratography (ERCP), ultrasound or
angiography
Soft tissue lesion, e.g. soft tissue
sarcoma
Bone tumors
Prostatic lesion
Testicular lesion
Cervical cysts, e.g. thyroglossal,
branchial and desmoid cyst
Advantages: easy, simple and less painful technique. The patient’s compliance is more, so easily repeated. It is more convenient for a busy surgical practice and can be performed in the outpatient clinic.
FINE NEEDLE ASPIRATION BIOPSY/CYTOLOGY – Technique, Equipment Needed, Procedure, Variation in Technique and Indications
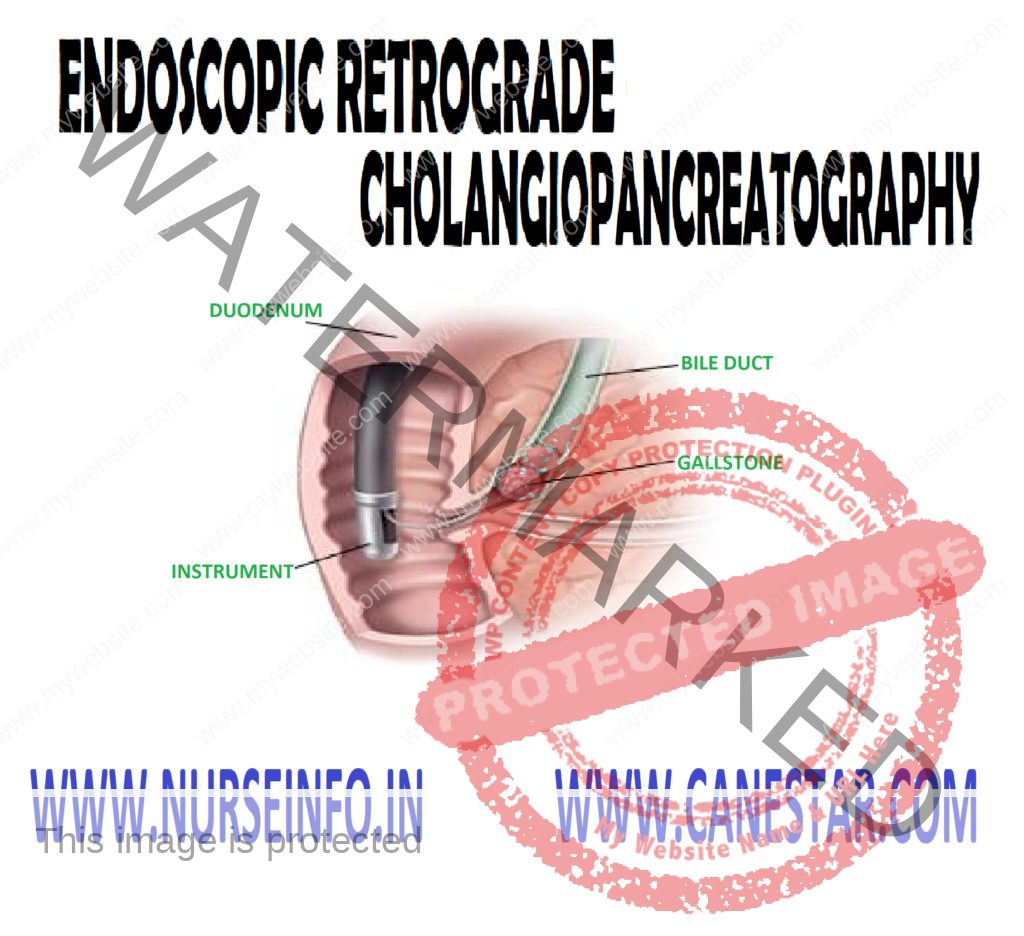
ENDOSCOPIC RETROGRADE
CHOLANGIOPANCREATOGRAPHY – Purpose, Indications, Client Preparation, Procedure,
Post-Procedural Care, Factor Affecting Diagnostic Results and Client Teaching
Endoscopic
retrograde cholangiopancreatography (ERCP) is an imaging in which the biliary
pancreatic ducts are examined endoscopically after contrast medium is injected
into the duodenal papilla.
The purpose
of this procedure is to identify the cause of a biliary obstruction, which
could be stricture, cyst, stones, or tumor; jaundice is usually present. ERCP
is performed following abdominal ultrasound, computed tomography, liver
scanning and/or biliary tract X-ray studies to confirm or diagnose
hepato-biliary or pancreatic disorders.
PURPOSE
To detect biliary stones, strictures,
cyst or tumor
To identify biliary obstruction, such
as stones or strictures
To confirm a biliary or pancreatic
disorders
INDICATIONS
Biliary stones
Biliary strictures, cyst or tumor
Primary cholangitis
Cirrhosis
Pancreatic stones
Stricture, cysts, or pseudocyst or
tumor
Chronic pancreatitis
Pancreatic fibrosis or duodenal
papilla tumors
CLIENT PREPARATION
Obtain a client history of allergies
to seafood, iodine and contrast dye. Report allergic findings
Determine whether the anxiety level
may interfere with the client’s ability to absorb information concerning the
procedure
Check that the consent form has been
signed prior to premeditations
Explain to the client that when the
contrast medium is injected, there usually is a transient flushing sensation
Be supportive of the client prior to
and during the test procedure
Explain to the client that when the
contrast medium is injected, there usually is a transient flushing sensation.
Be supportive of the client prior to
and during the test procedure
Monitor the vital signs during the
test and compare them to baseline vital signs. An increase in the pulse rate
could be due to atropine. Rupture within the gastrointestinal tract caused by
endoscope perforation could cause shock
Inform the client that the endoscope
will not obstruct breathing
Inform the client that atropine will
make the mouth dry and the tongue feels large or swollen
Inform the client that the test takes
approximately 1 hour and that lying still on the X-ray table is important
PROCEDURE
Food and fluids are restricted for at
least 8 hours before the test
The consent form should be signed
prior to premeditation
Obtain baseline vital signs. Have the
client void
Premedicate with mild narcotic or
sedative. Atropine may be given prior to or after insertion of the endoscope.
Atropine relaxes gastrointestinal motility and will cause dryness of mouth
Local anesthetic is sprayed in back
of throat (pharynx) to decrease the gag reflex prior to the insertion of the
fiberoptic endoscope
Secretion may be given intravenously
to paralyze the duodenum. Contrast medium is injected after the endoscope is at
the duodenal papilla and the catheter is in the pancreatic duct
POST-PROCEDURAL CARE
Monitor vital signs. A rise in
temperature might indicate (bacteremia or septicemia). Check respirations for
respiratory distress resulting from anesthetic spray and/or the endoscope
Check the skin color. Increased or
decreased jaundice is an indicator of a disease process or the result of
therapy
Check the gag reflex before offering
food or drink
Check signs and symptoms of urinary
retention caused by atropine
FACTOR AFFECTING DIAGNOSTIC RESULTS
Inability to
cannulate biliary and/or pancreatic duct
CLIENT TEACHING
Suggest warm saline gargle and/or
lozenges to decrease throat discomfort
Explain to the client that he or she
has a sore throat for a few days after the rest. This is due to the endoscope
ENDOSCOPIC RETROGRADE CHOLANGIOPANCREATOGRAPHY – Purpose, Indications, Client Preparation, Procedure, Post-Procedural Care, Factor Affecting Diagnostic Results and Client Teaching
ESOPHAGOGASTRODUODENOSCOPY/ESOPHAGOGASTROSCOPY
– Purpose, Client Problems, Client Preparation, Procedure and Post-Procedural
Care
Esophagogastroscopy
includes gastroscopy and esophagoscopy. If duodenoscopy is included with the
endoscopic examination, the term is esophagogastroduodenoscopy. A flexible
fiberoptic endoscope is used for direct visualization of the internal
structures of the esophagus, stomach and duodenum. Biopsy forceps or a cytology
brush can also be inserted through a channel of the endoscope. Suction can be
applied for the removal of secretions and foreign bodies
This test is
performed under local anesthesia or IV sedation (benzodiazepine or narcotics),
in a gastroenterologist. This procedure can be done on an emergency basis for
removal of foreign objects (a bone, a pin, etc) and for diagnostic purposes.
The major complications that can occur from esophagogastroduodenoscopy are
perforation and hemorrhage
PURPOSE
To visualize the internal esophagus,
stomach, and duodenum
To obtain a cytological specimen
To confirm the presence of
gastrointestinal pathology
Description: gastritis, gastric neoplasm (benign or malignant), gastric
ulcer (acute or chronic), gastric varices
Duodenal (small intestinal)
Description: duodenitis, diverticula, duodenal ulcers, neoplasm (benign
or malignant)
CLIENT PREPARATION
Recognize that a gastroscopy for
visualizing the esophageal, gastric and duodenal mucosa is actually an
esophagogastroduodenoscopy. These names are frequently used interchangeably
Explain the procedure to the client.
Inform the client that instrument is flexible; the procedure will be done under
local anesthesia (the throat will be sprayed) premedications will be given
before the test and usually IV sedation is given with the test; dentures are
jewelry should be removed; and food and fluids will be restricted for 8-12
hours before the test
Check the client dentures, eyeglasses
and jewelry is removed. Give a client a hospital gown
Have the client void. Take vital
signs
Check the consent form has been
signed before giving the client premedications. Once the sedative and the
narcotic analgesic are given, the client should remain in bed with side up.
Tell him or her that these medications will cause drowsiness
Explain to the client that he or she
may feel some pressure with the insertion of the endoscope and may feel some
fullness in the stomach and intestine areas
Be a good listener. Allow the client,
time to ask questions and to express concerns or fear
PROCEDURE
A consent should be signed
The client should be on and NPO for
8-12 hours before the test. When this procedure is used during an emergency and
NPO cannot be enforced, the client’s stomach is lavaged (suctioned) to prevent
aspiration.
The client may take prescribed
medications at 6 am on the day of the rest. Check with laboratory or healthcare
provider for any changes.
A sedative/tranquilizer, a narcotic
analgesic, and atropine may be given an hour before the test, or they can be
titrated intravenously immediately prior to the procedure and during the
procedure as needed
A local anesthetic may be used
Dentures, jewelry and clothing should
be removed from the neck to the wrist
Record baseline vital signs. The
client should void before the procedure
Specimen containers should be labeled
with the client’s name, the date and the type of tissues
Emergency drugs and equipment should
be available for hypersensitivity to medications (premedication and anesthetic)
and for severe laryngospasms
The test takes approximately 1 hour
or less
The client should not drive self-home
following the test because of possible after-effects of sedation
POST-PROCEDURAL CARE
Check the gag reflexes offering food
and fluids by asking the client to swallow or by touching the posterior pharynx
with a cotton swab or tongue blade if the throat was sprayed with the
anesthetic
Monitor vital signs (blood pressure,
pulse, respiration) as ordered
Give the client throat lozenges or
analgesics for throat discomfort. Inform the client that he or she may have
flatus or burp-up gas, which is normal. This is caused by instillation of air
during the procedure for visualization purposes
Observe the client for possible
complications
Be supportive of the client and
family
Complications:
perforation in the gastrointestinal tract from the endoscope. Symptoms could
include pain (epigastric, abdominal and back pain), dyspnea, fever, tachycardia
and subcutaneous emphysema in the neck
Factors affecting diagnostic results: barium from a recent gastrointestinal images series can decrease visualization of the mucosa. This test should not be performed within 2 days after such tests. An X-ray film of the abdomen can be taken to see if barium is in the stomach or duodenum.
ESOPHAGOGASTRODUODENOSCOPY/ESOPHAGOGASTROSCOPY – Purpose, Client Problems, Client Preparation, Procedure and Post-Procedural Care
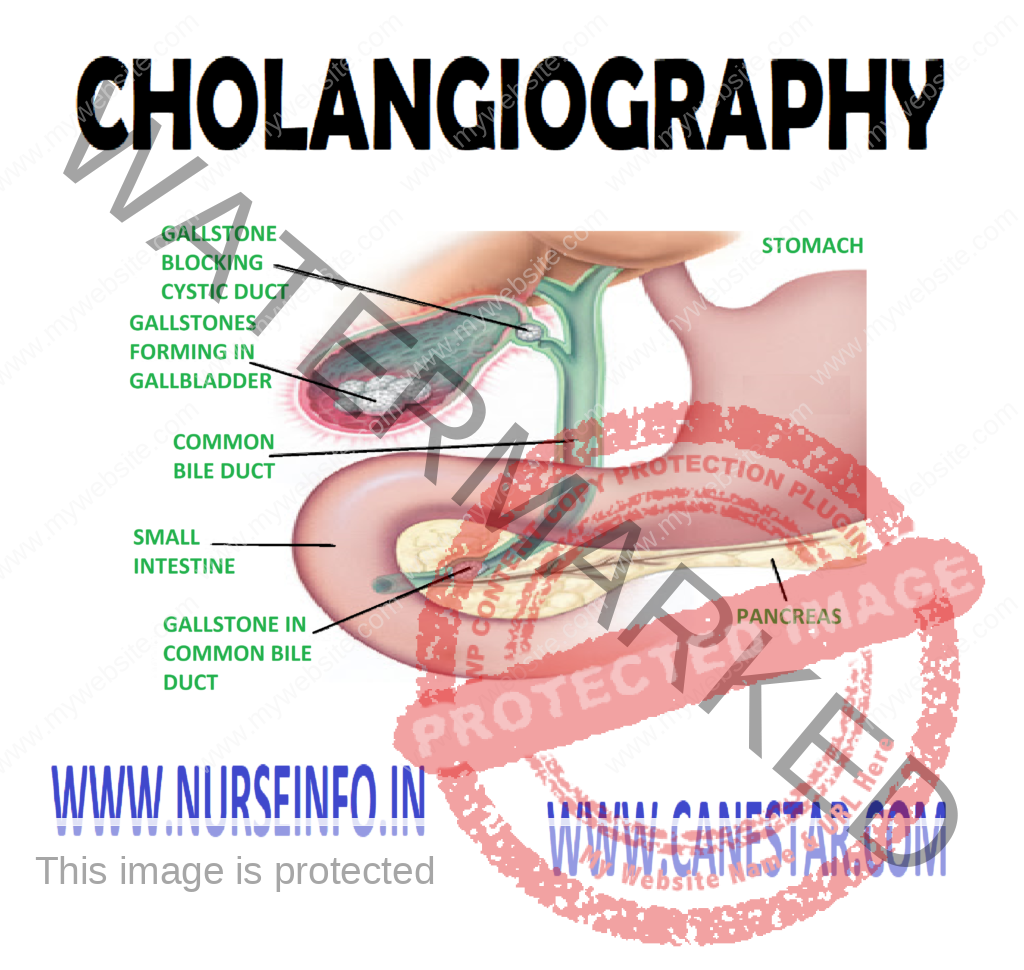
Intravenous
(IV) cholangiography examines the biliary ducts (hepatic ducts within the
liver, the common hepatic duct, the cystic duct, and the common bile duct) by
radiographic and tomographic visualization. Often the gallbladder is not
well-visualized.
The contrast
substances, an iodine preparation such as iodipamide meglumine (cholografin)
are injected intravenously. Approximately 15 minutes, X-rays are taken. IV
cholangiography is a tedious and time consuming test, and reactions are more
common with the IV contrast substances than with the oral agents.
Percutaneous
cholangiography is indicated when biliary obstruction is suspected. The
contrast substances are directly instilled into the biliary tree. The process
is visualized by fluoroscopy and spot films are taken.
T-tube
cholangiography is also known as postoperative cholangiography may be done 7-8
hours after a cholecystectomy to explore the common bile duct for patency of
the duct and to see if any gallstones are left. During the operation, a T-shaped
tube is placed in the common bile ducts to promote drainage. The contrast
substances are injected into the T-tube. A stone or two could be missed during
a cholecystectomy, causing occlusion of the duct.
Normal findings: patient biliary
ducts (absence of stones and strictures)
CLINICAL PROBLEM
Test
IV cholangiography
Indications: to detect stricture, stones, or tumor in the biliary system
Percutaneous cholangiography
Indications: to detect obstruction of the biliary system caused from
stones, cancer of pancreas
T-tube cholangiography
Indications: to detect obstruction of the common bile duct from stones or
stricture, fistula
CLIENT PREPARATION
Explain the client the purpose and
procedure for the IV cholangiography, percutaneous cholangiography or T-tube
cholangiography
Check with your institution to see if
procedure differ and make modifications in your explanation to the client
Explain the procedure step by step
for the client, as requested. This can decrease high levels of anxiety
Obtain a client history of allergies
to sea food, iodine or X-ray dye. Report a history of allergies to these
substances to the healthcare provider, and record in the client’s chart
Permit the client to express his or
her concerns. Answer questions, if possible
Check that consent form has been
signed by the client before giving a sedative and before the test
Administer the pre-test orders (e.g.
laxatives, sedatives, etc)
Inform the client having IV
cholangiography that the test may take several hours (up to 4 hours)
Observe for signs and symptoms
allergic reaction to contrast agents (e.g. nausea, vomiting, flushing, rash,
urticaria, hypotension, slurred, thick speech and dyspnea)
Check the infusion site for signs of
phlebitis (e.g. pain, redness, and swelling). Apply warm compresses to the
infusion site if symptoms are present, as ordered
Check the vital signs as ordered
following the percutaneous cholangiography
PROCEDURE
IV
Cholangiography
A consent form for IV cholangiography
should be signed
The client should be on NPO for 8
hours the test. Some radiologist encourages fat-free liquids before the test to
prevent renal toxicity caused by the injected dye
A laxative (e.g. citrate of magnesium
or castor oil) maybe given the night before the test, and cleansing enema may
be given in the morning. Keeping the gastrointestinal tract clear can prevent
shadows in the X-ray films. Check with radiology department for the exact
preparation needed
A contrast agent, iodipamide
meglumine (cholografin) is injected intravenously while the client is lying on
a tilting X-ray are taken every 15-30 minutes until the common bile duct is
visualized
Percutaneous
Cholangiography
A consent form for percutenous
cholangiography should be signed
The client should be on NPO for 8
hours before the test
A laxative the night before and
cleansing enema the morning of the test may be ordered
Preoperative medications usually
include sedatives/tranquilizers. An antibiotic may be ordered for 24-72 hours
before the test for prophylactic purposes
The client is placed on tiling table
that rotates. The upper right quadrant of the abdomen is cleaned and draped. A
local (skin) anesthetic is given
The client should exhale and hold his
or her breath while a needle is inserted with the guidance of fluoroscopy into
the biliary tree. Bile is withdrawn, and the contrast substances are then
injected. Spot films are taken
A sterile dressing is applied to the
punctured site
T-tube
Cholangiography
A consent form for T-tube
cholangiography should signed
The client should be on NPO for 8
hours before the test
A cleansing enema may be ordered in
the morning before the test
The client lies on an X-ray table,
and a contrast agent such as sodium diatrizoate (hypaque) is injected into the
T-tube and an X-ray is taken 15 minutes later
The T-tube may be removed after the
procedure or it may be left in place
Factors
affecting diagnostic results: obesity and gas or fecal material in the
intestines can affect the clarity of the X-ray
Client education: instruct the client to remain in bed or 6 hours following percutaneous cholangiography
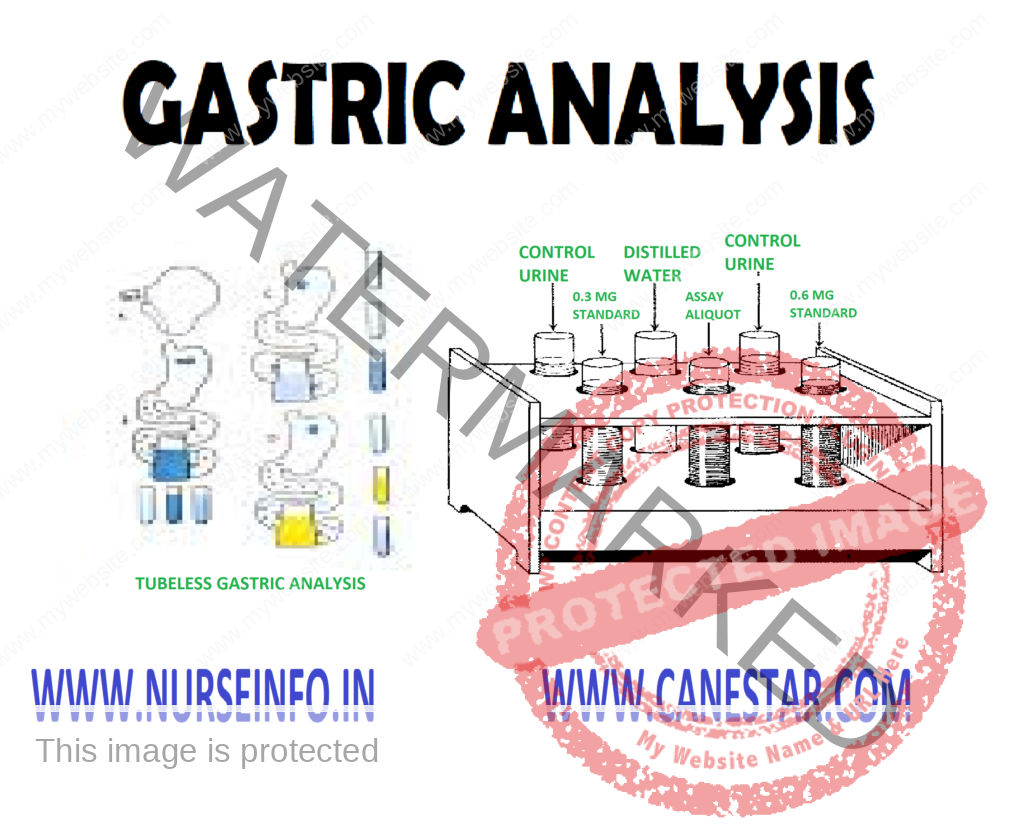
The gastric
analysis test examines the acidity of the gastric secretions in the basal state
(without stimulation) and the maximal secretory ability (with stimulation, i.e.
with histamine phosphate, betazole hydrochloride (histalog) indicate a peptic ulcer
(stomach or duodenal), and an absence of a HCl (achlorhydria) could indicate
gastric atrophy (possibly caused by gastric malignancy) or pernicious anemia.
In addition,
gastric contents can be collected for cytological examinations. Gastric
analysis by tube (basal and stimulation) and tubeless gastric analysis (urine
examination after a resin dye and stimulant are administered) are the methods
used for evaluating gastric secretions.
BASAL GASTRIC ANALYSIS (TUBE)
Gastric
secretions are aspirated through a nasogastric tube after a period of fasting.
Specimens are obtained to evaluate the basal acidity of the gastric content
first and the gastric stimulation test follows.
STIMULATION GASTRIC ANALYSIS (TUBE)
The stimulation
test is usually a continuation of the basal gastric analysis. After samples of
gastric secretions are obtained, a gastric stimulant (i.e. histalog or
pentagastrin) is administered, and gastric contents are aspirated every 15 – 20
minutes until several samples are obtained.
TUBELESS GASTRIC ANALYSIS
This test is
for screening purpose to detect the presence or absence of HCl; however, it
will not indicate the amount of the free acid in the stomach. A gastric
stimulant (caffeine, histalog) is given, and an hour later a resin dye (azuresin,
diagnex blue) is taken orally by the client. The free HCl releases the dye from
the resin base; the dye is absorbed by the gastrointestinal tract and is
excreted in the urine. Absence of the dye in the urine after 2 hours is
indicative of gastric achlorhydria. This test method saves the client
discomfort of being intubated with nasogastric tub; however, it does lack
accuracy.
NORMAL FINDINGS
Fasting: 1.0-1.5 mEq/L/h
Stimulation: 10-25 mEq/L/h
Tubeless: detectable dyes in the
urine
PURPOSE
To evaluate gastric secretions
To detect an increase or decrease of
free HCl
CLINICAL PROBLEMS
Decreased
Level
Pernicious anemia
Gastric malignancy (atrophy)
Atrophic gastritis
Elevated
Level
Peptic ulcer (duodenal)
Zollinger-Ellison syndrome
CLIENT PREPARATION
Explain the purpose and procedure of
the tube or tubeless gastric analysis test to the client. Check with the
healthcare providers before you give your explanation to find out whether he or
she will perform both basal and stimulation gastric analysis. List the steps of
the test on paper for the client, if needed.
Tell the client how the nasogastric
tube is inserted (i.e. the tube is lubricated and passes through the nose or
mouth) and that he or she will be asked to swallow or will be given sips of
water as the tube is passed into the stomach. The end of the tube may be
attached to low intermittent suction
Notify the healthcare provider if the
client is receiving the following categories of drugs; antacids,
antispasmodics, anticholinergics, adrenergic blocker, cholinergics and
steroids. Drugs from the above groups and a few others should be withheld for
24-48 hours before the gastric analysis. Drugs that cannot be withheld should
be listed on the request slip.
Monitor vital signs. Observe for
possible side effects for use of stimulants (i.e. dizziness, flushing,
tachycardia, headache and a lower systolic blood pressure)
Label the specimens (gastric or
urine) with the client’s name, the date, the time and the specimen’s number
Be supportive of the client.
Encourage the client to express his or her concerns or fear. Answer questions
or refer to appropriate health professions
PROCEDURE
The client should be on NPO for 8
hours to 12 hours prior to the test. Smoking should be restricted for hours
Certain groups (i.e.
anticholinergics, cholinergics, adrenergic blockers, antacid, and steroids) and
alcohol and coffee should be restricted for atleast 24 hours before the test.
It should be notes on the request slip if the drugs cannot be withheld.
Baseline vital signs should be
recorded
Loose dentures should be removed
A lubricated nasogastric tube is
inserted through the nose or mouth
A residual gastric specimen and four
additional specimen taken 15 minutes apart should be aspirated and labeled with
the client’s name, the time, and a specimen number. The nasogastric tube may be
attached to low intermittent suction
Stimulation
Test
A
continuation of the basal gastric analysis
A gastric stimulant is administered
(i.e. betazole hydrochloride (histalog) or histamine phosphate intramuscularly;
pentagastrin subcutaneously)
Several gastric specimens are
obtained over a period of 1-2 hours (histamine four 15-minute specimens in 1
hour and histalog eight 15-minute specimen in 2 hours). Specimens should be
labeled with the client’s name, the date, the time, and specimen numbers.
Vital signs should be monitored.
Emergency drugs, such as epinephrine (adrenalin) should be available
The test usually takes 2 and half
hours for both parts (basal and stimulation)
TUBELESS GASTRIC ANALYSIS
The client should be on NPO for 8-12
hours before the test
The morning urine specimen is
discarded
Certain drugs are withheld for 48
hours before the test (i.e. antacids, quinine, iron, vitamin B complex), with
the health care providers permission
Give the client caffeine sodium
benzoate 500 mg in a glass of water
Collect a urine specimen 1 hour
later. This is control urine specimen
Give the client the resin dye agent
(azuresin or diagnex blue) in a glass of water
Collect a urine specimen 2 hours
later. The urine may be colored blue or blue green for several days. Absence of
color in the urine usually shows absence of HCl in the stomach
FACTORS AFFECTING DIAGNOSTIC RESULTS
Incorrect labeling of specimens could
affect test results
Drugs: antacids, anticholinergics,
and histamine blockers (cimetidine, ranitidine) could decrease HCl levels;
antacids, electrolyte and iron preparations, vitamin B complex, and quinidine
could fastly elevate the diagnex blue level
Stress, smoking and sensory
stimulation could increase HCl secretions
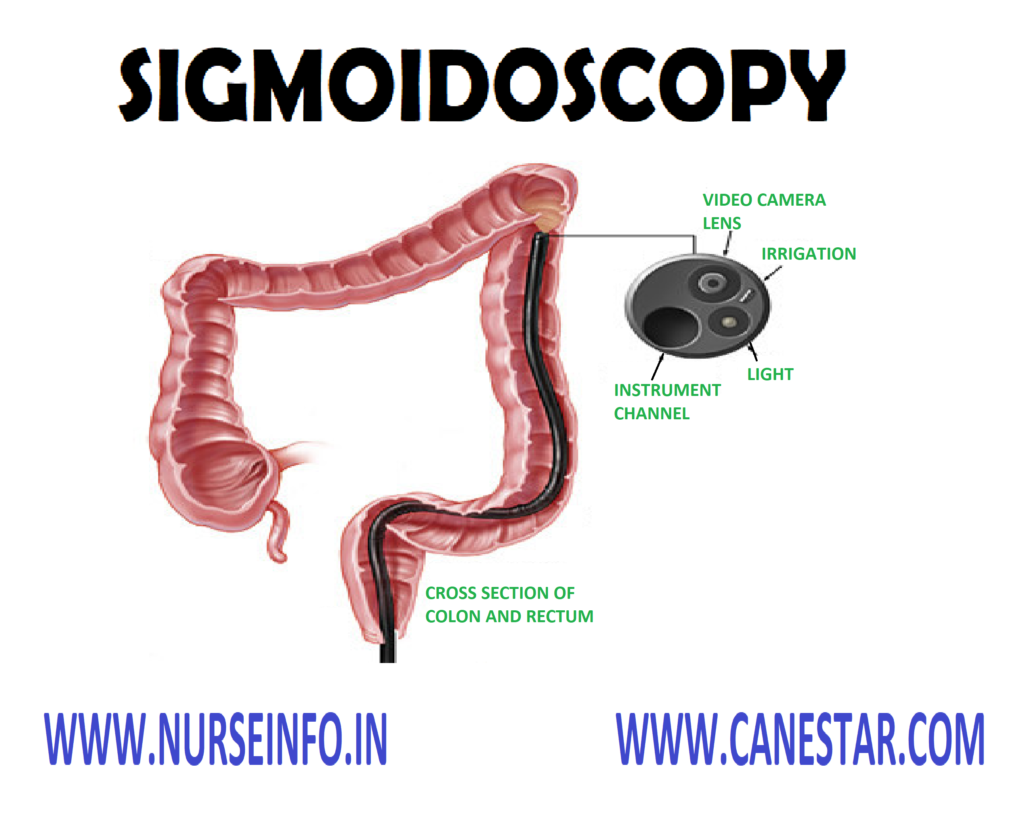
SIGMOIDOSCOPY – Definition, Purpose,
Principle, General Instruction, Preliminary Assessment, Preparation of the
Article, Preparation of the Patient, Procedure and After Care
DEFINITION
Sigmoidoscopy
is defined as an examination of the distal sigmoid colon, rectum and anal canal
PURPOSE
To diagnose malignant and benign
neoplasm
To detect hemorrhoids, polyps,
fissures and fistula
To detect abscesses within the anal
canal and rectum
Before the rectal surgery
To evaluate rectal bleeding, acute or
chronic diarrhea
PRINCIPLE
Microorganism are found everywhere
the nurse takes care to prevent the transference of microorganism
A thorough knowledge about the
anatomy and physiology of the GI tract
Mental and physical preparation of
the patient facilitates introduction of the tube
Systematic ways of functioning may
save time, energy, and material
Any unfamiliar situation produces
fear and anxiety
GENERAL INSTRUCTION
Explain the procedure to the client
and win his confidence and cooperation
The client assumes a knee-chest
position
The client is instructed to eat a
light evening meal prior to the examination
The nurse should remain with client.
Watch his general condition and monitor the vital signs and skin color
Both doctor and nurse should follow
strict aseptic technique
Lubricate the instrument before
introducing into the rectum
Do not expose the patient
unnecessarily
PRELIMINARY ASSESSMENT
Identify the patient name, age, ward,
bed number, sex and diagnosis
Check doctors order for specific
precautions
Check the general condition of the
patient
Check for any lesions on the rectal
area
Check the consciousness and ability
to follow instruction
Assess the need for extra help
Articles available in the unit
PREPARATION OF THE ARTICLE
Sigmoidoscope
Draping sheet
Gloves
Lubricant
Cotton swabs
Emesis basin
Toilet tissue
Biopsy forceps
Suction machine
Paper bag
PREPARATION OF THE PATIENT
Explain the procedure to the client
Provide privacy with curtains and
adequate draping
Cover the patient with sheet or bath
blanket
Remove the back rest and
extra-pillows
Place the mackintosh and towel under
the patient
Place the patient in a knee-chest
position
Keep all the article arranged on the
bedside locker and check the article for good working condition
Remove the bottom garments or raise
it up above the waist level
Fold back a small portion of the
sheet or bath blanked to expose only the anal region
PROCEDURE
The client
assumes a knee chest position and encourages him to relax, as much as possible
and to take deep breathing. The physician usually first examines the rectum
with gloved fingers. After that the sigmoidoscope is inserted into the anus to
visualize the distal sigmoid colon and rectum. A flexible sigmoidoscope is also
make it possible to visualize the descending colon and rectum. The examines may
obtain specimen from suspicious looking access of anus
AFTER CARE
The client is observed for signs of
peforation, such as bleeding, liver, etc
Label and send the specimen to the
laboratory
Allow the patient to take rest
Replace all the articles
Recording and reporting (time, data,
patient responses to the procedure complication if any)
SIGMOIDOSCOPY – Definition, Purpose, Principle, General Instruction, Preliminary Assessment, Preparation of the Article, Preparation of the Patient, Procedure and After Care
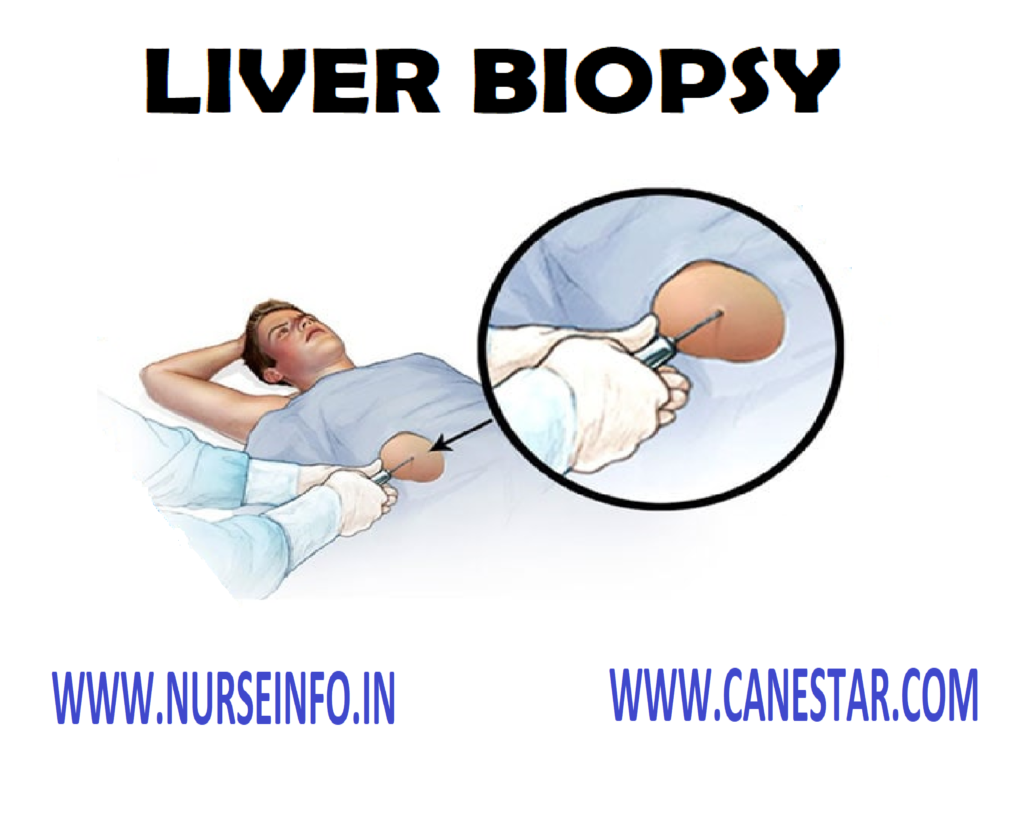
LIVER BIOPSY – Definition, Purpose,
Indication, Contraindication, General Instruction, Preliminary Assessment,
Preparation of Patient and Environment, Articles Needed, Procedure, After Care
and Complication
DEFINITION
It is the
removal of a bit of liver tissue particularly for histological examination.
PURPOSE
Diagnostic pour pose
Morphologic studies
Biochemical studies
Bacteriologic studies
Immunologic studies
To get information regarding
progression of disease
Response to therapy
INDICATION
Cirrhosis of liver
Hepatic malignancies
Granulomas
Reticuloendothelial disease, e.g.
leukemia
CONTRAINDICATION
Bleeding disorders e.g.
thrombocytopenia
Infection in liver, peritoneum,
biliary
Severe form of hepatocellular
jaundice
Gross ascites
Suspected hemangioma of liver
Site: needle
is inserted at eighth and ninth intercostal space
Position:
Position the patient on the right
side near to the edge of bed
After procedure, position patient
supine
GENERAL INSTRUCTION
Aseptic technique to be followed
Investigate clotting time, bleeding
time and prothrombin time
Explain the need of procedure in a
simple way
Watch for complications during and
after the procedure
Keep two units of blood available for
emergency care
After procedure, patient should take
24 hour strict bed rest
PRELIMINARY ASSESSMENT
Check the doctors order for specific
instructions
Check age, sex, name and diagnosis of
patient
Check investigation report from
laboratory
Check patient’s ability to obey
orders
Check patient’s self-care ability
Check if all articles are available
in the unit
PREPARATION OF PATIENT AND ENVIRONMENT
Explain the procedure to minimize
fear and anxiety
Provide privacy
Position the patient
Teach the patient breathing exclusive
Vitamin K is injected to prevent
hemorrhage
Informed consent is obtained from the
patient
Shave the area and clean it with
antiseptic agent
Arrange articles at bedside
Monitor vitals before, during and
after the procedure
Maintain NPO, hours before procedure
ARTICLES NEEDED
An unsterile
tray:
Solutions – surgical spirit, Tr.
Benzoin, iodine
Mackintosh with towel
K-basin
Paper bag
Xylocaine 2%
Sterile Tray
Containing the Following
Formalin 10% solution in a container
Sponge holding forceps
Dissecting forceps
Small 2 bowls to receive solutions
Keep patient NPO for 4 hours
Wash hands thoroughly
Recording and reporting
Documentation
COMPLICATION
Pain due to irritation of liver cells
Hemorrhage
Damage to neighboring organs
Peritonitis
Infection to the needle site
Shock
Pneumothorax
LIVER BIOPSY – Definition, Purpose, Indication, Contraindication, General Instruction, Preliminary Assessment, Preparation of Patient and Environment, Articles Needed, Procedure, After Care and Complication
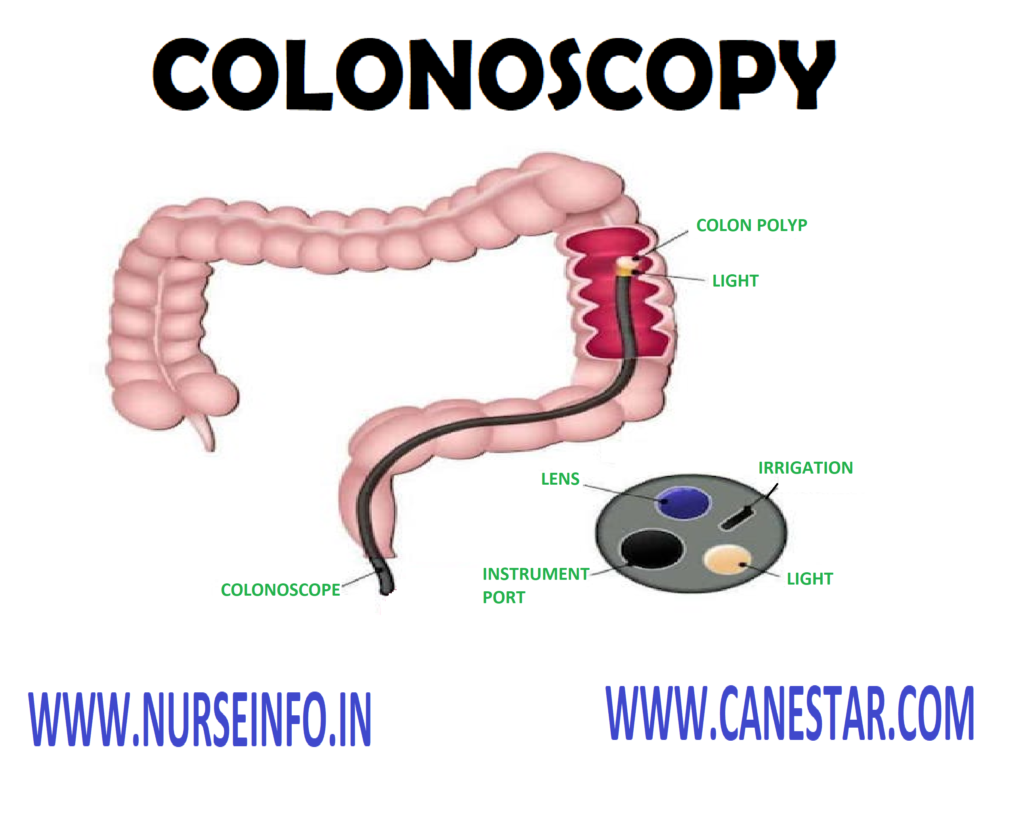
COLONOSCOPY – Definition, Purpose,
Indication, Principle, General Instruction, Preliminary Assessment, Preparation
of the Article, Preparation of the Patient, Procedure, After Care and
Complication
DEFINITION
It is a
diagnostic procedure which provides visualization of the lining of the large
intestine with the help of flexible endoscope.
PURPOSE
Diagnostic
Purposes
To detect colon cancer or polyps
To detect inflammation and disease of
bowel
Therapeutic
Purposes
To remove the polyps
Detection and prevention of
colorectal cancer
To treat bleeding or stricture
INDICATION
Unexplained constipation/diarrhea
Rectal bleeding, lower abdominal pain
PRINCIPLE
A thorough knowledge about the
anatomy and physiology of the GI tract
Mental and physical preparation of
the patient facilitates introduction of the tube
Systematic way of functioning saves,
time, energy and material
Any unfamiliar situation procedure
fear and anxiety
GENERAL INSTRUCTION
Explain the procedure to the client
to win his confidence and cooperation
Limit the intake of fluids for 24 to
72 hours before the examination
Fleet saline enema should be given
until the return is clear
Lavage solutions are used for
effective cleansing of bowel
Instruct the patient not to take
routine medication when lavage solution is ingested
Advise the diabetic patient to
consult his/her physician about medication adjustment
Instructing all the patients
especially elderly to maintain adequate fluid, electrolyte and caloric intake
NSAIDs must be discontinued before
the test and for 2 weeks after the procedure
The patients having cardiovascular
disease require careful cardiac monitoring during the procedure
Colonscopy cannot be performed if
there is a suspected colon perforation, acute severe diverticulitis
The patients taking heparin must
consult physician for specific instruction
PRELIMINARY ASSESSMENT
Identify the patient name, age, sex,
diagnosis, ward and bed numbers
Check the doctor’s order for specific
precaution
Check the general condition of the
patient
Check for any lesion on the rectal
area
Check the consciousness and ability
to follow the instructions
Check the articles available in the
unit
Check the purpose of the procedure
Check the medical order for the
collection of specimen
PREPARATION OF THE ARTICLE
Colonoscope
Draping sheet
Lubricant
Cotton swabs
Gloves
Emesis basin
Toilet tissue paper
Kidney tray and paper bag
Biopsy forceps
PREPARATION OF THE PATIENT
Explain the procedure to the patient
Provide privacy with curtains
Cover the patient with sheet or bath
blanket
The patient receivers NPO after
midnight before the test
Place the patient in a left lateral
position
Keep the entire article on the bedside
and check the articles for good working condition
Remove the bottom garments or raise
it up above the waist level
Get the written consent from the
client
PROCEDURE
The patient assumes left lateral
position. Ask him to relax as much as possible. The client is usually given
(IV) sedation with valium, Demerol. The lubricated colonoscope is inserted into
the anus. A small amount of it is instilled to help the physician visualize the
bowel lumen. When the colonoscope reaches the sigmoid junction, the client may
move to the supine position making it easier to advance the colonoscope pass
the splenic flexure. During the test, encourage the client to relax. Monitor
the vital signs throughout the procedure watching for a vasovagal response
reaching to hypotension and bradycardia
AFTER CARE
Place the patient in a comfortable
position
Monitor the vital signs
Assess for the signs of perforation
Administer the IV fluids with sedation
Client may develop nausea which may
dictated with IV antiemetic
Recording and reporting (time, date,
patient response, complication, if any)
COMPLICATION
Bleeding
Intestinal perforation
COLONOSCOPY – Definition, Purpose, Indication, Principle, General Instruction, Preliminary Assessment, Preparation of the Article, Preparation of the Patient, Procedure, After Care and Complication
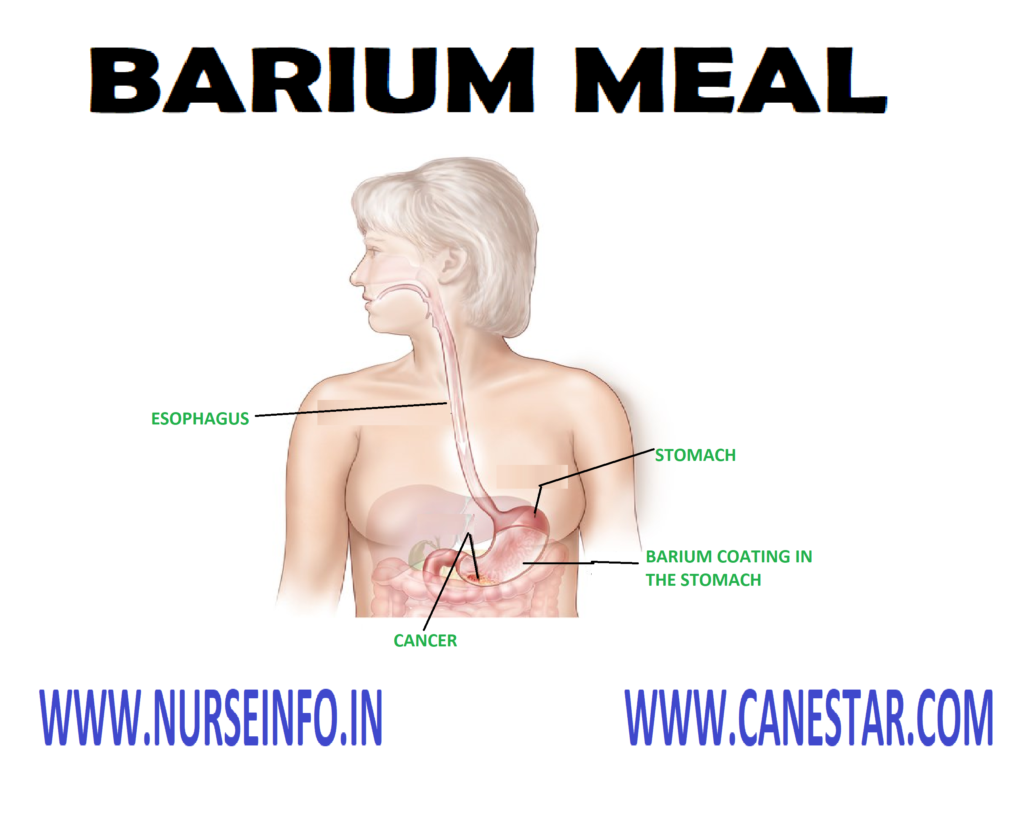
BARIUM MEAL – Purpose, Principles,
General Instruction, Types, Preliminary Assessment, Preparation of the
Articles, Preparation of the Patient, Procedure, After Care and Complication
The
examination of upper GI tract under fluoroscopy after the client drinks BaSO4
PURPOSE
To detect or exclude any anatomic or
functional changes of upper gastrointestinal sphincter
To diagnose ulcer, varices, tumors,
regional enteritis
Malabsorption syndrome
PRINCIPLE
Microorganisms are found everywhere.
The nurse takes care to prevent the transfer of microorganism
Any unfamiliar situation produces
fear and anxiety
Good body mechanics maintains the
body alignment and prevents fatigue
Systematic ways of functioning saves
time, energy and material
GENERAL INSTRUCTION
The client should be prepared both
physically and psychologically for the procedure
Instruct the patient not to take
anything orally 8 hours prior to rest
Ensure the patient to take low
residual diet for two days
Instruct patient not to smoke prior
to test
The nurse should remain with the
client and watch his general condition
Both doctor and nurse should follow
strict aseptic technique
X-ray should be taken in every fixed
interval
The nurse should assess the client
allergy to BaSO4 prior to procedure
Give prescribed laxative in previous
night
TYPES
Double-contrast studies
Enteroclysis
PRELIMINARY ASSESSMENT
Check the diagnosis
Check the abilities and limitations
Check the consciousness and ability
to follow dissection
Any extra help needed
Articles available in the patient
unit
PREPARATION OF THE ARTICLES
A tray
containing:
Mackintosh
and towel
BaSO4
suspension in a bottle
Ounce glass
Paper bag
and kidney tray
X-ray
machine
PREPARATION OF THE PATIENT
Explain the procedure to the patient
to win his confidence
Transfer the patient to the X-ray
department
Change client’s garments with
hospital dress
Maintain the privacy of the client
with screen and drapes
Maintain the desired position
Arrange all the articles near bedside
PROCEDURE
Films are taken at first
Patient is given BaSO4
suspension to drink
1st X-ray will be taken
Series of X-rays are taken at
prescribed timings
AFTER CARE
Transfer the patient to ward
Place the patient comfortably
A laxative may be prescribed
Instruct the client to take more oral
fluids it help to pass the barium
Monitor the stools for the passage of
barium
Stools will be appearing chalky while
barium can cause bowel obstruction
COMPLICATION
Obstruction in the intestine or
Impaction in the rectum
BARIUM MEAL – Purpose, Principles, General Instruction, Types, Preliminary Assessment, Preparation of the Articles, Preparation of the Patient, Procedure, After Care and Complication