MAGNETIC RESONANCE IMAGING – Purpose,
Indications and Client Preparation
Magnetic
resonance imaging (MRI) is one of the most expensive noninvasive diagnostic
options; a verity of data may be obtained in a single image. It provides the
best information on chamber, size, wall motion, valvular function and great
vessel blood flow without the use of ionizing radiation
PURPOSE
MRI is commonly used for examination
of the aorta and detection of tumors, aneurysms, masses, cardiomyopathies and
pericardial disease
MRI can show the heart beating and
the blood flowing in any direction
All standard quantitative functional
indices, except transstenotic gradients can be obtained from an MRI study
INDICATIONS
Normal morphology and structural
changes
Wall thickness, chamber volumes,
valve areas, vessel cross-section and extent, location and size of lesions
Global and regional biventricular
function, including ejection fraction, stroke volume and cardiac output
Blood flow quantifications within
vessels over the cardiac cycle
Tissue characterization of
paracardiac and intracardiac masses, pericardiac masses, pericardial diffusion
and myocardial infarction
CLIENT PREPARATION
Inform the client that the test is
noninvasive
Provide written information about the
test, if available
Explain to client that he will lying
in one position for a long period
Screen the client for claustrophobia
and anxiety; these can be reduced by premeditation with an antianxiety drug
MAGNETIC RESONANCE IMAGING – Purpose, Indications and Client Preparation
MAGNETIC RESONANCE IMAGING –
Definition, Purpose, Principle, Instruction, Preparation of the Client, MRI
Equipment, Procedure, After Care, Advantages of MRI, Disadvantages and
Contraindications
Magnetic
resonance imaging is also called as nuclear magnetic resonance; this technique
was independently discovered by Felix Bloch and Purcell in 1952. He explained
that when the nuclear energy is exposed to a magnetic field, it behaves like a
magnet. This nuclear magnetism with its magnetic field helps the nuclear energy
to act as a small magnet
DEFINITION
Magnetic resonance imaging (MRI) is a
noninvasive diagnostic test with a powerful magnetic field to obtain images of
different areas of the body
Magnetic resonance imaging or MRI
uses a powerful magnetic field and radiofrequency waves to produce computerized
images of internal organs and tissues
PURPOSE
To produce tissue analysis and images
not readily seen on standard X-ray
To detect tiny lesions of multiple
sclerosis on brain and spinal cord
To detect slipped disc in the spinal
cord
To get a clear image of internal
structures in response to the magnetic field, created by harmless, low energy
radiowaves
To detect, localize and stage
malignancies of the CNS, spine, head and neck and musculoskeletal system
PRINCIPLE
MRI does not employ ionizing
radiations, so it is free from radiations where as CT scan is by X-ray
The picture from an MRI are opposite
of the CT scan. In MRI the bones appear black whereas in CT scan bones appear
white
MRI is used to study the tissue
metabolism by spectroscopy where as CT not
MRI is used to obtain sectional views
in any plane unlike CT scan which is more or less restricted to cross-sectional
imaging
MRI detects water because it focuses
on the behavior of hydrogen atom in water molecule. This allows MRI to
distinguish between water proof and water rich tissues
MRI gives early warning of myocardial
infarction or stroke with the help of sodium or phosphorus ions
INSTRUCTIONS
The client informed that it is
painless noninvasive procedure and he will hear a lot of noises during the
procedure
All jewelry, eye glasses and hair
pins/clips or any other metal objects should be removed
Carefully question and screen for the
presence of any metal implantation
Consent for contrast and general
anesthesia to be taken
Patient should wear only cotton dress
No dietary restriction for MRI even
for contrast, unless anesthesia is planned
Extra blanket may be provided as the
client is in the air conditioned for more than 45 minutes
PREPARATION OF THE CLIENT
Explain the procedure to the patient
in a simple language
Remove all metal objects, clips and
jewelry from the patient’s body
Give information about actual
procedure, staff involved, duration and sensation to be experienced and
probable outcome
The patient is assured the
investigation is safe and painless
Psychological support and assistance
to be given for claustrophobia
MRI EQUIPMENT
Magnet
Radiofrequency (RF) coils
(transmitter/receiver)
Gradient coils
Computer
Display unit
Digital storage facilities
PROCEDURE
After removing all metal objects, the
client lies on a padded stretcher that slides into tunnel like chamber
Place the head in a plastic helmet
like structure
Place the arms at the side of the
X-ray table is the rolled several feet into the scanner
The patient is placed in a strong
magnetic field up to 40,000 times stronger than the earth’s magnetic field and
is then subjected to precise, computer programmed bursts of radiofrequency
waves
The client feels nothing and hears
only loud noises caused by the pulsating radiofrequency waves the resemble a
Jackhammer or drill which lasts about a few minutes
AFTER CARE
Ask the patient to get up slowly, it
the client may feel dizzy provide bed rest
Check the vital signs and record it
Assess the allergic reactions if dye
administered
For clients who had MRI under general
anesthesia kept fasting for 3-4 hours and IV fluids to be given
ADVANTAGES OF MRI
Does not expose the client to
radiation because it is non-ionizing radiation
Results are obtained rapidly
Multisectional imaging
It is safe even contrast dye is used
Cost affordable when comparing with
other invasive surgical procedures
Provides tissue characterization and
blood flow
Provides clear images of moving
organs
Helps to detect disorders that cause
loss of myelin from nerve such as multiple sclerosis
DISADVANTAGES
Long imaging time
Many protocol options
Correct choice of machine parameters
essential
Poor bone and calcium detail
Not available in all areas
Difficult to manage and monitor
patients who are critically ill
CONTRAINDICATIONS
Clients with pacemaker are
contraindicated
Cannot use in clients who are
extremely obese
Cannot use in clients with metal
implants
MAGNETIC RESONANCE IMAGING – Definition, Purpose, Principle, Instruction, Preparation of the Client, MRI Equipment, Procedure, After Care, Advantages of MRI, Disadvantages and Contraindications
MAGNETIC RESONANCE IMAGING –
Indications, Advantages, Nursing Consideration, Contraindications, Interfering
Factors, Client Preparation, Procedure and Post-Procedural Care
Magnetic resonance
imaging (MRI) is a noninvasive test that employs a powerful magnet, radio waves
and a computer to help diagnose respiratory disorders by providing
high-resolution, cross sectional images of lung structures and by tracing blood
flow. MRI’s great advantage is its ability to see through bone and to delineate
fluid-filled soft tissue in great details, without using ionizing radiation or
contrast media
INDICATIONS
It provides valuable information
about body’s biochemistry by placing the client in a magnetic field
MRI is based on how hydrogen atoms
behave when they are placed in a magnetic field and then distributed by radio
frequency signals
ADVANTAGES
MRI provides better contrast between
normal tissues and pathogenic tissues
It provides a natural contrast from
other tissues to the blood vessels when using MRI
It is possible to image the
transverse, sagittal and coronal planes directly with MRI
NURSING CONSIDERATION
Instruct the client to remove all
jewelry and taken everything out of his packet
Emphasize that there must be no metal
may demagnetize the magnetic strip on a credit card to stop a watch from
ticking
Make sure the client has notified his
doctor if he has any metal inside his body, such as a pacemaker, orthopedic
pins or discs and bullets or sharper fragments
Inform the client he will asked to
lie on a table slides into an 8’ (2.4 m) tunnel inside the magnet
Advise him to breathe normally but
not to talk or move during the test to avoid distorting the results
Inform him the test usually takes
15-30 minutes
Warn the client that the machinery
will be noisy with sounds ranging from an incessant ping to a loud bang
The client may feel claustrophobic or
board. Encourage him to relax and to concentrate on breathing or a favorite
subject or image
CONTRAINDICATIONS
Clients who are extremely obese
Clients who are pregnant, because the
long-term effects of MRI are not known at this time
Clients who are confused and agitated
Clients who are claustrophobic if
using an enclosed scanner
Clients who are unstable and require
continuous life support equipment, because monitoring equipment cannot be used
inside the scanner room
Clients with implantable metal
objects such as pacemaker, infusion pumps, aneurysm clips, inner ear impacts
and metal fragments in one or both eyes, because the magnet may move the object
within the body and injure the client
INTERFERING FACTORS
Movement
during the scan causes artifacts on MRI
CLIENT PREPARATION
Explain the procedure to the patient
Inform the client that there is no
exposure to radiation
Obtain informed consent if required
by the institution
Inform the client that he or she can
drive without assistance after the procedure
Tell parents of young client’s that
they may read or talk to a child in the scanning room during procedure, because
no risk of radiation from the procedure exists
If possible, show the client a
picture of the scanning machine and encourage verbalization of anxieties. Some
client’s may experience claustrophobia. Antianxiety medications may be helpful
for those with mild claustrophobia
Instruct the client to remove all
metal objects (e.g., dental brides, jewelry, hair clips, belts, credit cards)
because they will create artifacts on the screen. The magnetic field can damage
watches and credit cards
Inform the client that he or she will
be required to remain motionless during this study. Any movement can cause
artifacts on the screen
Inform the client that during the
procedure he or she may hear a thumping sound; earplugs are available if the
client wishes to use them
Inform the client that no fluid or
food restrictions are necessary before MRI
For comfort, instruct the client to
empty the bladder before the rest
PROCEDURE
The client lies on the flat form that
slides into a tube containing the doughnut shaped magnet
The client is instructed to lie very
still during the procedure
During the scan, the client can talk
to and hear the staff via microphone or earphones placed in the scanner
A contrast medium called gadolinium
(magnevist) has been approved by the US Food and Drug Administration. This is a
paramagnetic enhancement agent that crosses the blood-brain barrier. It is
especially useful for distinguishing edema from tumors
This procedure is performed by
qualified radiological technologist in approximately 30 to 90 minutes
Inform the client that the only
discomfort associated with this procedure may be lying still on a surface and
possible tingling sensation in teeth containing metal filling. Also, an
injection may be needed for administration of magnevist
POST-PROCEDURAL CARE
Inform the client that no special post-procedural care is needed
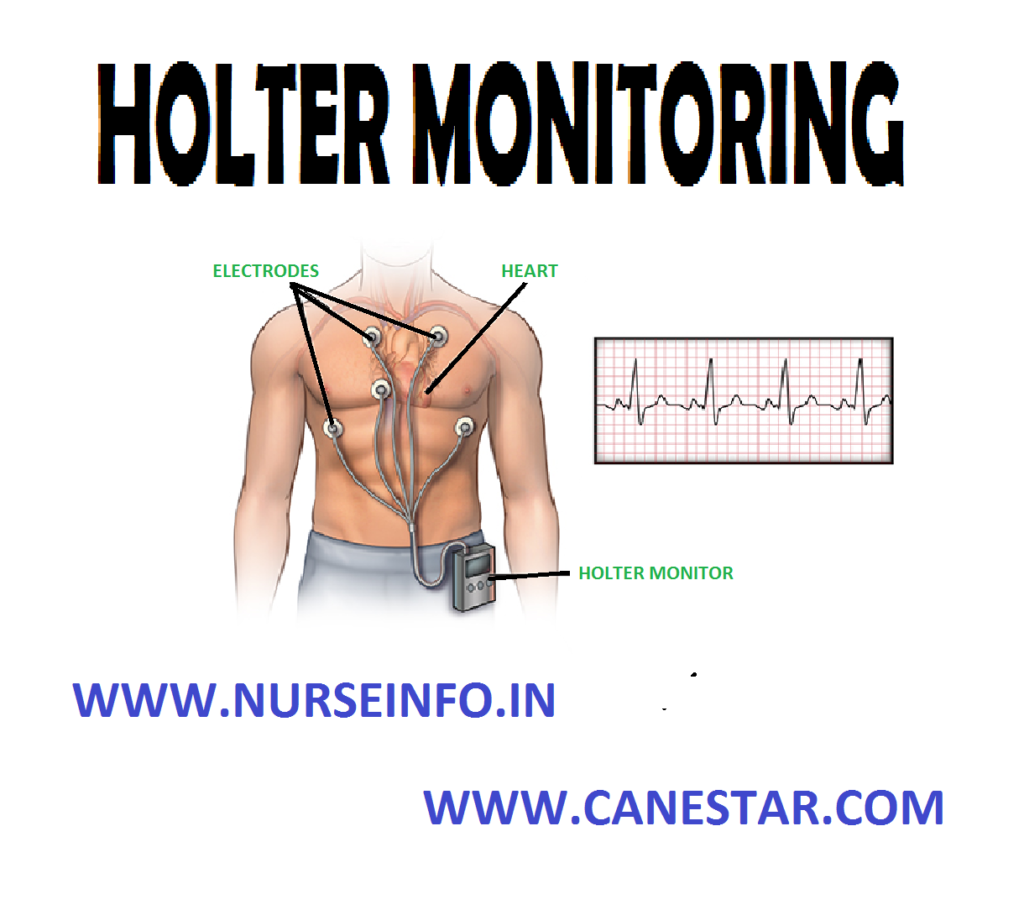
HOLTER MONITORING – Normal Findings,
Definition, Purpose, Findings, Client Preparation, Components, Procedure and
After Care
Holter
monitoring permits the recording of cardiac electric activity over time
(usually 24 hours) on a cassette tape recorder. It allows the client to perform
normal daily activities can be determined. When the client wears a portable
holter monitor, an ECG tracing may be recorded continuously over a period of a
day or longer on an out-patient basis
Holter
monitoring (ambulatory electrocardiography) evaluates the client’s heart rate
and rhythm during normal daily activities, rest, and sleep over 24 hours
(occasionally 48 hours). The holder monitor consists of a continuous
electrocardiogram recording on a cassette tape that is boxed inside. After 24
hours, the monitor with the tape is returned to the cardiac center and is
scanned or reviewed for abnormal findings such as cardiac dysrhythmia
NORMAL FINDINGS
No abnormal
electrocardiography findings
DEFINITION
Holter is
monitoring or 24 hours ambulatory monitoring provides a record of client’s
heart rate and rhythm over a period of 24-48 hours while the client is engaged
in the activities of daily living
PURPOSE
To identify and record cardiac
arrhythmias associated with normal daily activities, which cannot be detected
by routine ECG
To correlate these arrhythmias with
symptoms such as syncope, palpitation, chest pain. Light headedness or dyspnea
as described by the client
To assess the effectiveness of
antiarrhythmic or anginal drugs
To evaluate the functioning of the
artificial pacemaker suspected of malfunctioning
To detect ST segment alterations
during exertion in clients with obscure chest pain
FINDINGS
Conduction disturbances
Dysrhythmia
CLIENT
PREPARATION
Inform client regarding the purpose
of the holder monitoring and the vital role he or she plays in obtaining the
needed information
Check the holter monitor’s indicator
light to determine if the battery is functioning
The client is instructed to keep a
daily of activities and is taught how to trigger the event marker
Shave the site if the chest is hairy
to apply electrodes to the chest
Have the client demonstrate
triggering the event marker. The client will push the marker whenever pain or
other symptoms occur
Give the client a writing pad to
record activities during the test time
COMPONENTS
Recording apparatus: this is like a
small transistor radio that can be carried over the shoulder or connected to a
waist belt. This will contain a blank tape on which the heart rhythm is
recorded for 24 hours
Client’s dairy: the client recordings
all activities and any unusual symptoms experienced with time
Holter monitor scanner: it is a
computer system which can scan 24 hours tape in 12-15 minutes for any
arrhythmia
PROCEDURE
Explain the procedure to the client
and prepare the chest for electrodes
Apply the electrode jelly and fix the
electrodes securely to the chest
Fix the connecting wires from each
lead to the client’s skin with a stress loop to prevent accidental dislodging
of the leads
Connect the lead system to the holder
recorder which is prechecked and has a blank magnetic tape and fresh batteries
The recorder is fastened to the
client’s waist using a belt. When the recorder is activated, ECG signals are
recorded on the magnetic tape
Note the time in the client’s dairy
when the recorder is activated
Explain to the client to record all
the activities with time in the dairy and also any unusual symptoms experienced
Instruct client to come back with
dairy and the equipment on the next day at the specified time
Once the client reports back put off
the monitor and remove it from the client with the electrodes
Play back the tape on the scanner and
identify the areas of abnormal wave patterns
Record these areas on the ECG paper
as a permanent print out which can be analyzed later
AFTER CARE
Remove electrodes and cleanse the
site of gel
Observe the skin for signs of
irritation
HOLTER MONITORING – Normal Findings, Definition, Purpose, Findings, Client Preparation, Components, Procedure and After Care
ELECTROCARDIOGRAM – Normal Conduction System of Heart, Purpose of ECG, Components of ECG, ECG Graph Sheet, Heart Rate, Rhythm, Blocks, Axis, Hypertrophy, Electrolyte Disturbance in ECG, Myocardial Infarction, 12 Lead ECG, Lead Placement, Indications of 12 Lead ECG, Cause of Abnormal ECG Pattern, Preparation of the Patient, Preprocedural Care, Procedure, After Care and Nurses Responsibility (NURSING PROCEDURE)
Electrocardiogram
(ECG) is invented by Enthovan in 1901. It is a permanent record of the
electrical activity of the heart. It is a tracing made of the various phases of
the heart action by means of an electrocardiography. It is a graphical
representation that describes about the heart
The
electrocardiogram is an instrument which detects very small electrical signals,
generated by depolarization and repolarization of the myocardium. Electrodes
are attached to the limbs and chest of the patient, and electrical changes are
amplified and recorded on a moving paper
NORMAL CONDUCTION SYSTEM OF THE HEART
The
electrical impulse is generated in the sino-atrial node (pacemaker) of the
heart. it spreads through the both atria and cause atrial contraction. It
crosses the atrioventicular node and is passed down through right and left
bundle branches and finally reaches the Purkinje fibers, where the ventricular
contraction take place
PURPOSE OF ECG
Electrocardiogram is the most
important signal tool for the diagnosis of arrhythmias
It is helpful to study the cardiac
functions – rate, rhythm, and axis
It helps to diagnose cardiac disease
condition – myocardial infarction, injury, ischemia and hypertrophy
It helps to detect electrolytes
imbalance hyperkalemia
To give valuable diagnostic
information about cardiac function
To confirm the coronary heart disease
in most cases
To demonstrate cardiac arrhythmias
such as ventricular tachycardia and heart block
COMPONENTS OF ECG
Electrocardiography
consists of waves, complexes and intervals
Wave or complex: it is a deflection
that can be positive or negative wave-atrial depolarization QRS
complex-ventricular depolarization. T wave – ventricular repolarization
Segment: A is the period of time
between a wave or complex, e.g. ST-segment
Interval: an interval is the time
between two points on the ECG, e.g. PR- interval
Time duration (normal) for the P-wave
– 0.08 seconds PR-interval less than 0.20 seconds (average 0.16 seconds), QRS
complex 0.08 seconds, ST segment – 0.12 seconds and T-wave – 0.16 seconds
ECG GRAPH SHEET
ECG tracing are recorded on graph
paper, which is divided into small (1/1 mm) squares light lines and large (5/5
mm) squares by heavier lines
Horizontal lines (Y-axis) measures
the amplitude (voltage), one small square represents 1 mm and a large square
represents 5 mm or 0.5 mm
The vertical lines (X-axis) measure
time, each small square represents 0.20 seconds
HEART RATE
Normal heart rate is 60 to 100 beats
per minutes, less than 60 beats per minute called bradycardia and more than 100
beats per minutes called tachycardia
The heart rate per minute is equal to
the number of large squares between the R-waves divided into 300, e.g. if there
are two large squares between the R-waves 300 divided by 2 = 150 beats per
minutes
Count the number of small squares
between R-R intervals and divide. When the heart rhythm is irregular, count the
QRS complexes in 6 seconds and multiply the number by 10 to get the patient’s
heart rate per minutes (30 large block are equal to 6 second)
RHYTHM
Atrial rhythm measures the distance
between two consecutive P-waves (P-P interval). If the distance between all the
P-waves are same, the atrial rhythm is regular
Ventricular rhythm measures the
distance between the two consecutive R-waves (R-R interval)
Sinus tachycardia – heart rate is
more than 100 beats per minutes with normal PQRST waves
Sinus bradycardia – heart rate is
less than 60 beats per minutes with normal PQRST waves
Premature atrial contraction (PAC)
RR-intervals vary with a compensatory pause after the PAC
Paroxysmal atrial tachycardia (PAT)
heart rate is 150 to 250 per minutes, P-wave are difficult to recognize. QRS
complexes are normal in shape
Atrial flutter – P-waves form saw
tooth pattern, there are more than one P-wave between two consecutive QRS complexes
Atrial fibrillation – no regular
P-wave, P-wave appearing as a wavy baseline
Paroxysmal junctional tachycardia –
heart rate is 150 to 220 beats per minutes, P-wave are either absent or appear
inverted
BLOCKS
Sino-atrial blocks (SA block)
occasional long pauses between R-R complexes
First degree AV block: P-R interval
is prolonged beyond 0.20 second
Second degree AV block (Mobitz type 1
or Wenckebach) P-R interval is progressively prolonged until finally as QRS
complex is dropped. Second degree AV block (Mobitz type II) A QRS complex is
present after every 2nd, 3rd, 4th wave
Third degree AV block (Complete heart
block) P wave, do not have any relation with QRS complexes
Right bundle branch block (RBBB):
M-shaped QRS complexes in lead V1, V2, QRS complexes measure more than 0.12
second in width and are above the isoelectric line in lead Vi. Broad and
slurred S-wave in lead VS and V6
Left bundle branch block (LBBB):
M-shaped QRS complexes in leads V5 and V6. QRS complexes prolonged more than
0.12 second and are below the isoelectric line in lead V1. Deep S-wave in leads
V1 and V2
Premature ventricular contractions
(PVCs): No P-wave, QRS complexes are wide and bizarre with T-wave in opposite
direction
Ventricular tachycardia: No P-waves,
QRS complexes are wide and bizarre and resemble PVC in succession
Ventricular fibrillation: A wavy
baseline, no discernable QRS complexes. Ventricular asystole – no wave pattern,
usually only a flat line present
AXIS
It refers to the direction of
depolarization which spreads throughout the heart to stimulate the myocardium
to contract
Vector: it shows the direction in
which most of the stimulus is traveling. QRS vector is always AV node. QRS
vector-normally points downwards and to the patients left side
We can locate the position of the QRS
vector with in a large cycle around the heart. The center point is AV node. QRS
vector changes in hypertrophy (vector is less than 90 degree angle) and infarction (vector is more than 90 degree
angle)
Normal axis: QRS vector shows left
downwards points in 0 to 90 degree angle. Lead 1 QRS vector right side called
positive vector and left side called negative vector. Lead 1 positive called
normal axis
AVF lead shows lower half is positive
and upper half is negative. The AVF positive vector is the normal axis
Normal axis defined as lead 1
positive and AVF lead positive. Left axis deviation defines lead 1 positive and
AVF lead negative
Right axis deviation defines as lead
1 negative and AVF lead positive. Extreme right axis deviation defined as lead 1
negative and AVF negative
HYPERTROPHY
Hypertrophy is defined as enlargement
of the tissue or organ
Atrial enlargement includes right
atrial enlargement (RAE) and left atrial enlargement (LAE). Right atrial
enlargement is peaked P-wave, more than 2.5 mm in any lead (best seen in II,
III, V3 and V1). Left atrial enlargement is P-wave duration is more than 0.08
seconds, may have plateau or notched counter. Terminal and deep invasion of the
P wave is V2 or V1
Right ventricular hypertrophy shows
dominant R in V1 or V2 essential
Dominant S in I, AVL, V5 or V6 and
inverted T and depressed ST in leads with dominant R
Left ventricular hypertrophy shows
large R wave in lead I, AVL, V5 and V6 and more than 30 mm. inverted T and
depressed ST in leads with a large R-wave. Essential criteria for left
ventricular hypertrophy is S in V1 or V2 + R in V5 or V6 = /35 MM
ELECTROLYTE DISTURBANCE IN ECG
Normal serum potassium (K) value is
3.5 to 5.0 mEq/L. extremely serious problem occurs if potassium level less than
2.5 mEq/L or more than 7.0 mEq/L
If the potassium level less than 5.0
mEq/L called hyperkalemia causes wide flat P wave, prolonged PR interval,
decreased R-wave, widen QRS complex and peaked narrow T-wave in the ECG
Serum potassium level less than 3.5
mEq/L is called hyperkalemia causes prolonged P wave, depressed ST segment and
large U-wave is seen in ECG
Serum calcium level is 8.5 – 10.5
mg/dL. If the serum calcium level less than 8.5 mg/dL is called hypocalcemia.
Calcium level more than 10.5 mg/dL called hypercalcemia. Hypercalcemia shows
increased QT interval and hypocalcemia shows decreased QT interval in the ECG
MYOCARDIAL INFARCTION
Anterioseptal (anterior) myocardial
infarction causes ECG changes are abnormal Q wave in lead 1, AVL and V1-V3.
Reciprocal changes are depressed ST segment in lead II, III, and AVF
Anteriolateral (lateral) myocardial
infarction causes abnormal Q-wave in lead 1, AVL and V5-V6. Reciprocal changes
are depressed ST in lead II, III and AVF
Inferior myocardial infarction causes
abnormal Q wave in lead II, III and AVF
Posterior myocardial infarction
causes often large dominant R in lead V1 and V2
12 LEAD ECG
Electrocardiogram
Consist of Record from 12 Leads
The three
standard bipolar leads (I, II and III), three unipolar limb leads (AVR, AVL,
AVF) and six unipolar chest leads (V1-V6)
LEAD PLACEMENT
Lead I: right arm to left arm
Lead II: right arm to left leg
Lead III: left arm to left leg
AVR: right arm
AVL: left arm
AVF: left foot
V1: 4th RICS at right
sterna border
V2: 4th LICS at left
sternal border
V3: midway between V2 and V4
V4: 5th LICS at
midclavicular line
V5: 5th LICS at anterior
axillary line
V6: 5th LICS at
midaxillary line
INDICATIONS FOR 12 LEAD ECG
Dysrhythmia
Chest pain
Myocardial infarction
Heart rate determination
Hypertrophy or chamber dilatation
Preoperative assessment
Pericarditis
Effects of systemic disease on heart
Effects of electrolyte disturbances
CAUSE OF ABNORMAL ECG PATTERN
Skeletal muscle activity or movement
of the patient
Loose electrodes
Damaged or broken wires
Improper connections
Improper placement of electrodes
Electrical interferences
PREPARATION OF THE PATIENT
There is no way special preparation
for the investigation
Explain the procedure to the patient
and relatives that the seemingly complex apparatus will do no harm but will
give information on the action of the heart
There should not be any ornaments
during ECG on the body or the leads should not come in contact with the
ornaments
Apply jelly to the skin where
electrode is to be attached to have a good contact between the skin and the
electrode
Give flat and relaxed position to the
patient because any movements or muscular twitching recorded by the machine may
alter the tracings
Clean the jelly off the electrode
sites before leaving the patient
There are
specific positions for the placement of the chest leads. The improper placement
of the chest leads can distort the tracing and alter the diagnosis
PREPROCEDURAL CARE
Check and arrange the ECG machine,
cables, and electrodes and needed articles ready in advance
Explain the procedure clearly to the
patient and family
Check the doctor’s order for the ECG
Identify the patient name, age, Id.
No. and diagnosis
Inform the patient not to move during
procedure
PROCEDURE
Position the patient relaxed and flat
Inform the bystanders to keep away,
to prevent them touching the patient during procedure
Enter the identification data of the
patient
Expose the needed area for connecting
electrode
Stay with the patient till it get
over
AFTER CARE
Clean the patient’s electrode site
with gauze or tissue paper
Ambulate and transfer the patient
send the ECG record to doctor for interpretation
Replace the ECG machine and articles
to the proper place
Record and report in the nurse’s
sheet
NURSE’S RESPONSIBILITY
Nurses working in coronary care unit
and intensive care unit should know to operate the ECG machine
Nurses should able to interpret and
identify the dysrhythmia
Nurses should understand about the
dysfunctions and loose connections
Nurses working in coronary care unit
are responsible in ECG interpretation and treating with appropriate life-saving
method as per institutional protocol
ELECTROCARDIOGRAM – Normal Conduction System of Heart, Purpose of ECG, Components of ECG, ECG Graph Sheet, Heart Rate, Rhythm, Blocks, Axis, Hypertrophy, Electrolyte Disturbance in ECG, Myocardial Infarction, 12 Lead ECG, Lead Placement, Indications of 12 Lead ECG, Cause of Abnormal ECG Pattern, Preparation of the Patient, Preprocedural Care, Procedure, After Care and Nurses Responsibility (NURSING PROCEDURE)
CENTRAL VENOUS PRESSURE – Objectives, Indications, Indication of Lowered CVP, Indication of Increased CVP, Site for Catheter Placement, General Instructions, Preliminary Assessment, Preparation of the Patient and Environment, Equipment, Procedure, Measurement Concept Validation Plan (MCVP) Measurement, Interpretation of CVP, False CVP, Post-Procedure Care and Complications (NURSING PROCEDURE)
Central
venous pressure (CVP) is the pressure within the superior vena cava, reflecting
the pressure under which the blood is returned to the superior vena cava and
right atrium
Central
venous pressure is determined by vascular tone, blood volume, and the ability
of the right heart to receive and pump blood
Central
venous pressure is one of the hemodynamic measurement techniques used to
measure the pressure in the right atrium or within the vena cava
Central
venous pressure is a dynamic or changing measurement. The change in CVP
correlated with patient’s clinical status
OBJECTIVES
To evaluate the adequacy of
circulating blood volume and assess the degree of hypovolemia, e.g. in shock
To provide access to central veins
for fluid replacement in case of emergency
To administer high caloric fluid diet
intravenously in certain chronic hypercatabolic states, e.g. burns (intravenous
hyperalimentation)
To serve as a guide in fluid
replacement in seriously ill patients
To administer long-term chemotherapy
INDICATIONS
Central venous pressure reflects
right ventricular failure. Most right ventricular failure is secondary to left
ventricular failure
Central venous pressure is a more
useful indication of adequacy of venous blood volume and alternations of
cardiovascular function
Cardiothoracic surgery
Management of patient in shock in ICU
Transplant surgery
Normal CVP: 2-12 cm H2O
INDICATION OF LOWERED CVP
Early left ventricular failure
Decreased circulating volume
Vasodilation/peripheral pooling
Septic shock
INDICATION OF INCREASED CVP
Valvular stenosis
Pulmonary hypertension
Increased circulating volume
Vasoconstriction
Hypertension
SITE FOR CATHETER PLACEMENT
Subclavian vein
Internal or external jugular veins
Median basilic vein
GENERAL INSTRUCTIONS
Do not give head down tilt to a
patient of impending cardiac failure
Before introducing bigger catheter,
incise skin with a No. 15 blade
Catheter, from which free blood
cannot be aspirated, should not be left in the skin
CVP catheter should be taken to
prevent blocking by continuous flush drip with low flow rates
Dressing over puncture site should be
changed on alternative days, with aseptic precautions
Periodic blood samples should be
taken for culture
PRELIMINARY ASSESSMENT
Check
The doctor’s order for specific
instructions
Check the assembly of the catheter
General condition and diagnosis of
the patient
Mental status to follow instructions
Articles available in the unit
PREPARATION OF THE PATIENT AND ENVIRONMENT
The procedure should be explained to
the patient
The CVP site should be prepared by
shaving and cleansing with an antiseptic solution
Measure the length of the manometer
Ensure that the facilitates for
cardiopulmonary resuscitation, intercostals drain and X-ray of the chest are
available
Measure the length of catheter
required from anatomical puncture point to superior vena cava
Assemble articles required for the
procedure
Place the patient in a comfortable
position. This is the baseline position used for subsequent reading
EQUIPMENT
Venous pressure apparatus with water
manometer
Cut down tray with intravenous
catheter
Infusion solution and infusion
catheter
Three way stop clock
IV pole attached to bed arm board and
adhesive tape
Carpenter’s level (for establishing
zero point)
ECG monitors
PROCEDURE
Attach the manometer to the IV pole
with the zero point of the manometer on the level with the patient’s right
Mark the midaxillary line on the
patient which is the reference point for subsequent reading
The intravenous catheter (about 24
inches long, size 14 or 16 gauge) is passed through the median basilica,
subclavian or jugular vein
CVP catheter is connected to a 3 way
stopcock which communicates with the manometer and an open IV system
Catheter is secured by a suture to
prevent accidental removal and apply dressing
MEASUREMENT CONCEPT VALIDATION PLAN (MCVP) MEASUREMENT
Always adjust the position of the
patient to the position used for first reading
Position the zero point on the
manometer with the level of the atrium
Turn the stopcock so that the IV
solution flows into the manometer filling 20 to 25 cm level
Turn the stopcock again so that the
solution in the manometer flows into the patient
Observe the fall of height of the
column of fluid in the manometer. Record the level at which the stabilizes
Turn the stopcock against to allow
the IV solution to flow from the container to the patient’s vein by a slow drip
INTERPRETATION OF CVP
Normal CVP value ranging from 2 cm to
14 cm of H2O
Low BP and low CVP hypovolemia
High or normal BP and high CVP – over
transfusion
Low BP and high CVP – cardiac
dysfunction
FALSE CVP
Before any
measurement of CVP is taken as fine, chances of false high or low reading
should be kept in mind and ruled out
Causes of
False High CVP
Leakage in the system
Wrong zero reference point
POST-PROCEDURAL CARE
To prevent
chances of infection when CVP catheter is kept for a long time in a critically
ill patient, special care should be taken such as:
Dressing over puncture site should be
changed on alternate days, with aseptic precautions
Changing of dressing in ward should
be done with aseptic precautions
Infusion set should be changed daily
Periodic blood samples should be
taken for culture
COMPLICATIONS
Pneumothorax: commonly occurs with
subclavian cannulation. It accounts for 30% of reported complications.
Incidence can be reduced by correct placement.
Air embolism: in hypovolemic
tachypneic patient and crying babies, potential for rapid air entry should not
be underestimated. To prevent this always expel the air from the tubing before
connecting them into the vein. All connections should be secured to prevent
accidental dislodging of the tube and entry of air into the veins
Clot formation: the CVP line should
always be connected to an IV infusion to prevent clot formation in the
intravenous catheter
Infection: use strict aseptic
techniques when preparing the tubing and/or when changing the tubing. Inspect
the catheter insertion site daily for pain, swelling or exudates
Arrhythmias: maintain ECG monitoring
to detect any arrhythmias caused by the passage of catheter into the right
ventricle. A chest X-ray may be taken to check the position of the catheter in
the right atrium
Fluid overload: carefully monitor the
CVP reading. Watch for other signs of fluid overload such as pulmonary edema,
respiratory distress, frothy sputum, etc
CENTRAL VENOUS PRESSURE – Objectives, Indications, Indication of Lowered CVP, Indication of Increased CVP, Site for Catheter Placement, General Instructions, Preliminary Assessment, Preparation of the Patient and Environment, Equipment, Procedure, Measurement Concept Validation Plan (MCVP) Measurement, Interpretation of CVP, False CVP, Post-Procedure Care and Complications (NURSING PROCEDURE)
CARDIAC CATHETERIZATION – Definition, Purpose, Equipment, Precatheterization Care, During Procedure and Post-catheterization Care (Nursing Procedure)
DEFINITION
Invasive
diagnostic procedure in which one or more catheters are introduced into heart
and selected blood vessels to measure pressures in various heart chambers and
to determine oxygen saturation in the body
PURPOSE
To determine appropriate treatment,
e.g. PCA/CABG, if atherosclerosis is present
To assess patency of coronary
arteries
To measure pressures in various
chambers of heart
To obtain blood samples for
measurement of hemocrit and oxygen saturation
To obtain clear picture of cardiac
anatomy prior to heart surgery
To confirm diagnosis of heart disease
and determine extent to which disease has affected structure and function of
heart
To obtain clear picture of cardiac
anatomy prior to heat surgery
To allow infusion of fibrinolytic
agent directly into occluded coronary artery to restore coronary blood flow
To obtain endocardial biopsies
Right heart
catheterization: passing radio-opaque catheter from antecubital or femoral vein
into right atrium, right ventricle and pulmonary vasculature
Left heart
catheterization: insertion of catheter into right brachial artery or femoral
artery, ascending aorta and into left ventricle. It can also be performed
transeptally from right atrium, left atrium, and into left ventricle
EQUIPMENT
Cardiac
monitor, pressure monitoring device, fluoroscope, sterile radio-opaque cardiac
catheters, radio-opaque dye, sterile liner for draping, cleaning solutions,
sterile gloves, cardiac catheterization pack, cut down set scalpel blade and
emergency equipment
PRECATHETERIZATION CARE
Explain procedure, purpose and risks
involved
Get consent from patient and relative
Explain that this procedure will be
performed in cardiac catheterization laboratory
Ask for history of allergies
particularly to iodine containing substance or shellfish
Shave following areas:
Wrists, arms and axillae
Bilateral groin
Pubic area
Make sure blood is collected and sent
for HBsAg, HIV, etc. as ordered
Instruct patient to withhold food and
fluids for 8-12 hours prior to procedure
Start IV line with heparin lock
Remove jewelry, dentures/contact lens
if any
Make sure of blood investigation
results are ready, e.g. HIV, HBsAg
Assess baseline observations such as
vital signs and neurovascular observations to both feet
Administer morning dose of routine
medications with sips of water
Ask patient to empty bladder
Administer premedications
Send patient to catheterization
laboratory with 5% dextrose 1 bottle, IV set 1, disposable 3 way 4, disposable
10 cc syringes 4, injection heparin 1 vial
DURING PROCEDURE
Monitor vital signs
Monitor for ventricular arrhythmias
Watch for signs for allergic reaction
to contrast dye
Instruct patient to inform physician,
nurse if chest pain develops
Keep emergency equipment ready
Provide reassurance throughout
procedure
POST-CATHETERIZATION CARE
Transfer patient from stretcher to
bed gently
Assess vital signs every 30 minutes
for 2 hours initially and then hurly till stable
Instruct patient about strict bed
rest for 12-24 hours
Advise to keep affected extremity
straight to prevent bleeding
Check dressing over puncture site for
bleeding or signs of hematoma
Assess neurovascular observations
which include peripheral pulse, color warming, and sensation in affected
extremity and compare with unaffected extremity
Monitor cardiac rhythm for
arrhythmias
Encourage fluid intake for adequate
fluid replacement and renal elimination of contrast
Provide urinal bedpan whenever needed
Observe for nausea, vomiting and
other signs of hypersensitivity to contrast
Encourage normal diet after 3 to 4
hours, if no vomiting
Remove pressure bandage after 24
hours and watch for hematoma formation and pseduoaneurysms
Maintain strict intake and output
chart
Instruct to restrict activities for 2
days after discharge
CARDIAC CATHETERIZATION – Definition, Purpose, Equipment, Precatheterization Care, During Procedure and Post-catheterization Care (Nursing Procedure)
TENSILON TEST (EDROPHONIUM BROMIDE) –
Indications, Purpose, Equipment, Procedure, Method, Follow-up, Cholinergic Side
Effects of Edrophonium, Positive Test, Utility of Tensilon Test, False Positive
Results, Client Preparation, Preparation and After Care
The Tensilon
test is a pharmacological challenge study performed to assist in the diagnosis
of myasthenia gravis. The drug used in edrophonium chloride (Tensilon), a
short-acting form of the drug used to treat this disorder. The test involves
the IV administration of the drug before and during the performance of various
muscular movements and the evaluation of these movements for changes in muscle
strength. A positive diagnosis is made when the administration of the drug
results in an improvement in muscle function. A negative diagnosis is made if
muscle fasciculations occur as a result of the drug
Myasthenia
gravis (MG) is a disease affecting the neuromuscular junction. It is caused by
a deficiency of acetylcholine receptor sites on the muscle side of the junction.
It is thought that the reduction in these sites is caused by an autoimmune
response that blocks the receptor site and is responsible for receptor
destruction. The most prominent symptom of the disease is weakness of the
involved muscles, which progresses in severity to all areas of the body
Interfering
factors: corticosteroids, muscle relaxants, and anticholinergics, which can
alter test results by their effect on muscle function or on the action of
Tensilon
INDICATIONS
Diagnosing myasthenia gravis when
fatigue and muscle weakness are present, as revealed by an immediate
improvement after injection of Tensilon
Monitoring medication regimen of oral
anti-cholinesterase to determine whether increase in dose is advised, as
revealed by an improvement in muscle strength after IV Tensilon
Determining whether an overdose is
present, which can place the client in cholinergic crisis, as revealed by an
exaggeration of muscle weakness after IV Tensilon
Contraindications:
breathing difficulties or apneic conditions, because the disease can cause
respiratory difficulties severe enough to require ventilatory support
Acetylcholine
is a neurotransmitter chemical that nerve cells release to stimulate your
muscles. People with a chronic disease called myasthenia
Definition:
A provocative best to diagnose myasthenia gravis, using endroonium bromide
PURPOSE
To diagnose myasthenia gravis
To differentiate between myasthenia
and cholinergic crisis
EQUIPMENT
Injection tray with tensilon
Atropine
Tuberculin syringe
1.5 ml syringe
500 ml saline or dextrose as ordered
Tourniquet
Spirit
Cotton balls
K-basin
Duster
Resuscitation equipment
12 ventilator and ECG monitor
PROCEDURE
A medicine
called Tensilon (also called edrophonium) or a dummy medicine (inactive
placebo) is given during this test. The health care provider gives the medicine
through one of your veins (intravenously, through an IV). You may also be given
a medicine called atropine before receiving Tensilon so that you do not know
you are getting the medicine. You will be asked to perform some muscle
movements over and over again, such as crossing and uncrossing your legs or
getting up from a sitting position in a chair. The provider will check whether
the Tensilon improves your muscle strength. If you have weakness of the eye or
face muscles, the effect of the Tensilon on this will also be monitored. The
test may be repeated and you may have other Tensilon tests to help tell the
difference between myasthenia gravis and other conditions
METHOD
Initially
Dosing: 2 mg of edrophonium is
administered intravenously as a test dose
Monitoring heart rate: bradycardia or
ventricular fibrillation may develop
FOLLOW-UP
After observing for about 2 minutes,
if no clear response develops
Up to 8 additional mg of edrophonium
is injected
A
double-blind protocol with a saline injection as placebo has been advocated
Testing
should be performed with patient free of all cholinesterase-inhibitor
medications
CHOLINERGIC SIDE EFFECTS OF EDROPHONIUM
May include increased salivation and
lacrimation, mild sweating, flushing, urgency and perioral fasciculations,
Atropine should be readily available
to reverse effects of edrophonium in case of hemodynamic instability
Extra precautions are especially
important in elderly patients
POSITIVE TEST
Most myasthenic muscles respond in 30
to 45 seconds after injection
Improvement in strength that may
persist for up to 5 minutes
Requires objective improvement in
muscle strength
Subjective or minor responses, such
as reduction of a sense of fatigue, should not be over interpreted
UTILITY OF TENSILON TEST
Only useful in patients with
objective, preferably measurable, findings on physical examination
Rarely helpful in the diagnostic
evaluation of equivocal cases of MG
Sensitivity for MG is relatively low
(60%) compared to other diagnostic tests
Tensilon testing should not be used
to determine adjustments in the dose of pyridostigmine
FALSE POSITIVE RESULTS
Can occur in patients with LES, ALS
or even localized, intracranial mass lesions
Positive testing does not necessarily
predict response to a longer-acting anticholinesterase drug
CLIENT PREPARATION
Instruct the client that the test
will aid in finding actual causes of muscle weakness
Check whether the client is taking
anticholinesterases drug, whether allergic to any drugs and whether any
respiratory problems
Inform that test will done in
semi-intensive care unit
PREPARATION
Place the client in comfortable
position on treatment table
Load 10 ml of tensilon into syringe
with 10 ml of normal saline and administer 2 mg initially
Watch for respiratory distress and
other symptoms
Inject the remaining 8 ml if no
symptoms appear
Assist in giving exercise to client
to reduce fatigue of muscles
Assist for repeating test if no
improvement is found within 5 minutes
Watch for respiratory failure
Keep resuscitation equipment and
ventilator ready
Administer adrenaline 2 mg as
prophylactic measures
AFTER CARE
Keep the client in semi ICU for a few
hours to monitor for complications, e.g. respiratory failure
Watch for cardiac changes, e.g.
tachycardia
Assess neurological signs every half
hourly for 2 hours
Transfer the client ward if stable
TENSILON TEST (EDROPHONIUM BROMIDE) – Indications, Purpose, Equipment, Procedure, Method, Follow-up, Cholinergic Side Effects of Edrophonium, Positive Test, Utility of Tensilon Test, False Positive Results, Client Preparation, Preparation and After Care
Myelography
or myelogram is an X-ray of the spinal subarachnoid space taken after an opaque
or air is injected into the spinal subarachnoid space through a spinal
puncture. It is also a diagnostic procedure used to visualize the lumbar,
thoracic or cervical areas or whole spinal axes for diagnosis of a spinal
tumor, a herniated intervertebral disc or a ruptured disc
DEFINITION
Myelography
is an X-ray examination of the spinal subarachnoid space taken after an opaque
medium or air is injected into the spinal subarachnoid space through a spinal
puncture. It shows any distortion of the spinal cord or spinal dural sac caused
by tumors, cysts, herniated intervertebral discs or other lesions
PURPOSE
To identify space-occupying lesions
of the spinal cord
To help diagnosis a herniated nucleus
pulposus
To diagnose intramedullary tumors
To identify the traumatic lesion and
cysts of the vertebrae or the spinal cord
INDICATIONS
Spinal cord tumors
Traumatic lesions of the spinal cord
Herniated intervertebral disc
GENERAL INSTRUCTIONS
The client should be prepared
physiologically and psychologically
Strict aseptic technique should be
followed throughout the procedure
The client should be informed that
the X-ray table may be titled in varying positions during the study
The commonly used dyes are
mertrizamide (amipaque) and iophendylate (pantoopaque) so the sensitivity
should be checked
Instruct the client to remain supine
for 12 to 24 hours after the procedure
Inform the client that the procedure
is done in X-ray department
CLIENT PREPARATION
Explain the procedure to the patient
and relatives
Obtain informed consent
The meal that would normally be eaten
prior to the procedure is omitted
The client may be given a light
sedative to help cooperate
Sensitivity test for the dye must be
checked
PROCEDURE
Place the client on the X-ray table
Position the client for lumbar
puncture
LP needle is inserted L4-L5
Approximately 10 ml of CSF is removed
Water soluble nonionic contrast
medium is then injected
The table is titled to allow the
column of the dye to move up and down within the subarachnoid space
By minimal changes in position of the
table and patient, various regions of the spine are screened and films taken at
appropriate levels
AFTER CARE
Keep the client strict bed rest
Position the client’s head elevated
30 degree
Check the neurological and vital
signs
Encourage more oral fluids
Provide light soft diet if no nausea
and vomiting
Mild analgesics may be given if
headache persists
Check the client’s ability to void
Observe for fever, stiff neck,
photophobia or the signs of chemical or bacterial meningitis
MYELOGRAPHY – Definition, Purpose, Indications, General Instructions, Client Preparation, Procedure and After Care
LUMBAR PUNCTURE – Definition,
Purpose, Indications, General Instructions, Special Considerations, Equipment
Needed, Queckensted’t Test (Lumbar Manometric Test), After Care,
Contraindications and Complications
Lumbar
puncture (LP) is an invasive procedure; it is carried out by inserting a needle
into the lumbar subarachnoid space directly into the intervertebral space in
order to withdraw cerebrospinal fluid for diagnostic and therapeutic purposes.
The normal range of spinal fluid pressure with the patient in a lateral
position is 70 mm to 180 mm of water. Pressure over 200 mm of water is
considered abnormal
DEFINITION
Lumbar
puncture is a percutaneous puncture entering the spinal column’s subarachnoid
space at the vertebral interspaces L3-L4 or L4-L5. A lumbar puncture is
performed for cerebrospinal fluid (CSF) pressure measurement, withdrawal of a
CSF specimen for analysis and the introduction of contrast media for diagnosis
tests
PURPOSE
To obtain cerebrospinal fluid
analysis and to evaluate for signs of infection or hemorrhage
To measure the intracranial pressure
and relive the pressure if it is high
To administer spinal anesthesia for
surgeries
For intrathecal injection of
antibacterial and other drugs
For evaluation of spinal dynamics for
signs of blockage of CSF flow due to tumor or other pathology of spinal cord
INDICATIONS
To reduce intracranial pressure (ICP)
after a spontaneous hemorrhage, by releasing CSF
To help diagnosis diffuse or
disseminated infections of the nervous system or meninges, subarachnoid
hemorrhage or demyelinating diseases
To introduce anesthetic, antibiotics
or other therapeutic drugs into the area
To identify degree of subarachanoid
blockage
GENERAL INSTRUCTIONS
Follow the strict aseptic technique
Site used for lumbar puncture is
between third and fourth and fifth lumbar vertebra in adults and still lower in
children
The position used is side lying with
knees drawn to the chin or sitting position with head and knees are flexed
All the articles used for lumbar
puncture should be autoclaved
The client should be placed near the
edge of the bed or table for the convenience of the doctor
The lumbar puncture needle should be
sharp and straight
The client should empty his bowel and
bladder before the procedure
Use restrain the uni-cooperative
clients and children
The pressure reading taken when the
client is relaxed and the fluid level remains fairly constant in the monometer
Inform the client not to move during
the procedure
Vital signs should be recorded before
and after the procedure
CSF collected should be sent to
laboratory immediately along with laboratory request form
The drug to be injected must be
warmed to the body temperature before administration
SPECIAL CONSIDERATIONS
Do not perform when increased ICP may
be caused by a expanding lesion, such as a subdural hematoma after a head
injury
Perform cautiously in client with
suspected spinal cord or brain tumor. Procedure may cause fatal cerebellar
tonsillar herniation or compression of medulla of the client:
Explain the procedure to the client and relatives to reduce their fear
and anxiety
Obtain a written consent for the client or relatives
Instruct the client not to move during the procedure
Help the client to wear a clean and loose garment
EQUIPMENT NEEDED
A sterile tray containing – LP
needles (19-21), sponge holding forceps, 5 ml syringe with needle, two small
sterile bowls, three specimen bottles, a spinal sheet, sterile cotton balls,
gauze pieces and cotton pads, a three way adapter and monometer tubing, sterile
gown, mask and gloves
A tray containing – Mackintosh and a
towel, kidney tray and paper bag, skin antiseptics (spirit, betadine and
tincture benzoine), local anesthetic agent xylocaine 1-2 percentage), sterile
normal saline, band aid, hand washing articles and screen
Procedure:
(done by the doctor and nurse has to assist)
Explain the procedure
Position the client
Wash hands and wear sterile gloves
Ask the assistant to open the sterile
LP set
Clean the site with spirit and
betadine
Spread the sterile center hole towel
Puncture the subarachnoid space by
accurate identification of L4 and L5 intervertebral spaces
The initial pressure reading is
obtained by measuring the level of the fluid column after it comes to rest
Collect 2-3 ml of spinal fluid in
each of the three test tubes
After the needle is withdrawn apply
pressure at the site for a few minutes
Apply tincture benzoin seal
QUECKENSTEDT’S TEST (LUMBAR MANOMETRIC TEST)
This test is done when a spinal
subarachnoid block (by tumor, vertebral fracture or dislocation) is suspected
Pressure may be applied manually by
pressing firmly and simultaneously upon the jugular veins on the each side of
the neck for a period of 10 seconds or blood pressure cuff may be placed around
the client’s neck and inflated to a pressure of 20 mm Hg
The increase in the pressure caused
by the compression is noted
Then the pressure is released and
pressure reading is made at 10 second intervals
In normal persons, the cerebrospinal
fluid pressure rises rapidly in response to compression of the jugular veins
and returns quickly to normal when the compression is released
A slow rise and fall in pressure indicates
a partial block due to a lesion compressing the spinal subarachnoid pathways
If there is no pressure change, a
complete block is indicated. This test is done if an intracranial lesion is
suspected
AFTER CARE
Place the client flat for at least 6
hours
Frequently monitor the neurological
vital signs
Encourage the client to drink plenty
of fluids
Observe puncture site for edema,
hematoma and CSF leakage
Foot end of the bed should elevated
Replace the articles after washing
CONTRAINDICATIONS
Cutaneous or osseous infection at the
site of lumbar puncture
When the client has drastically
increased LCP, lumbar puncture may result in brainstem compression
COMPLICATIONS
Post-lumbar puncture headache that becomes severe when the client sits and stands but decreases in a supine position
Herniation or coning of brain through foramen magnum
Local pain, edema and hematoma at the punctured site
Trauma to the tissue at the LP site
Injury to spinal cord and spinal nerves
Infection
LUMBAR PUNCTURE – Definition, Purpose, Indications, General Instructions, Special Considerations, Equipment Needed, Queckensted’t Test (Lumbar Manometric Test), After Care, Contraindications and Complications