Free Nursing Notes, MCQs & Nursing Procedures

Nurseinfo.in provides free Nursing Notes, Nursing Procedures, Medical MCQs, Nursing Calculators, Care Plans and exam preparation resources for BSc Nursing, GNM, P.B. BSc and MSc Nursing students. Browse subject-wise notes, previous year questions and study materials based on the latest nursing syllabus.

Home Blog Page 44

LUMBAR PUNCTURE

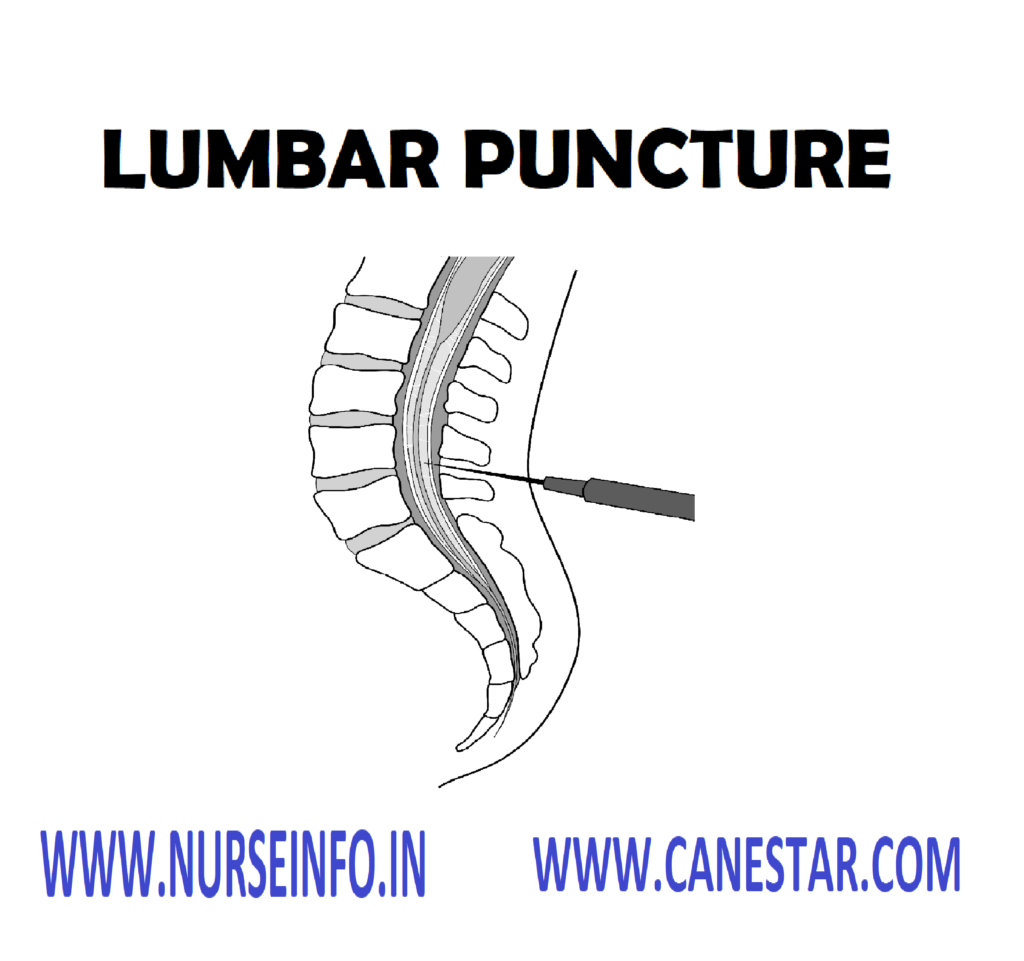
LUMBAR PUNCTURE – Definition, Purpose, Indications, General Instructions, Special Considerations, Equipment Needed, Queckensted’t Test (Lumbar Manometric Test), After Care, Contraindications and Complications

Lumbar puncture (LP) is an invasive procedure; it is carried out by inserting a needle into the lumbar subarachnoid space directly into the intervertebral space in order to withdraw cerebrospinal fluid for diagnostic and therapeutic purposes. The normal range of spinal fluid pressure with the patient in a lateral position is 70 mm to 180 mm of water. Pressure over 200 mm of water is considered abnormal

DEFINITION

Lumbar puncture is a percutaneous puncture entering the spinal column’s subarachnoid space at the vertebral interspaces L3-L4 or L4-L5. A lumbar puncture is performed for cerebrospinal fluid (CSF) pressure measurement, withdrawal of a CSF specimen for analysis and the introduction of contrast media for diagnosis tests

PURPOSE

  • To obtain cerebrospinal fluid analysis and to evaluate for signs of infection or hemorrhage
  • To measure the intracranial pressure and relive the pressure if it is high
  • To administer spinal anesthesia for surgeries
  • For intrathecal injection of antibacterial and other drugs
  • For evaluation of spinal dynamics for signs of blockage of CSF flow due to tumor or other pathology of spinal cord

INDICATIONS

  • To reduce intracranial pressure (ICP) after a spontaneous hemorrhage, by releasing CSF
  • To help diagnosis diffuse or disseminated infections of the nervous system or meninges, subarachnoid hemorrhage or demyelinating diseases
  • To introduce anesthetic, antibiotics or other therapeutic drugs into the area
  • To identify degree of subarachanoid blockage

GENERAL INSTRUCTIONS

  • Follow the strict aseptic technique
  • Site used for lumbar puncture is between third and fourth and fifth lumbar vertebra in adults and still lower in children
  • The position used is side lying with knees drawn to the chin or sitting position with head and knees are flexed
  • All the articles used for lumbar puncture should be autoclaved
  • The client should be placed near the edge of the bed or table for the convenience of the doctor
  • The lumbar puncture needle should be sharp and straight
  • The client should empty his bowel and bladder before the procedure
  • Use restrain the uni-cooperative clients and children
  • The pressure reading taken when the client is relaxed and the fluid level remains fairly constant in the monometer
  • Inform the client not to move during the procedure
  • Vital signs should be recorded before and after the procedure
  • CSF collected should be sent to laboratory immediately along with laboratory request form
  • The drug to be injected must be warmed to the body temperature before administration

SPECIAL CONSIDERATIONS

  • Do not perform when increased ICP may be caused by a expanding lesion, such as a subdural hematoma after a head injury
  • Perform cautiously in client with suspected spinal cord or brain tumor. Procedure may cause fatal cerebellar tonsillar herniation or compression of medulla of the client:

Explain the procedure to the client and relatives to reduce their fear and anxiety

Obtain a written consent for the client or relatives

Instruct the client not to move during the procedure

Help the client to wear a clean and loose garment

EQUIPMENT NEEDED

  • A sterile tray containing – LP needles (19-21), sponge holding forceps, 5 ml syringe with needle, two small sterile bowls, three specimen bottles, a spinal sheet, sterile cotton balls, gauze pieces and cotton pads, a three way adapter and monometer tubing, sterile gown, mask and gloves
  • A tray containing – Mackintosh and a towel, kidney tray and paper bag, skin antiseptics (spirit, betadine and tincture benzoine), local anesthetic agent xylocaine 1-2 percentage), sterile normal saline, band aid, hand washing articles and screen

Procedure: (done by the doctor and nurse has to assist)

  • Explain the procedure
  • Position the client
  • Wash hands and wear sterile gloves
  • Ask the assistant to open the sterile LP set
  • Clean the site with spirit and betadine
  • Spread the sterile center hole towel
  • Puncture the subarachnoid space by accurate identification of L4 and L5 intervertebral spaces
  • The initial pressure reading is obtained by measuring the level of the fluid column after it comes to rest
  • Collect 2-3 ml of spinal fluid in each of the three test tubes
  • After the needle is withdrawn apply pressure at the site for a few minutes
  • Apply tincture benzoin seal

QUECKENSTEDT’S TEST (LUMBAR MANOMETRIC TEST)

  • This test is done when a spinal subarachnoid block (by tumor, vertebral fracture or dislocation) is suspected
  • Pressure may be applied manually by pressing firmly and simultaneously upon the jugular veins on the each side of the neck for a period of 10 seconds or blood pressure cuff may be placed around the client’s neck and inflated to a pressure of 20 mm Hg
  • The increase in the pressure caused by the compression is noted
  • Then the pressure is released and pressure reading is made at 10 second intervals
  • In normal persons, the cerebrospinal fluid pressure rises rapidly in response to compression of the jugular veins and returns quickly to normal when the compression is released
  • A slow rise and fall in pressure indicates a partial block due to a lesion compressing the spinal subarachnoid pathways
  • If there is no pressure change, a complete block is indicated. This test is done if an intracranial lesion is suspected

AFTER CARE

  • Place the client flat for at least 6 hours
  • Frequently monitor the neurological vital signs
  • Encourage the client to drink plenty of fluids
  • Observe puncture site for edema, hematoma and CSF leakage
  • Foot end of the bed should elevated
  • Replace the articles after washing

CONTRAINDICATIONS

  • Cutaneous or osseous infection at the site of lumbar puncture
  • When the client has drastically increased LCP, lumbar puncture may result in brainstem compression

COMPLICATIONS

  • Post-lumbar puncture headache that becomes severe when the client sits and stands but decreases in a supine position
  • Herniation or coning of brain through foramen magnum
  • Local pain, edema and hematoma at the punctured site
  • Trauma to the tissue at the LP site
  • Injury to spinal cord and spinal nerves
  • Infection
LUMBAR PUNCTURE – Definition, Purpose, Indications, General Instructions, Special Considerations, Equipment Needed, Queckensted’t Test (Lumbar Manometric Test), After Care, Contraindications and Complications

INTRACRANIAL PRESSURE MONITORING

INTRACRANIAL PRESSURE MONITORING – Indications, Classification, General Instructions, Client and Environment Preparation, Equipment, Procedure, Interpreting ICP Waveforms and After Care

DEFINITION

Intracranial pressure monitoring measures the presence exerted by the brain, blood and cerebrospinal fluid against the inside of the skull

INDICATIONS

  • Head trauma with bleeding or edema
  • Over production or insufficient absorption of CSF
  • Cerebral hemorrhage and space occupying lesion

CLASSIFICATION

  • Intraventricular catheter monitoring:

In this procedure, which monitors ICP directly, the doctor inserts a small polyethylene or silicone rubber catheter into the lateral ventricle through a burr hole

Although, this method measures ICP most accurately, it carries the greatest risk of infection. This is the only type of ICP monitoring that allows evaluation of brain compliance and drainage of significant amounts of cerebrospinal fluid

Contraindications usually include stenotic cerebral ventricles, cerebral aneurysms in the path of catheter placement and suspected vascular lesions

  • Subarachnoid bolt monitoring:

This procedure involves insertion of a special bolt into the subarachnoid space through a twist-drill burr hole that is positioned in the front of the skull behind the hairline

Placing the bolt is easier than placing an intra-ventricular catheter, especially if a computed tomography scan reveals the cerebrum has shifted or the ventricles have collapsed

This type of ICP monitoring also carries less risk of infection and parenchymal damage because the bolt does not penetrate the cerebrum

  • Epidural or subdural sensor monitoring:

ICP can also be monitored the epidural or subdural space. For epidural monitoring, sensor is inserted into the epidural space through a burr hole. This system’s main drawback is questionable accuracy because ICP is not being measured directly from a CSF-filled space

For subdural monitoring, a fiber-optic transducer tip is placed on brain tissue under the dura mater. The main drawback to this method is its inability to drain CSF

  • Intra-parenchymal monitoring:

In this procedure, the doctor inserts a catheter through a small subarachnoid bolt and after puncturing the dura, advances the catheter a few centimeters into the brain’s white matter. There is no need to balance or calibrate the equipment after insertion

Although this method does not provide directly access to CSF, measurements are accurate because brain tissue pressure correlate well with ventricular pressure

Intraparenchymal monitoring may be used to obtain ICP measurements in clients with compressed or dislocated ventricles

GENERAL INSTRUCTIONS

  • ICP monitoring can detect elevated ICP early, before clinical danger signs develop, prompt intervention can help avert or diminish neurological damage caused by cerebral hypoxia and shifts of brain mass
  • The four basic ICP monitoring systems are intra-ventricular catheter, subarachnoid bolt, epidural sensor and intraparenchymal pressure monitoring
  • Regardless of which system is used, the procedure is always performed by a neurosurgeon in the operating room, emergency department or critical care unit
  • Insertion of an ICP monitoring device requires sterile technique to reduce the risk of central nervous system (CNS) infection
  • Setting up equipment for the monitoring system also requires strict asepsis

CLIENT AND ENVIRONMENT PREPARATION

  • Explain the entire procedure to the client or his family
  • Obtain informed consent
  • Determine whether the client is allergic to iodine preparations
  • Monitoring units and setup protocols are varied and complex and differ among health care facilities

EQUIPMENT

  • Monitoring unit and transducers as ordered
  • 16 to 20 sterile 4”/4” gauze pads
  • Linen-saver pads
  • Shave preparation tray or hair scissors
  • Sterile drapes
  • Povidone – iodine solution
  • Sterile gown
  • Surgical mask
  • Two pairs of sterile gloves
  • Head dressing supplies (two rolls of 4” elastic gauze dressing, one roll of 4” roller gauze, adhesive tape)
  • Optional: suction apparatus, yardstick

PROCEDURE

  • Provide privacy if the procedure is being done in an open emergency department or intensive care unit
  • Obtain baseline routine and neurological vital signs to aid in prompt detection of decompensation during the procedure
  • Place the client in the supine position, and elevate the head of the bed 30 degree (or as ordered)
  • Place linen-saver pads under the patient’s head. Shave or clip his hair at the insertion site, as indicated by the doctor, to decrease the risk of infection
  • Carefully fold and remove the device, hold the client’s head in your hands or attach a long strip of 4” roller gauze to one side rail
  • Observe for cardiac arrhythmias and abnormal respiratory pattern
  • After insertion, apply povidone-iodine solution and a sterile dressing to the site. If not done by the doctor, connect the catheter to the appropriate monitoring device, depending on the system used
  • If the doctor has setup a drainage system, attach the drip chamber to the headboard or bedside IV pole as ordered

INTERPRETING ICP WAVEFORMS

Normal Wave

A normal ICP waveform typically shows a steep upward systolic slope followed by a downward diastolic slope with a dicrotic notch. In most cases, this waveform occurs continuously and indicates an ICP between 0 and 15 mm Hg normal pressure

A Wave

  • The most clinically significant ICP waveform are A waves, which may reach elevations  of 50-100 mm Hg, persists of 5-20 minutes, then drop sharply-signaling exhaustion of the brain’s compliance mechanism
  • A waves may come and go, spiking from temporary rises in thoracic pressure or from any condition that increases ICP beyond the brain’s compliance limits
  • Activities such as sustained coughing or straining during defecation can cause temporary elevations in thoracic pressure

B Waves

  • B waves appear sharp and rhythmic with a saw tooth pattern, occur every one and half to 2 minutes and may reach elevations of 50 mm Hg
  • The clinical significance of B waves is not clear but the wave’s correlates with respiratory changes and may occur more frequently with decreasing compensation. Because B waves sometimes precede A waves, notify the doctor if B waves occur frequently

C Waves

  • B wave, C wave are rapid and rhythmic, but they are not as sharp
  • Clinically insignificant, they may fluctuate with reparations or systemic blood pressure changes

AFTER CARE

  • Positioning the drip chamber too high may raise ICP; positioning it too low may cause excessive CSF drainage
  • Inspect the insertion site at least every 24 hours or redness, swelling and drainage
  • Clean the site, reapply povidone-iodine solution and apply a fresh sterile dressing
  • Assess the client’s clinical status and take routine and neurological vital signs every hourly or as ordered
  • Make sure you have obtained orders for waveforms and pressure parameters from the doctor
  • Calculate cerebral perfusion pressure (CPP) hourly; use the equation CPP = MAP – ICP (MAP refers to mean arterial pressure)
INTRACRANIAL PRESSURE MONITORING – Indications, Classification, General Instructions, Client and Environment Preparation, Equipment, Procedure, Interpreting ICP Waveforms and After Care

GLASGOW COMA SCALE

GLASGOW COMA SCALE – Purpose, Description of the GCS, Equipment, Procedure, Eye Open, Best Motor Response, Verbal Response and Interpretation

The Glasgow Coma Scale (GCS) is an assessment tool designed to note trends in a client’s response to stimuli

The Glasgow Coma Scale can be used as an effective assessment tool. In order to achieve a clear and objective evaluation of the patient’s neurological status

The Glasgow Coma Scale is a standardized scoring system used to assess level of consciousness in a patient

PURPOSE

  • To monitor level of consciousness in any patient who has altered sensorium
  • To monitor patient with suspected or confirmed brain injury

DESCRIPTION OF THE GCS

Glasgow Coma Scale has three aspects of the patient’s behaviors are observed and recorded, eye opening, verbal responses and motor responses to a verbal command or painful stimulus. These assessments are further subdivided into different levels of response

EQUIPMENT

  • Glasgow Coma Scale proform
  • Knee hammer
  • Pen torch

PROCEDURE

  • Keep the patient in comfortable position
  • Score responses in GCS sheet
  • Add total score at bottom of sheet during each assessment
  • Assess pupils, limb movements and vital signs for completion of procedure
  • Document accurately and report for changes if any

EYE OPEN

  • Spontaneously – 4
  • To speech – 3
  • Topain – 2
  • No response – 1

BEST MOTOR RESPONSE

  • Obeys – 6
  • Localizes pain – 5
  • Withdraws – 4
  • Abnormal flexion – 3
  • Extends – 2
  • None – 1

VERBAL RESPONSE

  • Oriented – 5
  • Confused
  • Conservation – 4
  • Inappropriate words – 3
  • Incomprehensible
  • Sounds – 2
  • None – 1
  • Total 3-15

INTERPRETATION

  • Each response is given a number (high for normal and low for impaired)
  • The summation of these figures gives an indication of the severity of coma and a possible prediction of outcome
  • The lowest score is 3 and the highest is 15
  • In general, a score of 4 or 5 indicates the patient is deeply comatose
  • A score of 6 to 10 shows intermediate disturbance of consciousness
  • A score of more than 10 approaches a more conscious state
GLASGOW COMA SCALE – Purpose, Description of the GCS, Equipment, Procedure, Eye Open, Best Motor Response, Verbal Response and Interpretation

ECHOENCEPHALOGRAPHY

ECHOENCEPHALOGRAPHY – Reference Values, Interfering Factors, Indications for Echoencephalography, Client Preparations and Procedure

Echoencephalography is an ultrasound study performed to assist in the diagnosis of abnormalities of the midline cerebral structures that are associated with pathology, especially that shift of a ventricle. The procedure has generally been replaced by computer tomography (CT) in adults and children because the ultrasound beam is unable to penetrate the skull bone and is known to attenuate the echo reverberations within the skull

It is however, still an effective diagnostic study performed on infants and children under 2 years of age because the skull has not fused into solid bone mass. Depending on the finding, echoencephalography can be followed by CT and radionuclide scanning

REFERENCE VALUES

Normal position and size of cerebral midline structures; no third ventricle deviation or abnormal anatomic position of the right and left ventricles

INTERFERING FACTORS

  • Inability of client to remain still and maintain the head in position, especially if client is a child
  • Thick hair growth at the test site
  • Incorrect placement and movement of the transducer over the temporal area of the skull
  • Jewelry on the neck or ears

INDICATIONS FOR ECHOENCEPHALOGRAPHY

  • Determining the rate of blood flow in an area revealed by changes in intracranial pulsations, distribution patterns and contours
  • Suspected cerebral edema, subdural or extradural hemorrhage revealed by a shift of midline structures of 3 mm or more
  • Suspected lesions such as tumor or abscess in children revealed by a shift of midline structures of 3 mm or more
  • Monitoring hydrocephalus status in infants

CLIENT PREPARATIONS

  • Client teaching and physical preparation are the same as those for any ultrasound procedure
  • Remember any jewelry and obtain a history that includes neurological conditions and therapy
  • Perform baseline neurological checks for later comparisons

PROCEDURE

  • The client placed on the examination table in a supine position. The head is positioned to the side on a foam pillow and conductive gel is applied to the temporal area
  • Heavy hair growth can be cut before the study with client or caregiver permission
  • The client is requested to lie still during the procedure and, if the client is a small child, the head can be held in place by the assistant
  • The transducer is placed over the area and an ultrasound beam is directed to the internal structures. As the beam is converted to impulses, the waveforms that are produced are visualized on the screen and record for later viewing
  • When the study is completed, the gel is removed from the head

Nursing Care after the Procedure

  • Perform neurological checks and compare with baseline if an underlying pathological condition is known
  • Provide a hair shampoo to remove the gel
ECHOENCEPHALOGRAPHY – Reference Values, Interfering Factors, Indications for Echoencephalography, Client Preparations and Procedure

DIGITAL SUBTRACTION ANGIOGRAPHY

DIGITAL SUBTRACTION ANGIOGRAPHY – Definition, Purpose, Indications, Factors Interference, Special Instructions, Client Preparation, Procedure, After Care and Disadvantages

Digital subtraction angiography (DSA) is a newer method of visualization of vascular structures. Less contrast medium is required, when compared with cerebral angiography. The image produced is made more distinct by the elimination of surrounding and interfering anatomical structures

DEFINITION

Digital subtraction angiography is a computer-based imaging method for visualization of extracranial, intracranial and vascular system by passing a catheter to certain veins and arteries

PURPOSE

  • To identify the cause of transient ischemic attacks
  • To assess intracranial tumors
  • Preoperative and postoperative evaluation for vascular surgery

INDICATIONS

  • Transient ischemic attacks
  • Serial follow-up for clients with known carotid stenosis
  • Intracranial tumors
  • Postoperative aneurysm
  • Extracranial and intracranial bypass procedure follow-up
  • Dural venous sinuses

FACTORS INTERFERENCE

  • This examination is very sensitive and even slight physical movements may cause poor imaging
  • The art of swallowing results in unsatisfactory images

SPECIAL INSTRUCTIONS

  • If an arterial pressure was performed, the affected extremity should be kept straight for 12-24 hours and the client must lie flat
  • Do not raise the head of the bed because this can cause a strain the femoral puncture site
  • Sudden onset of pain, numbness or tingling, greater degree of coolness and absent is informed to physician immediately

CLIENT PREPARATIONS

  • Prepare the client physiologically and psychologically
  • Explain the entire procedure thoroughly in simple words
  • Instruct the client to make plenty of fluids to keep well hydrated
  • No solid food for 2 hours before the procedure
  • Inform the client that the entire procedure may take 30-45 minutes
  • Obtain informed consent from the client

PROCEDURE

  • Place the client comfortably on the treatment table
  • Radiographic dye is injected into either the venous or the arterial circulation, but significantly less dye is necessary for arterial angiography
  • X-ray film taken before and after dye injection is superimposed on each other all matching imaging are subtracted
  • Thus, only the dye enhanced cerebral vessels are left for study and evaluation
  • Digital subtraction angiography eliminates the shadows and distortions of bone or other material that sometimes block the viewing of the cerebral vessels
  • After completion of the procedure, the catheter is removed
  • Pressure is applied to the puncture site for several minutes and sterile dressing is applied

AFTER CARE

  • Place the client comfortably on the bed
  • Monitor vital signs and neurological status
  • Check the catheter site for hemorrhage or hematoma formation
  • Instruct the client to increase the fluid intake during the first 24 hours
  • Observe for allergic reactions such as nausea, vomiting and urticaria
  • Record the procedure in the nurse’s record

DISADVANTAGES

  • The major disadvantage of digital subtraction angiography involves the client’s ability to remain motionless during the entire procedure. Even swallowing interferes significantly with the imaging process. This study cannot be done for uncooperative and children
DIGITAL SUBTRACTION ANGIOGRAPHY – Definition, Purpose, Indications, Factors Interference, Special Instructions, Client Preparation, Procedure, After Care and Disadvantages

CISTERNAL PUNCTURE

CISTERNAL PUNCTURE – Definition, Purpose, Client Preparation, Procedure and After Care

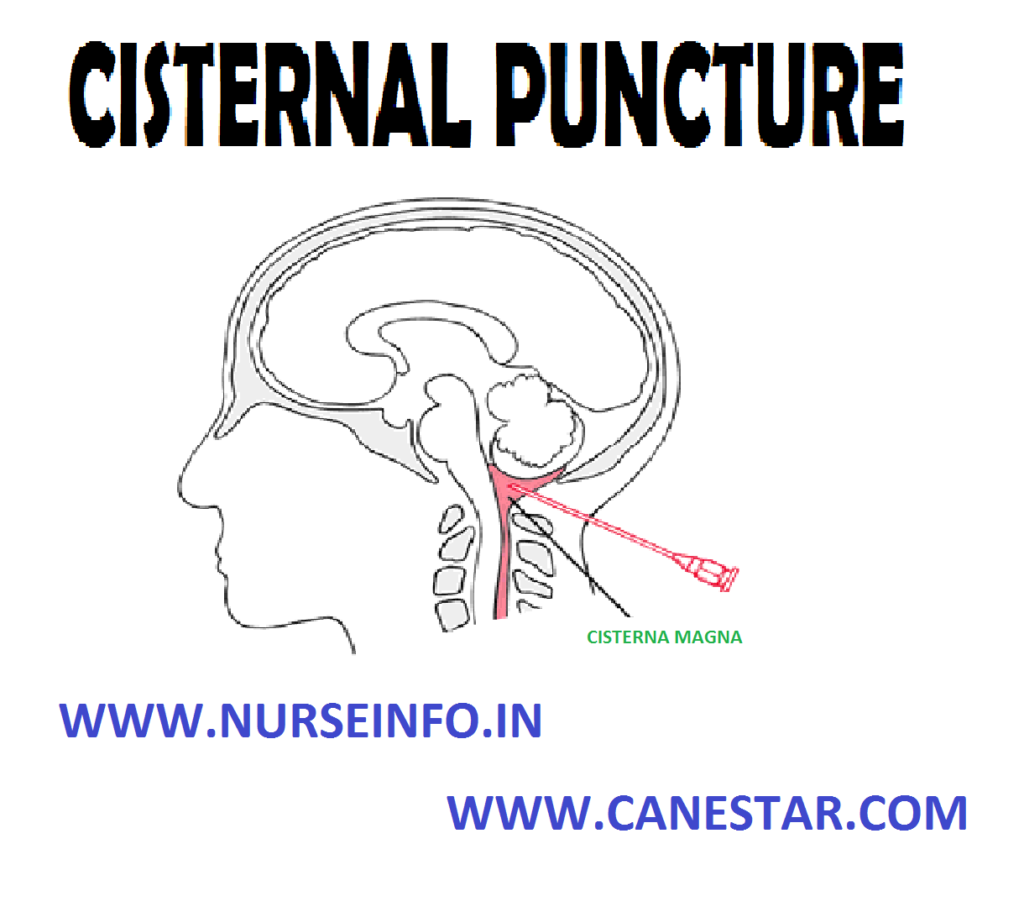
Cisternal puncture is done mainly if lumbar puncture is contraindicated. One rare occasion, access to the CSF cannot be made by LP and cisternal puncture may be used. Cisternal puncture is performed either to drain CSF or to obtain a CSF specimen when there is block in the subarachnoid space

DEFINITION

Cisternal puncture is puncture of the cisterna magna (a small reservoir of CSF between the cerebellum and medulla). A physician introduces a short-beveled needle below the occipital bone, between the first cervical lamina and the rim of the foramen magnum

PURPOSE

  • To drain CSF for increased intracranial pressure
  • When LP cannot perform because of deformity or local infection
  • To introduce medications directly into the meningeal space
  • To inject air or an opaque drug for myelography

CLIENT PREPARATION

  • Prepare the client physiologically and psychologically
  • Explain the entire procedure in simple words
  • Obtain informed consent
  • Position the client at the edge of a treatment table or bed, lying on the side with a sandbag under the head to keep the cervical spine and head straight with the thoracic spine
  • Check the vital signs and neurological status
  • Skin preparation at the puncture site

PROCEDURE

  • Place the client on the treatment table on side lying position
  • Flex the client’s head forward and hold it firmly in position
  • Local anesthetic may or may not be injected
  • A cisternal needle with stylet in place is inserted to a depth of about 5 cm
  • Gentle and slow withdrawal of CSF done
  • The needle is removed by providing pressure over the puncture site
  • Mild pressure is applied over the punctured area for few minutes

AFTER CARE

  • Provide strict bed rest for 8-24 hours
  • Check the vital signs and neurological status
  • Check the puncture site frequently for any CSF leakage
  • Send the specimen to the laboratory immediately with request
  • Replace the articles after washing
  • Record the entire procedure in the nurse’s record
CISTERNAL PUNCTURE – Definition, Purpose, Client Preparation, Procedure and After Care

CEREBROSPINAL FLUID FLOW MONITORING

CEREBROSPINAL FLUID FLOW MONITORING – Reference Values, Indications, Contraindications, Nursing Care Before the Procedure, Procedure and Nursing Care After the Procedure

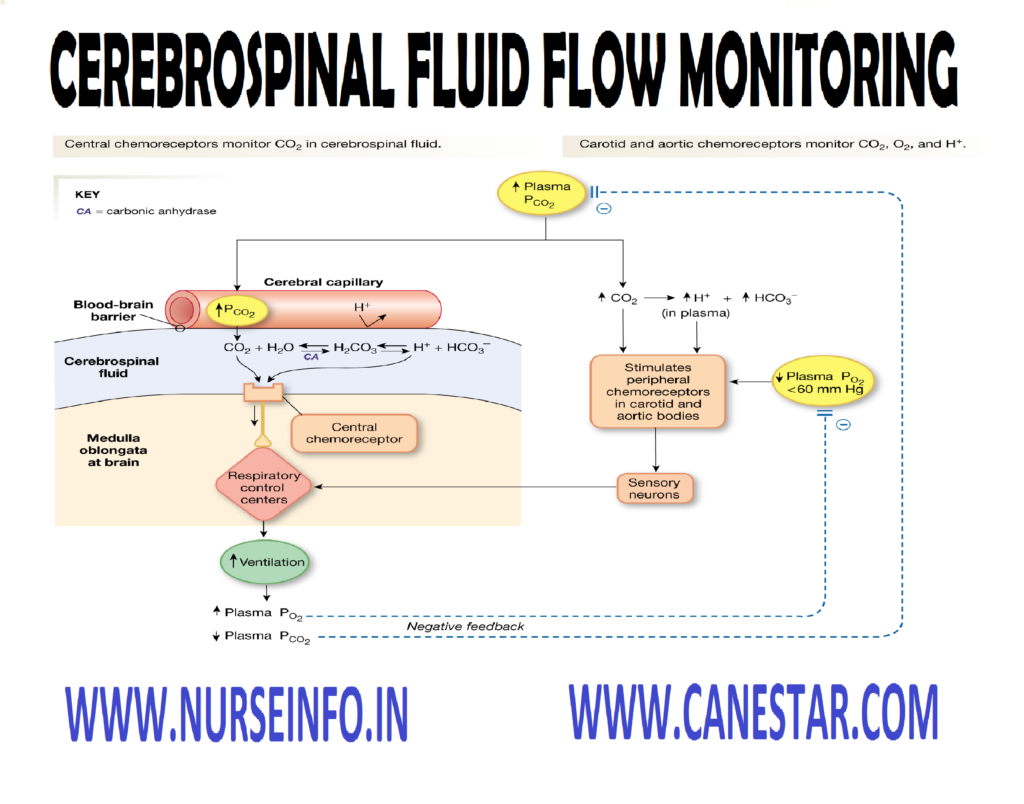
Cerebrospinal fluid (CSF) flow scanning is a nuclear study performed to evaluate patency and filling of the CSF pathways and the reabsorption or leakage of CSF. It is most commonly used to diagnose surgically treatable hydrocephalus and to evaluate shunt patency postoperatively. A radiopharmaceutical is administered by injection into the spinal column via a lumbar puncture

Radionuclide used as 99m Tc or indium 111 (1111n) administered as technetium (Tc) 99m diethylenetriaminepentaacetic acid (DTPA) or indium In 111 DTPA, which flow with CSF. Imaging is performed in 1 hour and periodically up to 72 hours after injection

REFERENCE VALUES

Reflux of CSF into the ventricles; no obstruction of or increase in CSF volume or pressure

Interfering factors: inability of client to remain still during the procedure, especially if the client is a child

INDICATIONS FOR CEREBROSPINAL FLUID FLOW MONITORING

  • Diagnosing and differentiating between communicating non-obstructive hydrocephalus or non-communicating obstructive hydrocephalus infants as revealed by reflux into ventricles or absence of reflux into ventricles respectively
  • Evaluating the size of the ventricles with CSF reflux if an obstruction is present or evaluating the ability to reabsorb the fluid revealed by an increased uptake of the radionuclide in the ventricles
  • Determining spinal masses lesions
  • Evaluating preoperatively for shunt type and placement and postoperatively for shunt patency and effectiveness

CONTRAINDICATIONS

Pregnancy, unless the benefits of performing the procedure greatly outweigh the risks to the fetus

NURSING CARE BEFORE THE PROCEDURE

  • Teaching should include information about the route of the radiopharmaceutical administration (lumbar puncture) and an explanation of the procedure
  • Inform the client that the schedule of delayed studies may continue up to 3 days and that no medications are administered before the procedure
  • Maintain the client in a supine position after the lumbar puncture

PROCEDURE

  • The client is placed flat on the examination table in a supine position 1 hour after injection of the radiopharmaceutical into the spinal column. A head down position is also sometimes used
  • The client is reminded to live very still while the scanner is operating. The scanner is moved over the head for imaging of ventricular flow
  • Subsequent imaging takes place in 4, 6, 24, 48, and 72 hours, depending on persistent reflux
  • Anterior, posterior, vertex and lateral views are made, with client position changed as needed for the desired projections

NURSING CARE AFTER THE PROCEDURE

  • Assess the puncture site for leakage and apply a small dressing
  • Return the client to the hospital room in a prone position
  • Have a client maintain a prone or supine position for 4 to 8 hours after the study
CEREBROSPINAL FLUID FLOW MONITORING – Reference Values, Indications, Contraindications, Nursing Care Before the Procedure, Procedure and Nursing Care After the Procedure

CEREBRAL BLOOD FLOW MONITORING

CEREBRAL BLOOD FLOW MONITORING – Definition, Indications, Client and Environment Preparation, Special Considerations, Equipment, Setting up the Sensor Monitor, Procedure, Care of the Insertion Site, Removing the Sensor and After Care

DEFINITION

Cerebral blood flow (CBF) monitoring is estimated blood flow in neurologically compromised client’s by calculating cerebral perfusion pressure. A sensor placed on the cerebral cortex calculates CBF in the capillary bed by thermal diffusion. Thermistors within the sensor detect the temperature differential between two metallic plates – one heated one neutral

INDICATIONS

  • Cerebral blood flow monitoring reveals the effects of interventions on it
  • This monitoring technique yields important information about the effects of intervention on CBF, which are essential in conditions in which compromised blood flow may put the client at risk, such as ischemia and infarction
  • CBF monitoring is indicated whenever CBF alternations are anticipated. It is used commonly in clients with subarachnoid hemorrhage, trauma associated with high intracranial pressure or vascular tumors

CLIENT AND ENVIRONMENT PREPARATION

  • Instruct the client and family members fully about the procedures involved in CBF monitoring
  • Obtain informed content
  • Instruct the client that the insertion site will be covered with a dry, sterile dressing

SPECIAL CONSIDERATIONS

  • CBF fluctuates with the brain’s metabolic demands, ranging from 60 to 90 ml/100 g/minute normally. however, the client’s neurological condition dictates the acceptable range
  • For instance, in a patient in a coma, CBF may be half the normal value; in a client in a barbiturate-induced coma with burst suppression on the EEG, CBF may be as 10 ml/100 g/minute
  • Vasospasm secondary to subarachnoid hemorrhage result in CBF below 40 ml/100 g/minute
  • In an awake client, CBF above 90 ml/100 g/minute
  • If you suspect poor contact between the sensor and the cerebral cortex, turn the client toward the side of the sensor or gently wiggle the catheter back and forth (using a sterile-gloved hand)
  • If your client has low CBF but no neurological symptoms that indicate ischemia, suspect a fluid layer (a small hematoma) between the sensor and the cortex
  • As with intracranial pressure monitoring, CBF monitoring may lead to infection. Administration prophylactic antibiotics as ordered and maintain in sterile dressing around the insertion site
  • CSF leakage, another potential complication, may occur at the sensor insertion site. To prevent leakage, the surgeon usually places an additional suture at the site
  • To reduce the risk of infection. Change the dressing at the insertion site daily

EQUIPMENT

Cerebral blood flow monitoring requires a special sensor that attaches to a computer data system or to a small analog monitoring that operates on a battery for client transport

  • For care of site: sterile 4”/4” gauze pads, clean gloves, sterile gloves, povidone-iodine solution or ointment
  • For removing sensor: sterile suture removal tray, 1” adhesive tape, sterile 4”/4” gauze pads, clean gloves, sterile gloves and suture material

SETTING UP THE SENSOR MONITOR

  • First assemble the following equipment at the bed side; a monitor and a sensor cable with an attached sensor. Attach the distal end of the sensor cable (from the client’s head) to the SENSOR CONNECT port on the monitor. When the sensor cable is securely in place, press on ON  key to activate the monitor
  • Calibrate the system by pressing the CAL key. You should see the red light appear on the CAL button. Ideally, you will begin by calibrating the sensor to 00.0 by pressing the directional arrows. Readouts of plus or minus 0.1 are also acceptable

PROCEDURE

  • The surgeon typically inserts the sensor in the operating room during or following a craniotomy (occasionally, he may insert I through a burr hole)
  • He implants the sensor far from major blood vessels and verifies that the metallic plates have good contact with the brain surface
  • Press the RUN key to display the CBF reading. Observe the monitor’s digital display and document the baseline value
  • Record the CBF hourly. Be sure to watch for trends and correlate values with the client’s status. Be aware that stimulation or activity may cause a 10% increase in CBF, if you detect a 20% increase or decrease. Suspect poor contact between the sensor and the cerebral cortex

CARE OF THE INSERTION SITE

  • Wash hands, put on clean gloves and remove the dressing from the sensor insertion site
  • Observe the site for cerebrospinal fluid leakage, a potential complication. Then remove and discard your gloves
  • Put on sterile gloves. Using aseptic technique, clean in insertion site with a gauze pad soaked in povidone-iodine solution
  • Clean the site, starting at the center and working outward in a circular pattern
  • Using a new gauze pad soaked with povidone-iodine solution, clean the exposed part of the sensor from the insertion site to the sensor
  • Apply povidone-iodine ointment to the insertion site if your faculty’s policy permits
  • Place sterile 4”/4” gauze over the insertion site to completely cover it, tape all edges securely to create an occlusive dressing

REMOVING THE SENSOR

  • In most cases, the CBF sensor remains in place for about 3 days when used postoperative monitoring
  • Explain the procedure to the client; then wash hands. Put on clean gloves, remove the dressing and dispose the gloving and dressing properly
  • Open the suture removal tray and the package of suture material. The surgeon removes the anchoring sutures and then gently removes the sensor from the insertion site
  • After the surgeon closes the wound with stitches, put on sterile gloves, apply a folded gauze pad to the site and tape it in place
  • Observe the condition of the site, including any leakage

AFTER CARE

  • Observe the neurological vital signs at regular intervals
  • Check the insertion site at regular intervals
  • Documentation
CEREBRAL BLOOD FLOW MONITORING – Definition, Indications, Client and Environment Preparation, Special Considerations, Equipment, Setting up the Sensor Monitor, Procedure, Care of the Insertion Site, Removing the Sensor and After Care

CEREBRAL ANGIOGRAPHY

CEREBRAL ANGIOGRAPHY – Definition, Purpose, General Instructions, Client Preparation, Procedure, After Care and Complications

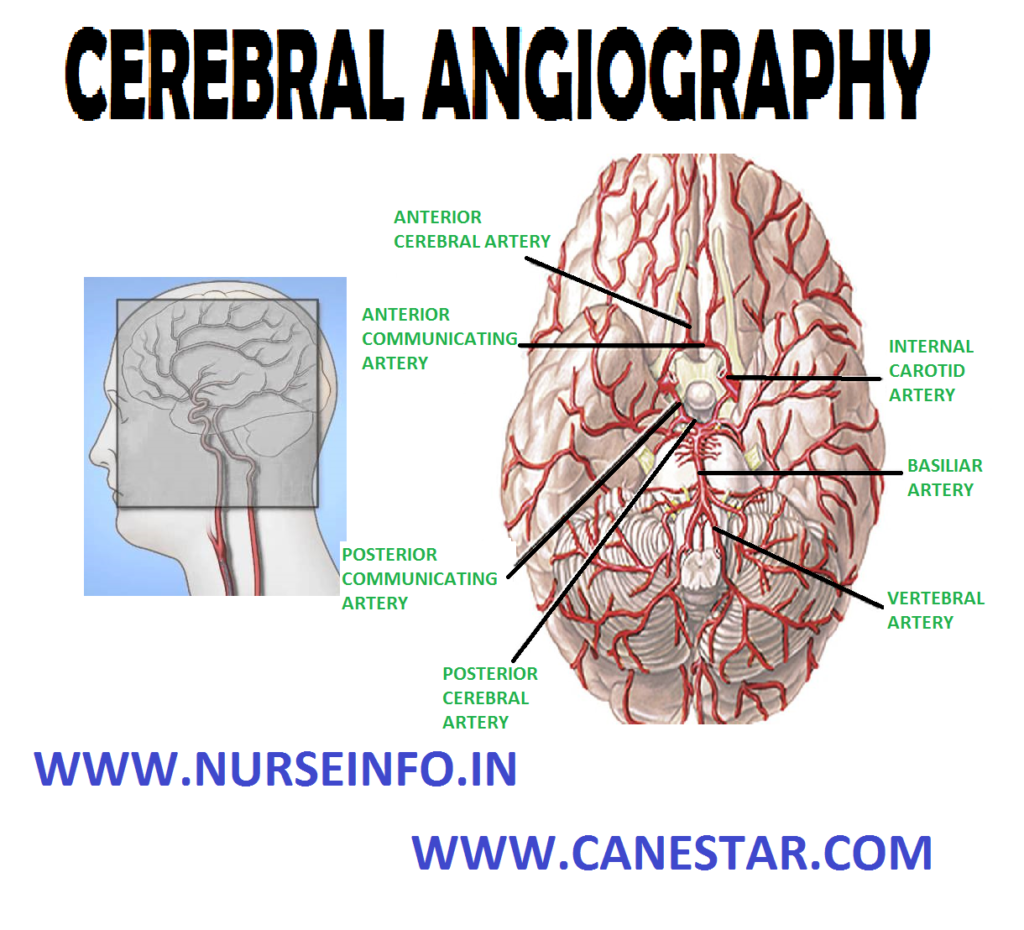
Cerebral angiography is an X-ray study of the cerebral circulation following injection of contrast material into a selected artery. Cerebral angiography is the primary investigate tool for intracranial aneurysm, arteriovenous malfunction, cerebral vascular occultation disease and study of collateral blood flow

DEFINITION

Cerebral angiography is the X-ray study by injecting radiopaque contrast medium into an artery visualization of intracranial and extracranial blood vessels

PURPOSE

  • To diagnose intracranial lesions
  • To detect abnormalities of blood vessels such as stenosis, aneurysms and arteriovenous malformation
  • To detect any displacement of cerebral vessels due to cysts, tumors or abscess
  • To visualize the cerebral arteries and veins to determine the size and nature of pathological process
  • It is done as a preparatory investigation to neurovascular interventional therapy
  • It is also has values in localizing mass lesion and may aid in preparative diagnosis
  • It is frequent done prior to craniotomy

GENERAL INSTRUCTIONS

  • The client needs to prepare physiologically and psychologically
  • The majority of cerebral angiograms are done by the transfemoral route, but the procedure may be accomplished by direct puncture of the carotid/vertebral artery or by retrograde injection of contrast medium into the brachial artery
  • The skin to be shaved at puncture site, for direct puncture. In male client, beard and neck to be shaved. For transfemoral approach shaving to be done for both male and females from umbilicus to mid-thigh on both sides
  • The client should be informed that the lie still during the procedure and he will feel a burning sensation during the injection for 4-6 seconds
  • Indwelling catheter for female and condom connected to urosac placed for male clients
  • Keep the client nothing per oral for 6-8 hours, those posted under general anesthesia
  • Mark the appropriate peripheral pulses with a felt tipped pen on the skin

CLIENT PREPARATION

  • Explain the procedure to the client that X-ray films will be taken from different angles during procedure
  • Obtain informed consent from the client
  • Remove any metal objects and jewelry from the client
  • Assess the client for allergic reactions to dye
  • Maintain nothing per oral before six hours to the procedure
  • Perform skin preparation and remove the hair from the sites of catheter insertion
  • Monitor the baseline neurological signs
  • Explain the client the local anesthesia is administered before insertion of catheter

PROCEDURE

  • The nurse in the angiogram room will receive the client
  • The nurse explain the entire procedure thoroughly to get cooperation
  • The client placed in the treatment table comfortably
  • Legs and hands are fixed
  • Blood pressure cuff and ECG leads are applied and connected to the monitor
  • The client is hydrated with IV fluids
  • Xylocain test dose given
  • Painting and draping is done for femoral artery puncture
  • Administration of injection heparin given after puncture
  • Vital signs are monitored continuously
  • At the end of puncture, heparin is neutralized by giving protamine injection
  • Apply direct pressure over punctured site for 15-20 minutes
  • Pressure crape bandage is applied in the punctured site
  • Check the peripheral pulse after conformation shift the client to the ward

AFTER CARE

  • Maintain strict bed rest for 12-24 hours
  • Observe for bleeding, swelling, redness and changes in the temperature
  • After bleeding stops, apply a pressure dressing and place sand bag over the dressing
  • If the punctured site is femoral artery, the leg is immobilized for 24 hours to prevent bleeding
  • Monitor vital signs and neurological signs
  • Icebags may also be used to provide pressure and relieve tenderness

COMPLICATIONS

  • Cerebral embolus caused by the catheter dislodging a segment of atherosclerotic plaques in the vessel
  • Hemorrhage or clot formation at the insertion site
  • Vasospasm of a vessel caused by the irritation of catheter placement
  • Thrombosis of the extremity distal to the injection site
  • Allergic reaction to the contrast medium
CEREBRAL ANGIOGRAPHY – Definition, Purpose, General Instructions, Client Preparation, Procedure, After Care and Complications

CALORIC TESTING

CALORIC TESTING – Definition, Purpose, Procedure, Interpretation and Preparation

The oculovestibular reflex or caloric test is a diagnostic examination providing information about the function of the vestibular portion of the eighth cranial nerve. It aids in the differential diagnosis of cerebellum and brainstem lesions

DEFINITION

Caloric test is performed by introducing either cold or hot water into the external auditory canal. A current then flows through the end lymphatic fluid, nystagmus is monitored in the both eyes (nystagmus is voluntary, rapid eyeball movement)

PURPOSE

This test checks the function of your acoustic nerve. This nerve is involved in hearing and balance. It also evaluates the function of brain areas involved in balance

Caloric stimulation is used to evaluate:

  • Hearing loss caused by antibiotic use
  • Vertigo (dizziness)
  • Certain forms of anemia
  • Psychological causes of vertigo
  • Brain damage in comatose individuals

PROCEDURE

Caloric stimulation is performed by inserting first cold and then warm water into the ear canals. This is done one ear at a time. The water stimulates the nerves of the inner ear

Caloric stimulation usually follows these steps:

  • Electrodes hooked up to a computer are placed around the eyes. These are used to measure eye movement during the test
  • A small amount of cold water is inserted into the ear canal. This changes the temperature of the inner ear and causes rapid, side-to-side eye movements called nystagmus. The cold water causes the eyes to move away from the direction of the cold water and then slowly move back
  • Warm water is then inserted into the ear. This time, the eyes should move toward the warm water and then slowly move back
  • Eye movements are detected by the electrodes and recorded by the computer. Sometimes the person conducting the test visually observes the eye movements

INTERPRETATION

  • When the vestibular eight cranial nerve is normal, stimulation of the auditory canal with hot water produce a rotatory nystagmus away from the side of the irrigated ear
  • When cold water is used, the normal response is rotatory nystagmus toward the irrigated ear
  • If pathology exits, nystagmus does not occur
  • Sometimes, unpleasant symptoms such as vertigo, dizziness, nausea and vomiting occur
  • Warn the client of possibility of these symptoms and give supportive nursing intervention
  • Caloric tests are contraindicated in clients with perforated eardrums or with acute labyrinthine disease

Risk of the test: The test may cause some minor discomfort, especially when cold water is inserted. The test may cause brief feelings of vertigo, which can lead to nausea in some people. Although rare, it is possible for excessive water pressure to injure an eardrum. This is more likely if the eardrum has been damaged in the past. Your doctor should check your eardrum before the procedure. This test should not be used if it is damaged

PREPARATION

Some food and medications can affect your test results. For 24 hours before your test, you should avoid the following:

  • Large, heavy meals
  • Alcohol
  • Caffeine
  • Sedatives
  • Allergy medications

Abnormal results: if your eye movements are abnormal, it may be a sign of acoustic nerve damage

Causes of abnormal result include:

  • Trauma
  • Blood clots
  • Atherosclerosis of the blood supply to the ear
  • Some poisons
  • Blood vessel disorders
  • Hemorrhage
  • Ear tumors
  • Rubella
  • Congenital disorders

Ear nerve damage can also be caused by certain medications, including:

  • Diuretics
  • Antibiotics
  • Antimalarial medications
  • Salicylates

Results from this test can also be used to rule out or confirm diagnoses, including:

  • Labyrinthitis
  • Meniere’s disease
  • Acoustic neuroma
  • Benign positional vertigo
CALORIC TESTING – Definition, Purpose, Procedure, Interpretation and Preparation
Nursing Notes, MCQs & Procedures
Download Our App
×
Nurseinfo Nursing Notes
⭐⭐⭐⭐⭐ 4.8 • Free
Get Nursing Notes, MCQs, PDFs, Exam Updates and Practice Questions in one app.
📲 Download App Not Now