PULMONARY ARTERY WEDGE – PRESSURE MONITORING – Definition, Purpose, Principle, Client and Equipment Preparation, Equipment, Procedure, Checking a PAWP Reading, Removing the Catheter, Special Consideration and Complications (NURSING PROCEDURE)
In August of 1970 Dr. HJC Swan, Dr. William Ganz et al. reported their results on use of a new flow-guided balloon-tipped catheter to measure pulmonary pressure in the critically ill client. At this time their discovery was a flexible double-lumen catheter capable of being inserted without fluoroscopy via the antecubital vein
Now, the most the critical care nurses commonly are utilizing a four lumen pulmonary catheter to monitor different parameters of cardiac function. In addition to values displayed on the bedside monitor, e.g. pulmonary artery systolic, diastolic, and mean and wedge artery pressures. The four lumen catheter enables the nurse to perform cardiac output determinations at the bedside by thermo-dilution method
DEFINITION
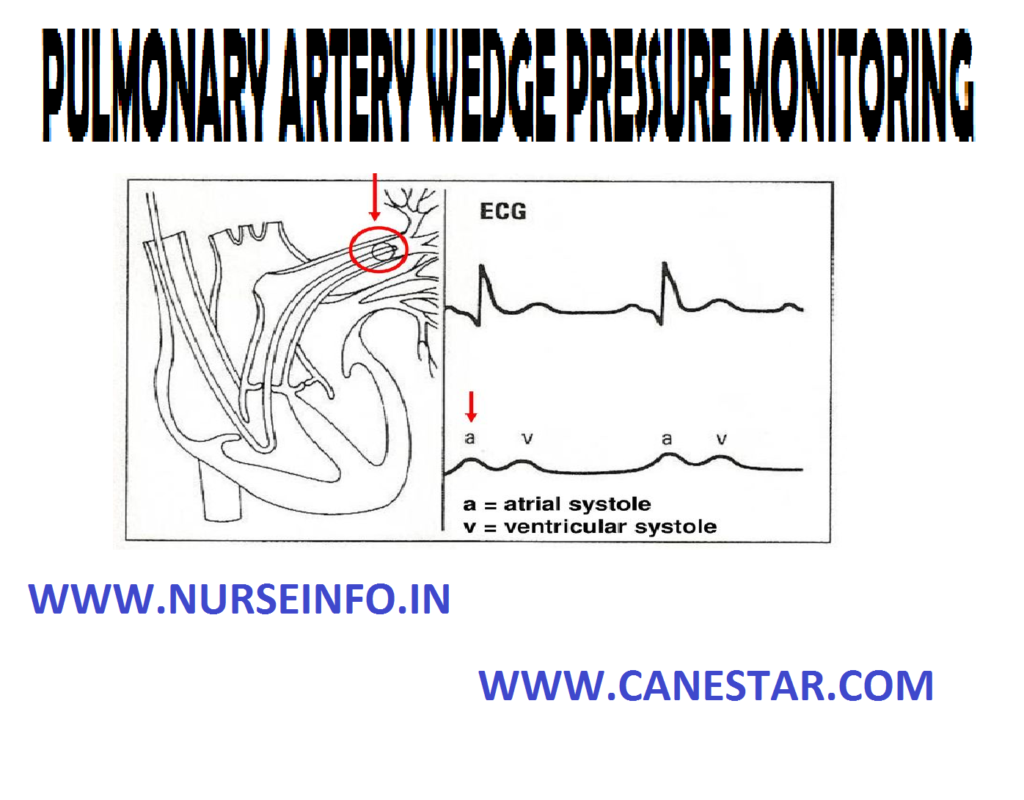
- Swan-Ganz is a balloon tipped, flow directed catheter used to monitor pulmonary artery pressure. It implies measuring in a distal branch of pulmonary artery with the catheter in the wedged position, so that the measurements recorded reflects left arterial pressure
- Pulmonary artery wedge pressure monitoring implies pressure in a distal branch of pulmonary artery with the catheter in the wedged position, so that the measurements recorded reflects left arterial pressure. This recorded using a balloon tipped, flow directed catheter called Swan-Ganz catheter
PURPOSE
- To measure cardiac output by themodilution method
- To obtain blood samples from the heart and pulmonary artery
- To monitor the hemodynamic pressures provides information about blood volume, fluid balance and how well the heart is pumping
- To measure direct pressure in the right atrium, right ventricle, pulmonary artery and distal branches of pulmonary artery
- To infer the pressure in the left atrium and the filling pressure of the left ventricle
- To serve as a guide for fluid management
- To evaluate the successes of the drug therapy
PRINCIPLE
- The pulmonary artery wedge pressure is closely related to the left arterial pressure since there are no values in the pulmonary veins
- Left arterial pressure is closely related to the left ventricular end diastolic (filling pressure of the left ventricle)
- When the catheter is wedged, it looks directly into the left side of the heart and is not influenced by the pressure in the pulmonary artery
- Pulmonary capillary wedge pressure is an indicator of the left ventricular function
- Continuous pulmonary artery pressure and intermittent pulmonary artery wedge pressure measurement provide important information about left ventricular function are preload
CLIENT AND EQUIPMENT PREPARATION
- Explain the procedure in simple words to the client and relatives to reduce anxiety
- Obtain informed consent
- To obtain reliable pressure values and clear waveform, the pressure monitoring system and bedside monitoring must be properly calibrated and zeroed
- Make sure the monitor has correct pressure modules; then calibrate it according to the manufacturer’s instructions
- Turn the monitor on before gathering the equipment to give it time to warm up
- Be sure to check the operations manual for the monitor you are using; some old monitor needs 20 minutes to warm up
- Prepare the pressure monitoring system according to policy. Your faculty’s guidelines also may specific whether to mount the transducer on the IV pole or tape it to the client and whether to add heparin to the flush
- Make sure to have emergency resuscitation equipment on hand (defibrillator, oxygen and supplies for intubation and emergency drug administration)
EQUIPMENT
- Balloon tipped, flow directed PA catheter
- Prepared pressure transducer system
- Alcohol sponges
- Medication added label
- Monitor and monitor cable
- IV pole with transducer mount
- Emergency resuscitation equipment
- Electrocardiogram monitor
- ECG electrodes
- Arm board (for antecubital insertion)
- Lead aprons
- Sutures
- Sterile 4”/4” gauze pads or other dry, occlusive dressing material
- Prepacked introducer kit
- Optional: dextrose 5% in water, shaving materials (for femoral insertion site)
If a prepacked introducer kid is unavailable, obtain the following
- An introduce (one size larger than the catheter)
- Sterile tray containing instruments for procedure
- Masks
- Sterile gowns
- Sterile gloves
- Povidone-iodine ointment and solution
- Solution
- Sutures
- Two 10 ml syringes
- Local anesthetic agents (lignocaine 2%)
- One 5 ml syringe
- 25 G needle
- 1” and 3” tape
PROCEDURE
- Check the client’s chart for heparin sensitivity, which contraindicates adding heparin to the flush position
- Position the client at the proper height and angle, if the doctor will use a superior approach for precutenous insertion
- Place the client flat or in a slight trendelenburg position, remove the client’s pillow to help engorge the vessel and prevent air embolism
- Turn his head to the side opposite the insertion site
- If the doctor will use an inferior approach to access a formal vein, position the client flat, be aware that with this approach, certain catheters are harder to insert and may require more manipulation
- Maintain aseptic technique and use standard precautions throughout catheter preparation and insertion
- Wash hands, then clean the insertion site with a povidone-iodine solution and drape it
- Put on a mask, help the doctor put on a sterile masks, gloves and gown
- Open the outer packing of the catheter, revealing the inner sterile wrapping. Using aseptic technique, the doctor open the inner wrapping and pick up the catheter
- To remove air from the catheter and verify its patency, flush the catheter
- Assist the doctor as he inserts the introducer to access the vessel. He may perform a cut down or insert the catheter percutenously, as with a modified Seldinger technique
- After the introducer is placed and the catheter lumens are flushed, the doctor inserts the catheter through the introducer in the internal jugular or subclavian approach, he inserts the catheter into the end of the introducer sheath with the balloon deflated, directing the curl of the catheter toward the client’s midline
- Using a gentle, smooth motion, the doctor advances the catheter through the heart chambers, moving rapidly to the pulmonary artery because prolonged manipulation here may reduce catheter stiffiness
- As the catheter floats into the pulmonary artery, note that the upstroke from right ventricular systole is smoother and systolic pressure is nearly the same as right ventricular systolic pressure
- Record systolic, diastolic and mean pressure (typically ranging from 8 to 15 mm Hg)
- To obtain a wedge tracing, the doctor lets the inflated balloon float downstream with venous blood flow to a smaller, more distal branch of the pulmonary artery
- Conform the catheter position by obtaining chest X-ray
- Apply a sterile occlusive dressing to the insertion site
CHECKING A PAWP READING
- PAWP is recorded by inflating the balloon and letting it float in a distal artery
- To begin, verify that the transducer is properly leveled and zeroed
- Take the pressure reading at end expiration. Note the amount of air needed to change the PA tracing to a wedge tracing (normally 1.25-1.5 cc)
REMOVING THE CATHETER
- To assist the doctor, inspect the chest X-ray for sign of catheter kinking or knotting
- Obtain the client’s baseline vital signs and note the ECG pattern
- Place the head end flat, the doctor will remove any sutures securing the catheter
- If the introducers were removed, apply pressure to the site and check it frequently for signs of bleeding. Dress the site again, as necessary
SPECIAL CONSIDERATION
- Advise the client to use caution when moving about in bed to avoid dislodging the catheter
- Never leave the balloon inflated because this may cause pulmonary infarction. To determine if the balloon is inflated, check the monitor for a wedge tracing, which indicates inflation
- Never inflate the balloon with more than the recommended air volume
- Be aware that the catheter may slip back into the right ventricle. Because the tip may irritate the ventricle, check the monitor for a right ventricle waveform to detect this problem promptly
- To minimize vascular trauma, make sure the balloon is inflated whenever the catheter is withdrawn from the pulmonary artery to the right ventricle or from the right to the right atrium
COMPLICATIONS
Complications of PA catheter insertion include PA perforation, pulmonary infarction, catheter knotting, local or systemic infection, cardiac arrhythmias and heparin-induced thrombocytopenia