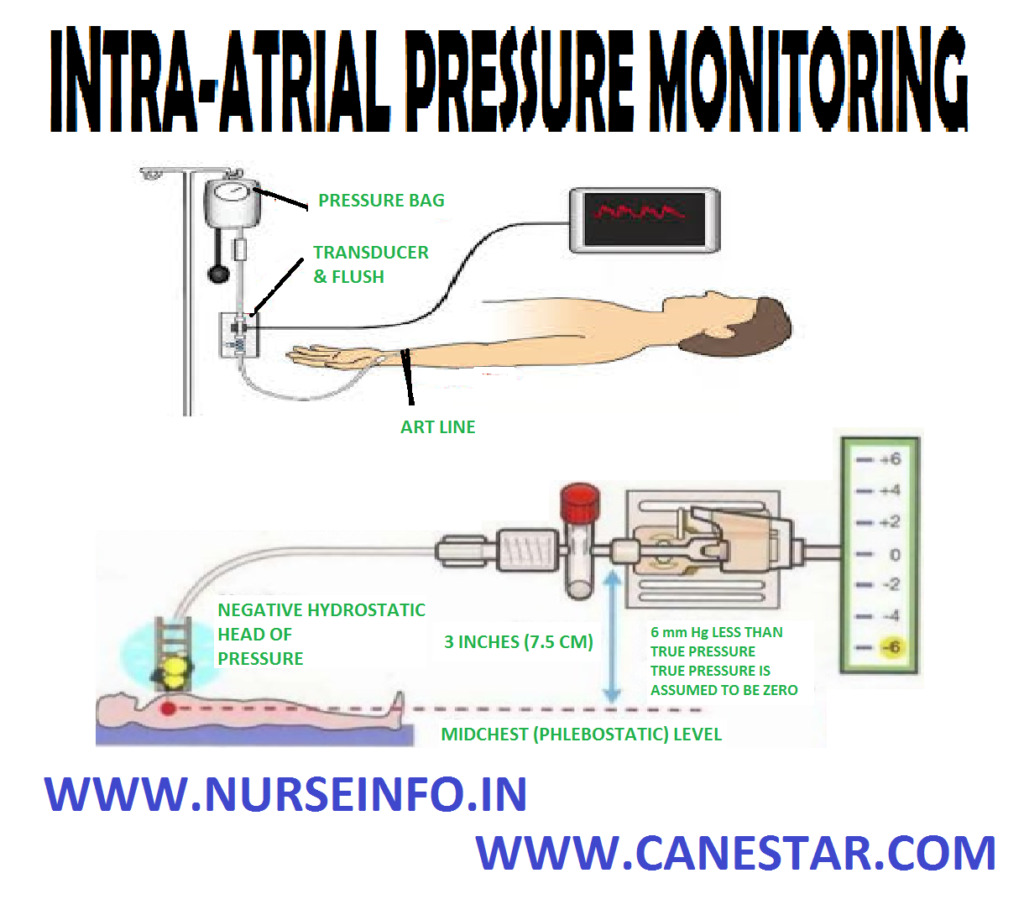
INTRA-ATRIAL PRESSURE MONITORING – Definition, Formula, Purpose, Indication, Components, Special Considerations, Client and Equipment Preparation, Equipment Needed, For Blood Sample Collection, Procedure, After Care and Complication (NURSING PROCEDURE)
Direct arterial pressure monitoring permits continuous measurement of systolic, diastolic and mean pressures and allow arterial blood sampling. Because direct measurement reflects systemic vascular resistance as well as blood flow, it is generally more accurate than indirect methods (such as palpation and auscultation of Korotkoff or audible pulse sound), which are based on blood flow
DEFINITION
Intra-arterial pressure monitoring is a continuous and direct method of monitoring blood pressure by passing a catheter into an artery and connecting it to an electronic pressure sensor called transducer
FORMULA
Arterial pressure equals the flow through the vessel multiplied by the resistance to that flow. SVR-systemic vascular resistance
AP = CO/SVR
Normal AP range between 90/60 mm Hg and 140/90 mm Hg
PURPOSE
- To provide continuous and more accurate intra-arterial pressure reading
- To detect dangerously high or low blood pressure
- To provide continuous access to arterial blood for analysis
INDICATION
- Clients with low cardiac output and high systemic vascular resistance
- Clients who are receiving titrated doses of vasoactive drugs or who need frequent blood sampling
- Clients with very high and low blood pressure
- Pulmonary embolism and cardiac tamponade
- Extensive burns with limited intact skin surfaces
COMPONENTS
- Intra-arterial catheter: this is introduced into an artery, from where the pressure waves are transmitted to the manometer (transducer)
- Transducer: this is attached to the intra-arterial catheter. The transducer converts the mechanical signal (pressure) to the electrical signal (voltage)
- Bedside monitor: this amplifies the signal coming for the transducer and displays it on the oscilloscope
- Fluid source: this is to flash the intra-arterial catheter to prevent clotting of blood in it. Either normal saline or 5% dextrose is used to keep the arterial line patient
- Heparin in a dose of 1 unit per ml is added to this solution; this may be increased to 4-5 units of heparin per ml when the client has history of thromboembolic diseases. It is delivered in small amounts using a flush device, without introducing the air
SPECIAL CONSIDERATIONS
- Always watch for hemorrhage. Keep all the connections tight
- Apply immediate pressure if the catheter is accidentally pulled out
- Prevent the possibility of clot formation in the catheter
- Provide a continuous infusion with heparin solution
- Flush the catheter thoroughly after each blood specimen is withdrawn
- Always inspect the extremity distal to the area of cannulation to detect any decrease in the circulation
- Watch for cold fingers, cyanosis, and poor capillary filling
- Prevent infection by maintaining strict aseptic technique and closed system, at all times
- Never inject any medications though the arterial line
- Keep the catheter site clean and dry to prevent skin maceration
CLIENT AND EQUIPMENT PREPARATION
- Prepare the client with providing adequate explanations
- Obtain informed consent
- Instruct the client needs to clench his hand tightly at the time of cannula insertion
- Before setting up and priming the monitoring system, wash hands thoroughly
- Maintain asepsis by wearing personal protective equipment throughout preparation
- Check the client’s history for an allergy or a hypersensitivity to iodine or the other local anesthetic agents
EQUIPMENT NEEDED
For catheterization:
- Gloves gown and mask
- Protective eye wear
- Sterile gloves
- 16G-20G catheter
- Preassembled preparation kit
- Sterile drapes
- Sheet protector
- Sterile towels
- Prepared pressure transducer system
- Local anesthetic agent (lignocaine 2%)
- Sutures
- Syringe and needle (21G-25G)
- IV pole
- Tubing and medication labels
- Site care set (containing sterile dressing, antimicrobial ointment and hypoallergic agent)
- Arm board and soft wrist restraints (formal site, ankle restraints)
- Optional: shaving kit
FOR BLOOD SAMPLE COLLECTION
- Gloves gown and mask
- Sterile 4”/4” gauze pads
- Protective eye wear
- Sheet protector
- 500 ml IV bag
- 5 or 10 ml syringe for discard sample
- Syringe of appropriate size and number for ordered laboratory tests
- Laboratory request forms and labels
- Vacutainers
PROCEDURE
- Maintain asepsis by wearing personal protective equipment
- Position the client for easy access to the catheter insertion site
- Place the sheet protector under the site
- Insert an arterial catheter by using preassembled preparation kit, the doctor prepares and anesthetizes the insertion site
- The catheter is then inserted in to the artery and attached to the fluid-filled pressure tubing
- The doctor may suture the catheter in place
- Apply antimicrobial ointment and cover the insertion site with dressing
- Immobilize the insertion site by using an arm board and soft wrist restraint
- Activate monitor alarms as appropriate
- Observe the pressure waveform on the monitor can enhance assessment of arterial pressure
AFTER CARE
- Change the pressure tubing every 2-3 days, according to facility policy
- Change the dressing at the catheter site at intervals specified by facility policy
- Regularly assess the site for signs of infection, such as redness and swelling
- Notify the doctor immediately if you note any such sign
- Documentation
COMPLICATION
- Arterial bleeding
- Infection
- Air embolism
- Arterial spasm
- Thrombosis


