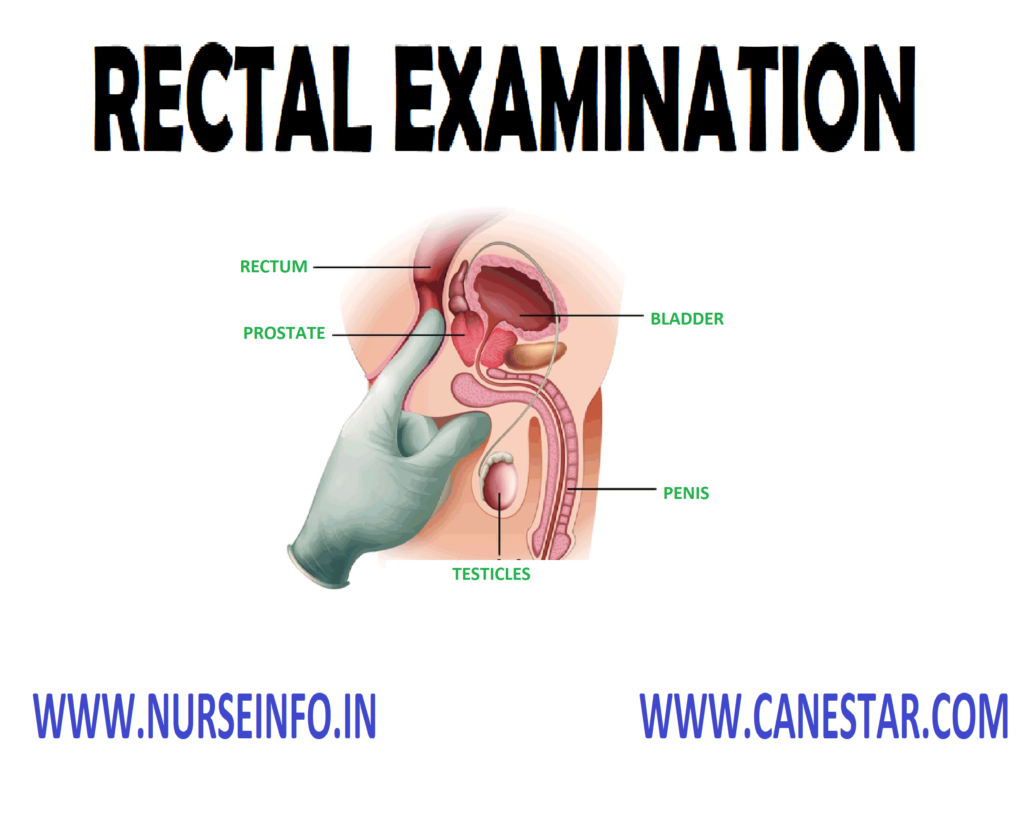
RECTAL EXAMINATION – Purpose, Method
and Position, Preliminary Assessment, Preparation of the Patient and the
Environment, Equipments, Procedure and Complications
Rectal
examination is an essential part of every comprehensive physical examination
involves inspection and palpations.
PURPOSE
To identify the rectal problems
To identify the enlargement of any
part
This performs only the inspection of
the anus
METHODS AND POSITION
The rectal examination done by visual
examination and digital examination of the anus and the rectum are
indispensable for detecting and identifying lesions involving these structures
Rectal examination may be done with
the patient in the knee chest position, Sims lateral, or inverted position, on
a special protoscopic table
PRELIMINARY ASSESSMENT
Check the physician orders
Explain the procedure to the patient
Check the articles available in the
patient unit
Check the correct position of the
patient
Check the any precautions
PREPARATION OF THE PATIENT AND ENVIRONMENT
Lubricate your index finger and
instruct the client to bed downward as through having a bowel movement. This
relaxes them
Slowly insert your finger into the
rectum in the direction of the umbilicus
The end canal distance from the end
opening to the anorectal junction is short (3 cm)
The posterior wall of the rectum
follows the curve of the cay coccyx and sacrum
Never force digital insertion. If
lesion and painful bleeding occurs disconnection the examination
Ask the client to the end sphincters
around your fingers and note the tone of the anal sphincter
Rotate the pad of the index finger
long the anal and rectal feeling for nodules masses and tenderness
Note the location of any
abnormalities of the rectum
EQUIPMENTS
Gloves
Lubricate
Gauze piles
Cotton
Kidney tray
Normal saline
Soaps
PROCEDURE
Inspect the anus and surroundings
tissue for colon, integrity and skin lesion
Then ask the client to bear down as
through defecting
Beading down creates slight pressure
on the skin that may accentuate rectal lapse polyps
Describe the location of all abnormal
findings in items of check with the 2 o clock position between the pubic
symphysis
Palpate the rectum for any sphincter
take care of the patient who is under the effect of anesthesia
Palpate the prostate gland
COMPLICATIONS
Internal hemorrhoids
Rectal prolapse
Polyps
Tissue damage
Tenderness
RECTAL EXAMINATION – Purpose, Method and Position, Preliminary Assessment, Preparation of the Patient and the Environment, Equipments, Procedure and Complications
NASOGASTRIC INSERTION – Purpose,
Indications, Types of Tubes Used, Description of Ryle’s Tube, General
Instructions, Preliminary Assessment, Preparation of Patient and Environment,
Equipment, Procedure and Post-Procedure Care
Nasogastric
insertion is defined as the passage of a tube through the node to the stomach.
Inserting a
nasogastric tube or feeding tube into the stomach or duodenum allows a patient
who cannot eat to receive nourishment.
PURPOSE
To relieve abdominal distension
To maintain gastric decompression
after surgery
To prevent nausea and vomiting after
surgery
To treat patients and mechanical
obstruction and bleeding of the upper gastrointestinal tract
To obtain a specimen of gastric
contents for laboratory studies
Administer medications and feeding
directly into GI tract
To relieve discomfort
INDICATIONS
Therapeutic
To decompress the gastrointestinal
tract, e.g. in paralytic ileus, intestinal obstruction and acute dilatation of
stomach
To keep the stomach empty to give
local rest, e.g. in peritonitis, after intestinal anastomosis
To prevent distension of abdomen,
especially after repair of the incisional hernia
After an esophagus operation, e.g.
resection of growth excision of diverticulum, suturing of esophageal tear,
correction of tracheoesophageal fistula
Feeding: nasogastric tube feeding in
unconscious and comatose patients to maintain nutrition and nasogastric hyperalimentation,
especially in malnourished patients and low fecal fistula
Gastric lavage: alcohol or
non-corrosive poisoning or in hematemesis
Prerequisite: before facial surgery.
Also called in major faciomaxillary injury
Diagnostic
Aspiration of gastric juice to know
secretory activity and mobility of the stomach in chronic gastric ulcer, chronic
duodenal cancer, pyloric obstruction, gastric carcinoma, and Zollinger-Ellison
syndrome
In abdominal trauma: if Ryle’s tube
aspirate is blood stained, it indicates injury to the stomach and an emergency
laparotomy is indicated
To differentiate the bleeding above
the pylorus from bleeding from below the pylorus. If blood is present in
gastric samples but present in duodenal samples, then bleeding is from distal
to pylorus
Collection of duodenal contents to
diagnose typhoid carriers and to demonstrate tuberculosis bacilli in children
and recumbent patients who cannot expectorate
To diagnose pseudopancreatic cyst:
lateral view of the abdomen after Ryle’s tube is in the stomach, shows the tip
near the abdominal wall due to compression of the stomach by cyst from behind
TYPES OF TUBES USED
Ryle’s tube (Nasogastric tube): Old
Ryle’s tube was a red rubber tube with one bead of metal at the tip. Now
plastic Ryle’s tubes are in use they are made polyvinyl chloride
Ewald tube: in an emergency, using
this single-lumen tube with several openings at the distal allows you to
aspirate large amounts of gastric contents quickly
Levacuator tube: this tube has two
lumens. Use the large lumen for evacuating gastric contents, the smaller for
instilling an irritant
Edlich tube: this single lumen tube
has four openings near the closed distal tip. A funnel or syringe may be connected
at the proximal end. Like the Ewald tube, the Edlich tube lets you withdraw
large quantities of gastric contents quickly
DESCRIPTION OF RYLE’S TUBE
They are made up of polyvinyl
chloride
Size caliber ranger from 10 to 20 F
Length is 105-125 cm long
Tip it is behind to avoid trauma
There are three or four metal beads
because:
Metal is radiopaque, so radiologically we can confirm the position of the
tip
They facilitate the passage of the tube by action of the gravity and also
facilitate swallowing due to their weight
There is multiple opening at different levels
There are four marking in the tube:
40 cm from the tip to mark cardioesophageal junction
50 cm from the tip (tip in stomach)
60 cm from the tip (tip in pylorus)
65 cm from the tip (tip in the duodenum)
Base: it is provided with one cork.
Size of its lumen is just adequate to adopt the nozzle of the syringe
GENERAL INSTRUCTIONS
Tube: the tip of the tube is
lubricated with sterile paraffin or jelly (distal 10-15 cm of the tip is
lubricated with water soluble lubricant)
Nose: wider nostril is selected.
Nostril is cleaned with pledget of cotton wool, moistened with savlon in water
Patients: sitting position or, when
the patient lying, the head should be flexed by one hand
Sterilization
Gamma-rays irradiation
Ethylene oxide gas sterilization
Boiling (ideally, Ryle’s tube should be cleaned with water, it is not
necessary to sterilize it)
PRELIMINARY
ASSESSMENT
Check the physicians order
Check the progress notes and nursing
care plan
Check the level of consciousness and
ability to follow directions
Check the ability for self-care
Check the articles available in
patients unit
Position the patient in supine
PREPARATION OF PATIENT AND ENVIRONMENT
Explain the procedure to patient, if
patient is conscious
Explain the sequence of procedure and
explain how patient can cooperate to you
Provide privacy
Provide safe and comfortable position
Place Mackintosh and face towel
across chest
Allow the patient to adjust kidney
tray according to his convenience
Remove dentures if any
Arrange articles near to bed
Give a mouth wash and help him to
clean teeth
Clean the nostrils, if there is any
secretion
EQUIPMENT
Sterile gloves
Aseptoc syringe
Nasogastric tubes
Water based lubricating jelly
Cup of water or ice chips
Bile bag or drainage bag
Stethoscope
Securing device or tape
Specimen container
Container
Soap and water
PROCEDURE
Explain the procedure to with the
cooperation of patient
Wash and dry hands
Establish the distance that the tube
is to be passed by measuring the distance on the tube from patient’s ear lobe
to the bride of nose to the bottom of xiphisternum
Lubricate 15-20 cm of the tube and
jelly
Insert the tube and slide it gently
but firmly inwards and backward along the floor of nose to naso case of the
patient who is under the effect of anesthesia pharynx
Encourage the patient to swallow and
breathe through mouth when tube reaches pharynx keeping chin down and head
forward to assist the passage of tube
Advance the tube until the length
previously measured has been inserted and the mark has reached the external
nares. If the patient shows any distress remove the tube immediately
Ascertain whether the tube is in
stomach by:
Aspirating the contents of stomach and a syringe
The aspirate should turn the litmus paper red
Place the steth over the epigastrium and inject 2-3 ml of air to the
tube. It can be detected by whooshing sound
Secure the tube to the patient nose
with tape
POST-PROCEDURE CARE
Ensure that patient is an comfortable
as possible
Clean and dispose of the equipment
Wash hands
Initiate and maintain intake output
chart
Record the time, date, and reaction
of patient, etc. in nurse’s record as well as in the intake output chart
Remove the tube when the aspiration
is to be stopped
NASOGASTRIC INSERTION – Purpose, Indications, Types of Tubes Used, Description of Ryle’s Tube, General Instructions, Preliminary Assessment, Preparation of Patient and Environment, Equipment, Procedure and Post-Procedure Care
ENTERAL/NASOGASTRIC FEEDING –
Purpose, Advantages of Enteral Tube Feeding, Methods of Tube Feeding, General
Instructions, Preliminary Assessment, Preparation of the Patient and
Environment, Equipment, Procedure, Post-Procedure Care and Complications of
Tube Feeding
Nasogastric
feeding or gastric gavage is the instillation of specially prepared nutrients
into the digestive tract through a tube that is inserted through one of the
nostrils, down the nasopharynx and into the alimentary tract
Enteral tube
feedings are delivered to the distal duodenum or proximal jejunum when it is
necessary to bypass the esophagus and stomach
PURPOSE
To supply the body with adequate
nourishment, when the patient is unable to take food by mouth (e.g.
unconscious, semiconscious and delirious patients) or for patients who will not
eat
To supply with adequate nutrients
when conditions of mouth or esophagus make the chewing or swallowing difficult
or impossible, e.g. patients with fracture jaw, structure esophagus, surgery of
mouth and esophagus
ADVANTAGES OF ENTERAL TUBE FEEDING
Intraluminal delivery of nutrients
preserves gastro-intestinal integrity
Tube feedings preserve the normal
sequence of intestinal and hepatic metabolism prior to nutrient delivery to the
arterial circulation
The intestinal mucosa and liver are
important in fat metabolism and are the only sites of lipoprotein synthesis
Normal insulin – glucagon ratios are
maintained with the intestinal administration of carbohydrates
GENERAL INSTRUCTIONS
Patient receiving internal tube
feedings should be in an upright position to avoids aspiration or reflux
If the patient is ambulatory, he is
encouraged to walk, since movement facilitates absorption of the feeding
Fluid balance is carefully recorded
to identify decreased intake or excessive diarrhea
Feeding are delayed for 2 hours if
gastric residue is greater than to 150 ml. if this amount persists, the
physician is notified
During the feeding monitor for signs
of intolerance which includes cramping, diarrhea, nausea, vomiting, aspiration,
glycosuria and diaphoresis
Always check the placement of the
tube. Gently aspirate gastric contents with a syringe, and measure the pH of
the gastric contents
If the feeding solution does not
initially flow through a bulb syringe, attach the bulb and squeeze it gently to
start the flow. Then remove the bulb. Never use the bulb to force the formula
through the tube
If the patient becomes nauseated or
vomits, stop the feeding immediately
During continuous feedings, assess
the patient frequently for abdominal distension
Flush the tubing by adding about 50
ml of water to the gavage bag or bulb syringe. This maintains the tube’s
patency by removing excess formula, which could occlude the tube
If the patient develops diarrhea,
administer small frequent, less concentrated feedings to administer bolus
feeding over a long time
Drugs can be administered through the
feeding tube. Except for enteric coated drugs
PRELIMINARY ASSESSMENT
Check the doctor’s order
Type of formula
Time, frequency amount of feeding
Specific indications for the client
PREPARATION OF THE PATIENT AND ENVIRONMENT
Explain procedure to patient
Ask patient for any history of
allergies
Auscultate for bowel sounds before
feeding
Check placement of gastric tube by
means of aspiration of gastric juice is by checking with stethoscope while
introducing air into the stomach
Position patient to high Fowler’s
position or elevate head if bed 30 degrees
Place a towel under the chin
Examine the appearance of aspirated
contents
EQUIPMENT
A clean tray
containing:
Large volume syringe
Required feed a fluid
Kidney tray
Stethoscope
A glass with water for flushing the
tubing
Continuous infusion set in continuous
drip method is ordered
Disposable gloves
Measured glass to measure to fluid
intake
PROCEDURE
Wash hands and put clean gloves
Pinch proximal end of the feeding
tube and elevate to 18 inches above the patients head. Fill the syringe with
the required feed. Allow syringe to empty gradually, refill until prescribed
amount has been given to the patient
If continuous drip method is used
hang the feeding bag to the pole above 18 inches above patients head and
connect end of the bag to the proximal end of the feeding tube and set rate
Regulate the drip rate to permit the
formula to infuse over 20-30 minute by adjusting the height of the feeding bag
or adjusting the rate of flow
When the tube feedings are not being
administered, clamp the proximal end of the tube
Rinse the tube with pain water at the
end of feeding
Reclamp the gastric tube
Remove gloves and wash hands
POST-PROCEDURE CARE
Cover the end of the feeding tube
with its plug or cap to prevent leakage and contamination of the tube
Leave the patient in semi-Fowler’s or
high Fowler’s position for at least 30 minutes
Rinse all reusable equipment with
warm water. Dry it and store it in a convenient place for the next feeding.
Change the equipment every 24 hours or according to your facility’s policy
The patient and family members are
gradually included in these activities
Weight is checked daily and watch for
sudden gain in weight
Observe for signs of dehydration (dry
mucous membranes, thirst, and decreased urine output)
Watch for possible complications
Record amount of feeding, patient’s
response to tube feeding and untoward effects in nurse’s notes and record
intake in fluid balance chart
ENTERAL/NASOGASTRIC FEEDING – Purpose, Advantages of Enteral Tube Feeding, Methods of Tube Feeding, General Instructions, Preliminary Assessment, Preparation of the Patient and Environment, Equipment, Procedure, Post-Procedure Care and Complications of Tube Feeding
COLOSTOMY IRRIGATION – Purpose, Types
of Colostomy, Solutions Used, Preliminary Assessment, Preparation of the
Patient and the Environment, Preparation of the Article, Procedure and
Post-Procedure Care
Colostomy
irrigation is similar to an enema, in a form of stoma management used only for
clients who have sigmoid colostomy or descending colostomy.
Colostomy is
an operations in which artificial opening is made into the colons on the
anterior abdominal wall to permit the escape of feces and flatus.
PURPOSE
To establish regularity of evacuation
To cleanse the intestinal tract of
gas, mucus and feces
To prevent excoriations of the skins
around stoma
To remove any irritant foods ingested
by the patient
To teach patient and his relatives
the care of colostomy
TYPES OF COLOSTOMY
Temporary and permanent colostomy
Double-barreled colostomy and
end-colostomy
Wet colostomy and dry colostomy
SOLUTIONS USED FOR COLOSTOMY IRRIGATION
Normal saline
Plain water
Soapy solutions
PRELIMINARY ASSESSMENT
What is the name, bed number and
other identification of the patient
Check the diagnosis and purpose of
irrigation
Check the type of colostomy done.
Make sure of the proximal and distal loop of the colors
Check the patient’s ability for
self-care
Check the doctor’s order for specific
instructions and the precautions, if any, regarding the colostomy irrigations,
movement of the patient, etc
Check the understanding of the
patient to follow instructions
Check the articles available in
patient’s unit
PREPARATION OF THE PATIENT AND THE ENVIRONMENT
Explain the procedure to the patient
Make the patient sit on a chair in
the bathroom. A rubber sheet placed on the lap of the patient can be used as a
through leading into the toilet to receive returns flow
Provide privacy. Remove undergarments
Clean the skin around the stoma with
clears cotton swabs or rag pieces
PREPARATION OF THE ARTICLE
Irrigating can with tubing, clamp and
catheter
IV stand
A jug with solution at the temp of
100-105 degree celcius
Water soluble jelly
Clean cotton swabs
Kidney tray
Dressing, protective ointments
Mackintosh
Clean linen
Bucket
Stoma bag
PROCEDURE
Wash hands
Fill the irrigating can with the
solutions and hang it at a required height
Expel the air from the tubing and
clamp it remove the froth if any
Unite colostomy bag and remove the
dressing
Introduce the catheter through the
teat and the tip of the catheter is lubricated with water and jelly
Pour some solutions over stoma
Introduce catheter into stoma about 4
inches. Do not use any force
Allow the solutions to pass slowly,
involving about 20 minutes
Clamp the tube before the entry of
entire fluid
Remove the catheter from stoma.
Disconnect it from the tubing and place it in the kidney tray
Wait for the return flow. Divert the
attention of the patient
POST-PROCEDURE CARE
When return flow is complete, remove
the Mackintosh clean the skin around the colostomy opening of and dry use skin
thoroughly
Apply a clean dressing or a clear
colostomy bag over the stoma
Change the dressing of incision
aspect technique
Take all the articles in utility
room. Clean the equipment immediately
Patients are instructed for the care
and support of colostomy bags to prolong its life and keep it free from odor
Chart the procedure in the patient’s
record
COLOSTOMY IRRIGATION – Purpose, Types of Colostomy, Solutions Used, Preliminary Assessment, Preparation of the Patient and the Environment, Preparation of the Article, Procedure and Post-Procedure Care
SURGICAL FOMENTATION – Purpose, Preliminary Assessment, Physiologic Effects, Indications, Contraindications and Cautions, Equipment, Preparation of the Patient, Procedure and After Care
Application of
moist heal or medication using sterile gauze, to a surgical incision or wound
Surgical
fomentation is the application of a hot moist fomentation pad over an open
wound under strict aseptic conditions
DEFINITION
A
fomentation consists of a local application of moist heat to the body surface.
A fomentation is usually made of blanket material: 50% wool to retain heat and
50% cotton to retain moisture and be more durable.
PURPOSE
To soften extrenuates
To hasten suppurative process
To promote healing
To reduce swelling
To reduce pain
To provide a soothing effect
To reduce inflammation
PRELIMINARY ASSESSMENT
Assess the general condition of the
patient
Check the physicians order
Check the specific precautions, if
any
Check the available articles in the
patients unit
Check the consciousness and ability
to follow the instructions
PHYSIOLOGIC EFFECTS
Promotes increase in circulating
white blood cells
Increases blood flow to the skin,
thereby relieving internal congestion
Relieves muscle spasm by increasing
circulation and releasing muscle tension
Relieves pain in muscles and joints
by counter-irritation and decongestion
Reflex relieves pain from internal
organs
Increases elimination by promoting
sweating
Stimulates or sedates according to
the temperature of the application
INDICATIONS
Joint pain
Neuralgia and neuritis pain
Muscle tension
Insomnia
To warm the tissues in preparation
for massage
To prepare for cold procedures
Active chest congestion in colds,
influenza, bronchitis, pleurisy (no cold used for pleurisy)
Nervous tension – sedative to spine
To produce sweating
CONTRAINDICATIONS AND CAUTIONS
Loss of skin sensation due to:
Unconsciousness
Paralysis of the part
Legs and feet of diabetic
Leg or feet edema, varicose veins,
advanced vascular disease
Malignancy
Tendency to bleed (hemorrhage)
Stomach or bowel ulcers
Omit cold in extreme pain such as
pleurisy, renal colic and dysmenorrhea
EQUIPMENT
Small dressing pack
Kettle with water heated to 105 – 115
degree F (42-46 degree celcius)
Solution needed for compress
magnesium sulfate, normal saline
Mackintosh
Plastic bag
Dressing drum
Pad drum
Adhesive and scissors, if required
Lotion thermometer
PREPARATION OF THE PATIENT
Explain the procedure to the patient
The dressing change is scheduled for
a suitable time
If the patient is an open unit the
curtains are drawn to ensure the privacy
PROCEDURE
Collect equipment
Explain procedure and purpose to
patient
Provide privacy and drape patient
Put-off fan
Wash hands
Open dressing pack
Pour solution into cup and cover pack
with one corner of wrapper
Check the temperature of water after
pouring into bowl, using lotion thermometer
Wash hands again
Open sterile dressing pack
Using artery clamp, well and remove
remaining adrenal gauze
Remove used clamp from sterile field
Place cup with solution into steel
bowl of warm water using artery clamp
Take sterile gauze and soak in
solution using thumb forceps and artery clamp squeeze excess solution form
gauze pieces into cup and place in wound, after checking patients heat
tolerance repeat this procedure for about 15 minutes using fresh gauze, each
time allow the next gauze to soak in solution until first one or provides gauze
is removed from wound and is disposed into plastic bag. Press wound if needed
Keep the patient comfortable
Replace the equipment
AFTER CARE
Keep patient comfortable
Replace the articles
Record procedure, wound condition
solution used and patient response
SURGICAL FOMENTATION – Purpose, Preliminary Assessment, Physiologic Effects, Indications, Contraindications and Cautions, Equipment, Preparation of the Patient, Procedure and After Care
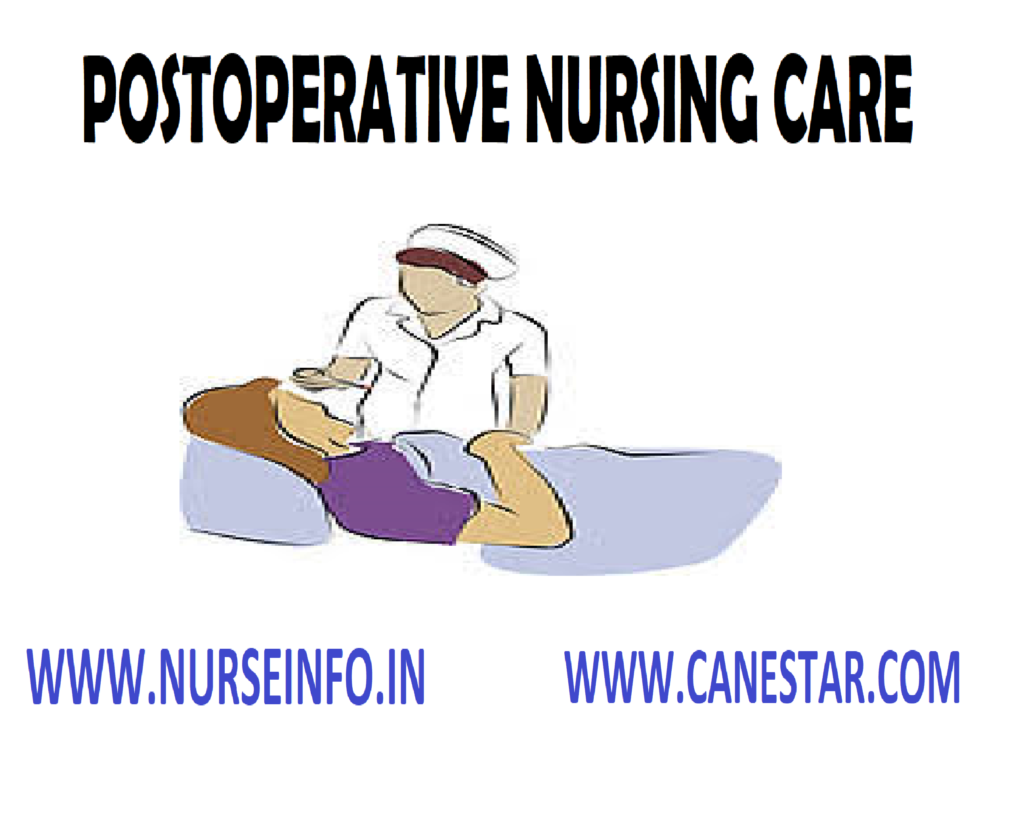
POST OPERATIVE CARE – Surgery, Postoperative Care (General), Care of Patient (anesthesia), Observation of Patient, Diet and Postoperative Health Teaching
The success
of every surgery depends on the type of nursing care given to the patient
before (preoperative), during (infraoperative) and after (postoperative) period
of surgery.
The
preparation of patient for surgery depends on the type of surgery, age of the
patient, general health of the patient and the organs involved
TYPE OF SURGERY
Emergency surgery: preoperative
period is very short, because of the life threatening situation, e.g. acute
appendicitis
Planned surgery: time for surgery is
fixed with the method consent of the surgeon and the patient
Major surgery: the operation
involving a large surface area of the body
Minor surgery: operation involving a
small area of the body
Diagnosis surgery: there is an
operative in which the diagnosis is unknown,
e.g. exploratory laparotomy in which the abdomen is opened to seek the cause of
symptoms
Curative surgery: this is an
operative in which discussed part or organ is removed to relieve symptoms, e.g.
cholecystectomy
Reconstructive surgery: this is an
operative involving strengthening of a weakened area, e.g. herniorrhaphy
Corrective therapy: this is an
operation in which deformities are corrected, e.g. replacement of the metal
valve
Quickly observe the functioning of
all devices and make sure they are in its functioning order
Palliative surgery: this is an
operation in which symptoms are relieved but the basic cause remains, e.g.
gastrojejunostomy
Cosmetic surgery: this is an
operation done to improve the appearance, e.g. repair of the left up and left
palate
POSTOPERATIVE CARE (GENERAL)
Preparation
of Postanesthetics and Reception of the Patient
After sending the patient to
operating room, prepare a bed to receive the patient undergone surgery and
anesthesia
There should be adequate number of people
to transfer the patient without disturbing the functioning of the devices
attached with the patient
Receive the patient, without
disturbing the devices attached to the patient
Ask the theater staff who has
accompanied with the patient about any complication that has occurred in the
operation room during surgery
Before the theater staff (including
anesthetist) return to operation theater, check the vital sign
Check the operation site for
bleeding, discharge, etc. if drainage tubes are filled
Keep the patient well covered to
prevent draught
Never leave the patient alone to
prevent injury from fall
Observe the patient for swallowing
reflexes
Quickly observe the functioning of
all devices and make sure they are in its functioning order
Check the doctor’s order for other
instruction and treatment
CARE OF PATIENT WHO IS UNDER THE EFFECTS OF ANESTHESIA
Patient needs close and diligent
observation, until the patient fully recovers from anesthesia
A noisy breathing is indicative of
airway observation that can occur due to the tongue falling lick and
obstructing the pharynx apply suction immediately
Keep the patient in a suitable
position that will be helpful to drain out the vomits, blood, secretions
collected
The oropharyngeal airway left in the
mouth of the patient should be removed as soon as the patient has required
cough and swallowing reflexes
If the patient is cyanosed administer
oxygen inhalation
In order to prevent injury from falls
from bed, put a side rails on the bed
Keep the family informed about the
successful completion of surgery, transfer of the patient from the operating
room to recovery room, etc
OBSERVATION OF THE PATIENT IN THE POSTOPERATIVE PERIOD
Close and diligent observation by the
nurses is important to prevent complication in the early stages, and thus, save
the patient
On the first day (postoperative) the
patient close and frequent observation is needed
The main
points that should be observed are:
Vital signs – BP, pulse rate,
respiratory rate
Intake and output – IV fluids, oral
fluids
Urinary concept – time and amount
Bowel movement
Sign of hypo/hypervolemia
Any breathing difficulties
Pain over the half muscles
POSTOPERATIVE ASSESSMENT
Airway – patency, presence/adequacy
of artificial airway
Dressing/suture lines – dressing: dry
or minimal drainage, suture lines (if visible): color approximation of wound
edges
Fluid lines/tubes – intravenous
fluids; rare, amount in bottle/beg/infusion rate
Other lines (example: CVP line arterial lines); patency, connection,
character and amount of drainage, Ryle’s tube drainage, urine output, quality
and color. Note and record fluids coming out of dressing
DIET OF THE PATIENT
All patients, except patients, who
had abdominal surgery, may start the normal diet, if desired so, on the first
day
Patient who had abdominal surgery,
but did not involve the intestine or stomach, can have the clear fluids on the
day after the surgery
Gradually, if can change into soft
diet and then normal diet
The patient who had undergone any
type of surgery need a diet such in vitamin and minerals
POSTOPERATIVE HEALTH TEACHING
All patients
need health teaching according to the educational background of the patient.
Teach the patient following points:
Maintain of personal hygiene
Diet that is allowed for the patient,
any control on the diet
Ambulation; activities that are
permitted as well as restricted
Any drugs to be taken
postoperatively; the side effects and precautions
Date on which the patient may resume
duty
Further treatment that may be needed
POST OPERATIVE CARE – Surgery, Postoperative Care (General), Care of Patient (anesthesia), Observation of Patient, Diet and Postoperative Health Teaching
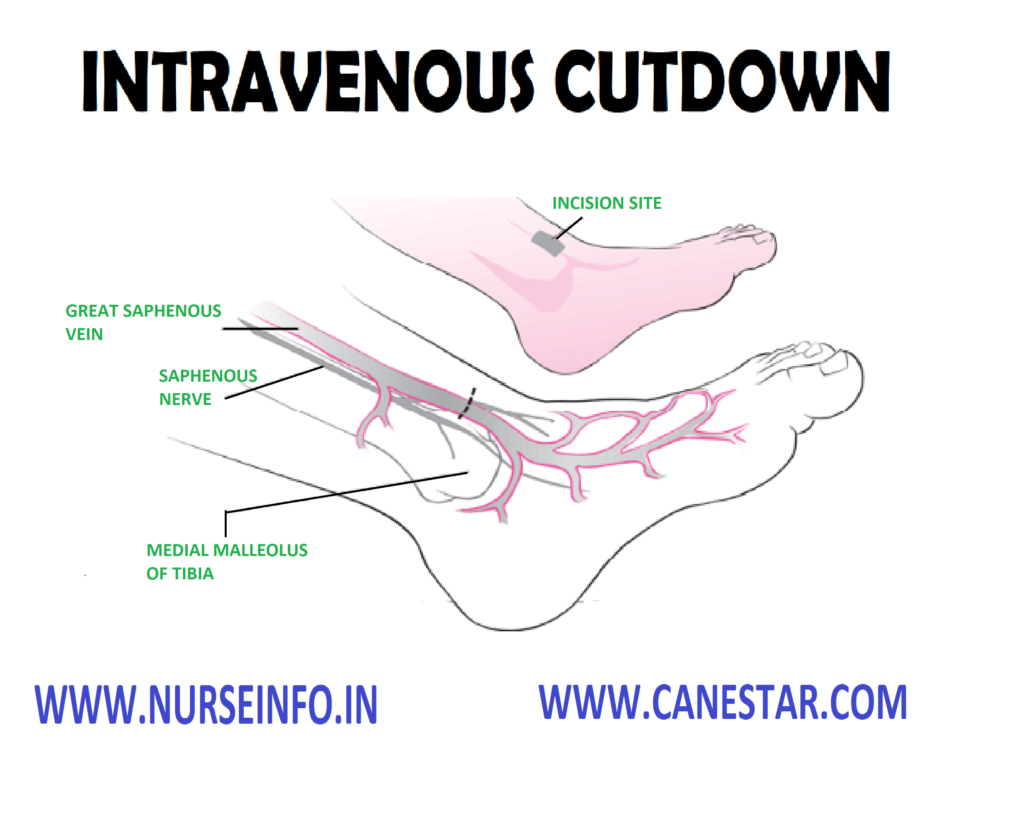
INTRAVENOUS CUT DOWN – Purpose,
Principle, Preliminary Assessment, Preparation of the Patient, Equipment,
Procedure, After Care and Complication
Cut down is
a small incision to insert a cannula or catheters directly into the vein or
artery.
Whenever the
blood vessels become collapsed and invisible, the veins will have to expose
opened and a metal cannula or a piece of fine polythene tubing is inserted into
the vein to start an infusion.
PURPOSE
To restore and maintain the child’s
fluid and electrolyte balance
To maintain body homeostasis when the
oral intake is inadequate to serve this purpose
To measure central venous pressure
To administer larger fluid, e.g.
cardiac arrest
PRINCIPLE
This procedure should carried out by
a doctor assisted by a nurse
Aseptic technique must be adhered
throughout all intravenously procedures to prevent bacterial contamination
The single most effective aseptic
procedure is good hand washing technique
If asepsis is not maintained, local
infection, septic phlebitis or septicemia may result
PRELIMINARY ASSESSMENT
Check the physician’s order for vein
cut down
Take written concern from the patient
Explain the procedure to the patient
Win the cooperation of the patient
Arrange all the articles and make
sure that it is available in the unit
PREPARATION OF THE PATIENT
Explain the procedure to the patient
and attendant of the patient. He should conscious to win his confidence and
cooperation
The site of cut down is prepared as
for any major surgery
If any hair is present get the site
shaved and cleaned
The bedding and garments are
protected with a Mackintosh and towel
Prepare all the articles and strict
aseptic technique should be followed
EQUIPMENT
IV Solutions
Betadine solutions
Alcohol solution 70 degree celcius
Hypoallergenic tape 1.2 cm, 2.5 cm
Splint
Sterile gauze
Sterile cotton wool
Sterile drapes
Sterile cut down tray
Syringes 2 ml and 5 ml
Needle 25 and 20 gauge
The 4/0 black silk suture
Assorted size of stereopolyethylene
tubing
Local anesthesia as prescribed
Normal saline 0.9%
Sterile gloves according to doctor’s
size
Restraining devices
Sterile gown
Gallipot
Hand towel
Window towel
Knife handles No. 15 blades
Forceps
Scissors
Gauze and cotton
Needle holders
PROCEDURE
Ensure that the physician has
explained the procedure to the patient and to gain consent and cooperation
Position the patient
Open the cut down set and drop the
inner pack into the trolley. Physician scrubs his hands thoroughly up to the
elbows for a full 3 minutes
Dries his hands and grim on the
sterile hand towel provided
Don a sterile gown and the
appropriate sized gloves
Opens the dressing packs. Pour
betadine and spirit directly from the bottle into the gallipots
Under local anesthesia and with
aseptic precautions, the skin is incised and the vein is exposed
The aneurysm needle is passed under
it
The loop of the threat is cut down
two strands and is formed under the vein
Tie the vein to prevent the blood
flow
The vein is then cut partially
between the two ligatures
The cannula is passed into the
proximal ligature that is tied the cannula in place
Wound is closed with interrupted
sutures
Leave it on a comfortable position
AFTER CARE
After the procedure, the nurse should
see that it is secured carefully by using the arm board, bandages, adhesive
plaster, etc
The movement of the patient should
not dislodge the IV cannula
The cut down site is inspected
frequently to detect infiltration of fluid and dislodgement of the cannula
The illusion site should be cleaned
and dressed after a week sutures are removed
COMPLICATION
Infiltration
Infusion phlebitis
Thrombosis
Pyrogenic reaction
Air embolism
Circulatory overload
Shock
INTRAVENOUS CUT DOWN – Purpose, Principle, Preliminary Assessment, Preparation of the Patient, Equipment, Procedure, After Care and Complication
BLOOD TRANSFUSION – Purpose,
Principle, Usual Timing, Factors Affecting, Types, General Instructions,
Preliminary Assessment, Preparation, Procedure, Equipment and Post-Procedure
Care
Blood
transfusion is the transfusion of whole blood or its components, such as blood
cells and plasma from one person (donor) to another person (recipient)
PURPOSE
To replace blood volume and blood
pressure during hemorrhage (hemoptysis, hematemesis, antepartum, and postpartum
hemorrhage, operations, etc) trauma or burns
To increase the O2
carrying capacity or hemoglobin level in cases of severe anemia which are not
corrected by the administrations of vitamins and iron therapy
To provide antibodies and leukocytes
(immune transfusions) to severally ill patients and persons having lowered
immunity by giving blood or plasma taken from persons who has just recovered
from the same disease deficiency
To correct or treat defiance of
plasma proteins clotting factors and hemophilic globulin, etc
To combat infection in patients with
leucopenia
To replace the blood with hemolytic
agents with fresh blood (exchange blood transfusions) as in case of
erythroblastosis fetalis, hemolytic anemia, etc
To improve the leukocyte count of
blood as in agranulocytosis
GENERAL INSTRUCTIONS
Blood should be fresh
Donors should not have any history of
jaundice, cancer, malaria, and hepatitis, tuberculosis, syphilis, AIDS, or any
transmissible diseases
Donor must be tested for AIDS. His
grouping and cross matching should be done, and it should be compatible to the
recipient’s blood. Any error in the labeling of blood can lead to serious
consequences
Blood must be stored at 1-6 degree F.
Donors must have a normal
temperature, pulse and blood pressure
Use an appropriate, sterile,
pyrogen-free transfusion set containing a fitter for administration of blood
one filters will remove clots and lagers aggregates of leukocytes and platelets
Use 18 gauge needles for infusion. It
will prevent damage to the red cells and will provide adequate rate of flow
Maintain TPR chart prior to blood
transfusion to find on any complication
Do not add any medications to be
blood or administer through the same intravenous needle, because they may cause
damage to the red cells
Adjust the rate of flow to 5-10 ml
per minute during first half an hour of transfusion to detect any complications
as early as possible. Because signs usually appear during the first half an
hour of the transfusion. The subsequent flow rate depends upon the condition of
the patient and the need for rapid transfusion
Check the expiration date on the
blood bag, and observe for color
The blood should be given at a slower
rate if the patient is elderly suffering from heart and lung diseases, anemia,
etc
Whole blood and packed cells are
administered cold. Avoid shaking the container, if needed the blood may be
allowed to stand in the room temperature for 30-45 minutes, before
administering to the patient
PREPARATION
Collection of blood from the donor is
done in the laboratory by the laboratory technicians
All the articles used for the
collection of blood should be sterile
Each donor unit must be labeled in
clear, readable letters
The donor blood immediately after it
is withdrawn should be placed in the refrigerator
Stored blood shall be inspected daily
The transportation of the blood in
the hospital should be done within 30 minute
Freezing, heating of the blood will
destroy the blood cells
When sending the recipient’s blood
sample for grouping and cross matching, it must be carefully labeled at the
bedside of the recipient with identification
Care is to be taken to prevent
introduction of air into the apparatus
It is recommended to use 18 gauge
needles for infusion, to prevent damage to the red cells of to provide an
adequate rate of flow
No medications, antibiotics,
vitamins, calcium
Rinse the infusion set with normal
saline before starting the solution
Before the administrations of blood,
the vital signs should be recorded correctly
Adjust the rate of flow to 5-10 ml
per minute during the first 30 minutes of transfusion (raised complications)
Whole blood and packed cells are
administered cold; blood may be allowed to stand in the room temperature for 30
to 45 minutes before it is administered
Once the blood is exposed to the
atmosphere, it should be discarded
Watch the patient carefully for the
onset of any complication any reactions developed, it should be reported to the
charge nurse and the physician immediately
Keep the patient warm and comfortable
with blankets (if necessary)
Offer bed part before the procedure
Record in the nurse’s record with
date and time (amount of blood administered, group, rate of flow, any reactions
seen, any medications)
PROCEDURE
Explain the procedure to the patient
and his relatives to get cooperation
Make him comfortable
Take the equipment to the bedside
Needle or casual should be inserted
in the vein with complete aseptic technique
Keep the needle in position with
adhesive tape
In small children, or in case of
difficult patient splint must be used. It should be securely placed bandage
Regulate the rate of flow from 40-45
drops per minute or according to physicians order
Observe the patient constantly
inspect the bottle frequently, if chill or shivering any other occurs at the
time of infusion, stop it immediately and irrigate the tubing with sterile
fluid and inform it to the physician
AFTER CARE OF PATIENT
After the infusions have been
started, the nurse should see that it is secured carefully by using the arm
board, bandages, adhesive plaster, etc
The movement of the patient in bed
should not dislodge the IV cannula
The cut down site is inspected
frequently to detect infiltration of fluid the dislodgement of the cannula, etc
The incision site should be cleaned
and dressed daily to help in the healing of the wound
After a week, the sutures are removed
COMPLICATIONS
Incompatibility: when the donor’s
blood is not compatible with the recipient’s blood, it is known as hemolytic
reactions. In a hemolytic reaction, there is clumping of the erythrocytes which
blocks the capillaries. It causes the erythrocyte to disintegrate and release
hemoglobin into the blood. It eventually gets into the kidney tubules. Their
blockage produces kidney failure. The symptoms of hemolytic reaction are
chills, fever, and headache of back pain, then dyspnea, cyanosis, chest pain,
and oliguria
Pyrogenic reactions: it is due to the
bacterial contamination of the blood or of the administration set. The symptoms
are fever, shaking chills warm flushed skin, headache, black pain and nausea
which progress on to hematemesis, diarrhea and delirium
Allergic reactions: the patient may
be sensitive to substances in the plasma. The symptoms are urticaria,
occasional wheezing, joint, pains, generalized itching, nasal congestion, and
circulatory collapse
Circulatory overload: it is due to
the rapid flow; also it may occur by giving whole blood to the severe chronic anemic
patient, a patient with heart failure. The symptoms are bounding pulse,
engorged peripheral veins, dyspnea,
cough slow the transfusion or step the transfusion and inform the doctor
Transmission of infection diseases:
if donors are not carefully screened for diseases like jaundice, syphilis,
malaria, filarial and AIDS, he may get untoward reactions and he may suffer
from above diseases
BLOOD TRANSFUSION – Purpose, Principle, Usual Timing, Factors Affecting, Types, General Instructions, Preliminary Assessment, Preparation, Procedure, Equipment and Post-Procedure Care
RENAL BIOPSY – Indications, Types,
Site and Position, Contraindications, Investigations, General Instructions,
Preliminary Assessment, Preparation of the Patient and Environment, Equipment,
Procedures, Post-procedure Care and Complications
Renal biopsy
means removal a bit of the renal tissue percutaneously for histological
examination.
INDICATIONS
Renal biopsy
is done in the following conditions:
Asymptomatic proteinuria
Chronic renal failure, where there is
no obvious case
Acute renal failure, where there is
no obvious cause
Acute nephritis with persisting
oliguria
Nephritic syndrome in adults
Follow-up cases of glomerulonephritis
TYPES OF RENAL BIOPSY
Open biopsy: it requires surgical
procedures and is costly
Closed biopsy: it is the retrograde
renal and ureteral brush
SITE AND POSITION
Site: the
side where the disease is suspected is the site of the biopsy
Position:
patient is placed in a prone position with a firm pillow under the abdomen
CONDRAINDICATIONS
Uncooperative patient
Pregnancy
Previous history of renal failure
Coagulation disorders
Single functioning kidney
Malignant tumors
Infections – perinephric abscess,
pyonephrosis,
Severe hypertension
INVESTIGATIONS
Investigations
to be done are:
Bleeding, clotting and prothrombin
time
Blood grouping and cross-matching
Blood urea
Renal function tests, e.g. urine
culture, urine analysis, serum creatinine, etc
IVP or plain X-ray abdomen determine
the size of the kidneys
GENERAL INSTRUCTIONS
Maintain aseptic technique throughout
the procedure to avoid entry of infection
Before renal biopsy, the patient
should be investigated thoroughly. Prepare the part thoroughly
Patient should be advised to take
complete bed rest after the procedure
Keep the patient nil by mouth for 4
hours
Keep the patient in supine position
for the next 24 hours
Encourage the patient to take plenty
of oral fluids post-operatively to avoid clot formation
The biopsy is taken after the one
week of menstruation, because during these days the cervix is least vascular
PRELIMINARY ASSESSMENT
Check
Doctor’s order for any specific
instructions
Written informed consent of the
patients or the relatives
General condition and diagnosis of
the patient
Mental status of the patient to
follow instructions
Articles available in the unit
PREPARATION OF THE PATIENT AND ENVIRONMENT
Admit the patient, at least 24 hours
prior to renal biopsy and he should remain in the hospital, at least 24 hours
after the biopsy
Renal function tests must be carried
out, e.g. routine urine analysis, blood urea, serum creatinine, etc
Explain the procedure to the patient
and his relatives thoroughly so that their fear and tension are relieved
Get written consent from the patient
or his relatives
Observe vital signs and record the
fact on the nurse’s record
Give premedications according to
physician’s order half an hour prior to the procedure and record it
EQUIPMENT
A sterile
tray containing:
Sponge holder
A 5 ml syringe with needle for local
anesthesia
Probe needle
Specimen bottles with formalin 10%
Gall pot with cleaning lotion
Dressing towel
Dissecting forceps
Dressing material
Gown, mask, gloves
Cytoscope
An unsterile
tray containing:
Spirit, iodine, Tr. Benzoin
Lignocaine 2%
Mackintosh and draw sheet
Kidney tray
Adhesive tape and scissors
PROCEDURES
The patient is placed in a prone
position with a firm pillow under the abdomen
The patient is instructed to take in
as deep a breath as positioned inside the renal capsule
The probe needle is inserted through
the skin and positioned inside the renal capsule
After confirming its position, take a
biopsy
When enough tissues are obtained the
needle is removed and firm pressure is applied
The pressure site sealed with a
tincture benzoin seal
POST-PROCEDURE CARE
Observe pulse, respiration and blood
pressure every half hourly for first few hours and then one hourly for first 24
hours
Keep the patient nil by mouth for 4
hours
Give complete bed rest and encourage
taking plenty of oral fluids to prevent clot formation in the kidney
Provide complete bed rest and
encourage him to take oral fluids to prevent clot formation in the kidney
Sent the specimen to the
histopathological lab with proper labeling and a requisition form
If there is pain, analgesics may be
given with physicians order
COMPLICATIONS
Hematuria
Infections causing renal abscess
Injury to ileo-inguinal nerves which
causes intense pain
Pre-renal hematoma, causing dull pain
and swelling in the loin
It is the removal of a small piece of
tissue from the cervix for the histopathological examination