Free Nursing Notes, MCQs & Nursing Procedures

Nurseinfo.in provides free Nursing Notes, Nursing Procedures, Medical MCQs, Nursing Calculators, Care Plans and exam preparation resources for BSc Nursing, GNM, P.B. BSc and MSc Nursing students. Browse subject-wise notes, previous year questions and study materials based on the latest nursing syllabus.

Home Blog Page 33

INSTILLATION OF EAR DROPS

INSTILLATION OF EAR DROPS

NURSING PROCEDURES LIST CLICK HERE

                Instillation of ear drops into the auditory canal

Purpose

  • To clean the ear
  • To remove the foreign body or wax
  • To relieve inflammation, congestion and pain
  • To kill an insect lodged in the ear
  • To anesthetize

General Instructions

  • Explain the procedure clearly to get patients cooperation
  • The auditory canal should be cleaned before instill the ear drops
  • Drops must be warm, when they are instilled into the ear
  • Hold the pinna of the ear upward and backward in case of adults and in children put it down backward to straighten the external auditory canal
  • Plug the ear with a small cotton ball or a small gauze piece
  • Allow 3 or 4 drops trickle down on one side of the canal so that the air may escape from the auditory canal and medication may reach up on the ear drum
  • Do not ignore any complaint by the patient

Equipment

A small tray containing

  • Medicine with dropper
  • Applicators with cotton tips
  • Normal saline
  • Little cotton
  • Kidney tray and paper bag

Procedure

  • Wash hands and collect the articles and take it to the bedside
  • Explain procedure to the patient
  • Place the patient in supine or sitting position with head to side and the affected ear up
  • Pull the pinna down and back in case of adult and down and back case of infant/child. Rest the other hand on patients head to avoid damaging the ear with dropper if the patient moves
  • Instill the medicine drop by drop directing the flow toward the canal do not allow the dropper to touch the ear
  • Place loose cotton in the outer ear absorbs any excess medicine and keeps the patients head turned to the side for 10 to 15 minutes

After Care

  • Place the patient comfortably
  • Replace the articles
  • Hand wash
  • Record the procedure in nurse’s record sheet
INSTILLATION OF EAR DROPS - Purpose, Instructions, Procedure, After Care, Equipment
INSTILLATION OF EAR DROPS – Purpose, Instructions, Procedure, After Care, Equipment

SPECIAL DRUG DELIVERY SYSTEM

SPECIAL DRUG DELIVERY SYSTEMS

        In order to improve drug delivery, to prolong the duration of action and thereby improve patient compliance, special drug delivery systems are being tried. Drug targeting, i.e. to deliver drugs at the site where it is required to act is also being aimed at, especially for anticancer drugs. Some such systems are ocusert, progestasert, transdermal adhesive units, prodrugs, osmotic pumps. Computerized pumps and methods using monoclonal antibodies and liposomes as carriers.

Ocusert : Ocusert systems are thin elliptical units that contain the drug in a reservoir which slowly releases the drug through a membrane by diffusion at a steady rate, e.g. pilocarpine ocusert used in glaucoma is placed under the lid and can deliver pilocarpine for 7 days.

        Progestasert is inserted into the uterus where it delivers progesterone constantly for over 1 year.

Transdermal adhesive units:

        Prodrug is an inactive form of a drug which gets metabolized to the active derivative in the body. A prodrug may overcome some of the disadvantages of the conventional forms of drug administration, e.g. dopamine does not cross the BBB; levodopa, a prodrug crosses the BBB and is then converted to dopamine in the CNS. Prodrugs may also be used to have a longer duration of action, e.g, Bacampicillin (a prodrug of ampicilin) is longer acting.

Osmotic pumps are small tablet-shaped units containing the drug and an osmotic substance in two different chambers. The tablet is coated with a semipermeable membrane in which a minute laser-drilled hole is made. When the tablet is swallowed and reaches the gut, water  enters into the tablet through the semipermeable membrane. The osmotic layer swells and pushes the drug slowly out of the laser-drilled orifice.

        This allows slow and constant delivery of the drug over a long period of time. It is also called gastrointestinal therapeutic system (GITS). Some drugs available in this formulation are iron and prazosin.

Computerized miniature pumps: These are programmed to release drugs at a definite rate either continuously as in case of insulin or intermittently in pulses as in case of GnRH. Various methods of drug targeting are tried especially for anticancer drugs to reduce toxicity.

Monoclonal antibodies are antibodies against the tumor specific antigens are used to deliver anticancer drugs to specific tumor cells.

Liposomes are phospholipids suspended in aqueous vehicles to form minute vesicles. Drugs encapsulated in liposomes are taken up mainly by the reticuloendothelial cells of the liver and are also concentrated in malignant tumors. Thus site-specific delivery of drugs may be possible with the help of liposomes.

Nurses Responsibility:

  • Ensure that the correct drug is administered by the right route and in the right dose.
  • History of allergy should be taken particularly before parenteral administration of drugs
  • Monitor the adverse effects
  • Drugs should be kept in a safe place
  • Check the prescription, drug label and the patient’s name before the administration of drugs.
SPECIAL DRUG DELIVERY SYSTEM - Ocusert, Transdermal adhesive units, Computerized miniature pumps, liposomes, nurse responsibility
SPECIAL DRUG DELIVERY SYSTEM – Ocusert, Transdermal adhesive units, Computerized miniature pumps, liposomes, nurse responsibility

RECTAL & TOPICAL ROUTE OF DRUG ADMINISTRATION

RECTAL & TOPICAL ROUTE OF DRUG ADMINISTRATION

RENAL ROUTE

        Rectum has a rich blood supply and drugs can cross the rectal mucosa to be absorbed for systemic effects. Drugs absorbed from the upper part of the rectum are carried by the superior hemorrhoidal vein to the portal circulation (can undergo first pass metabolism), while that absorbed from the lower part of the rectum is carried by the middle and inferior hemorrhoidal veins to the systemic circulation. Drugs like-indomethacin, chlorpromazine diazepam abd paraldehyde can be given rectally. Some irritant drugs are given rectally as suppositories.

Advantage

  • Gastric irritation is avoided
  • Can be administered by unskilled persons
  • Useful in geriatric patients and others with vomiting and those unable to swallow

Disadvantages

  • Irritation of the rectum can occur
  • Absorption may be irregular and unpredictable

Drugs may also be given by rectal route as enema.

Enema is the administration of a drug in a liquid form into the rectum. Enema may be evacuant or retention enema.

Evacuant enema: In order to empty the bowel, about 600 mL of soap water is administered rectum while soap lubricates. Enema is given prior to surgeries, obstetric procedures and radiological examination of the gut.

Retention enema: The drug is administered with about 100 mL  of fluids and is retained in the rectum for local action, e.g. prednisolone enema in ulcerative colitis.

        Drugs may be administered as suppository for rectum, bougie for urethra and pessary and douche for vagina. Pessaries are oval shaped tablets to be placed in the vagina to provide high local concentrations of the drug at the site, e.g. antifungal pessaries in vaginal candidiasis.

TOPICAL

        Drugs may be applied on the skin for action as ointment, cream, gel, powder, paste, etc. Drugs may also be applied on the mucous membrane as in the eyes, ears and nose as ointment, drops and sprays.

RECTAL & TOPICAL ROUTE OF DRUG ADMINISTRATION - Advantages & Disadvantages
RECTAL & TOPICAL ROUTE OF DRUG ADMINISTRATION – Advantages & Disadvantages

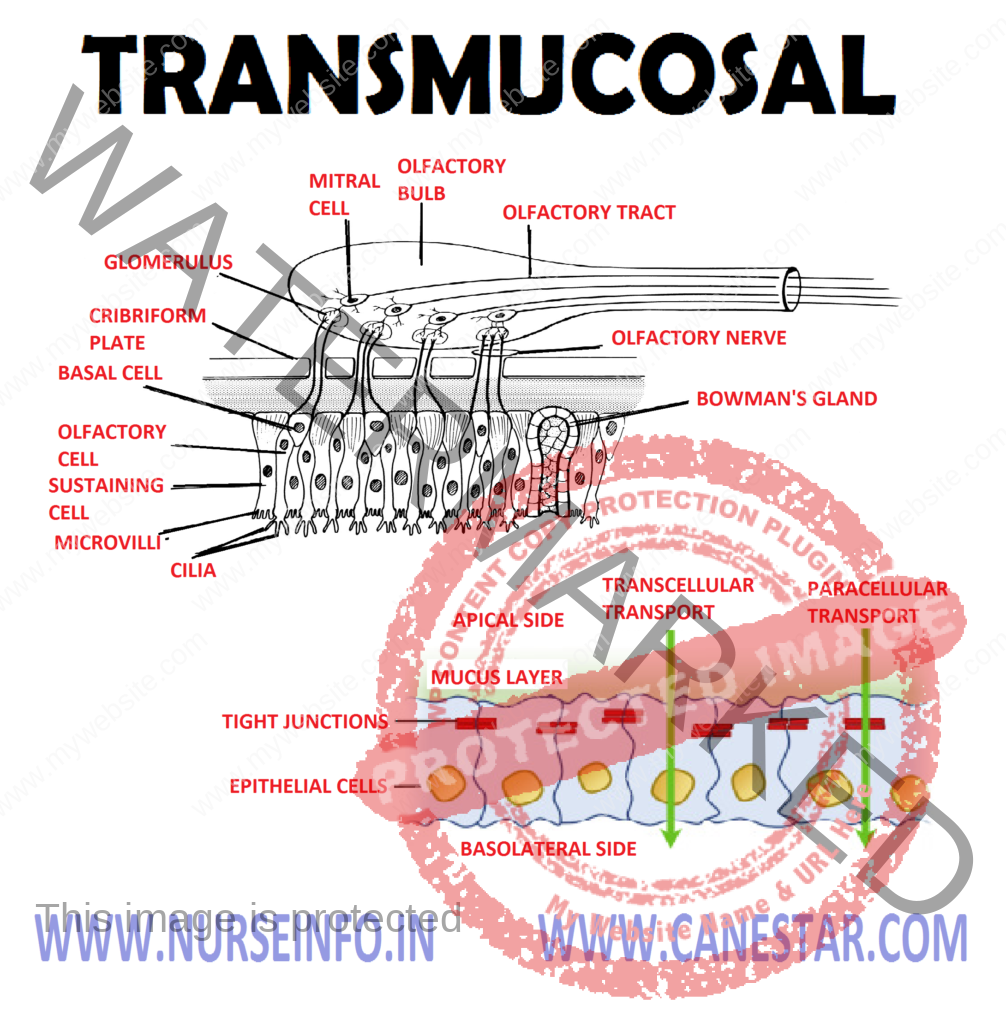
TRANSMUCOSAL

TRANSMUCOSAL

  • Drugs are absorbed across the mucous membranes
  • Transmucosal administration includes sublingual, nasal and rectal routes
  • Sublingual: here the tablet or pellet containing the drug is placed under the tongue. It dissolves and the drug is absorbed across the sublingual mucosa, e.g. nitroglycerine, nifedipine, buprenorphine

Advantages

  • Absorption is rapid – within minutes the drug reaches the circulation.
  • First pass metabolism is avoided
  • After the desired effect is obtained, the drug can be spat out to avoid the unwanted effects.

Disadvantages

        Buccal ulceration can occur.

Nasal drugs can be administered through nasal route either for systemic absorption or for local effects. For example:

  • Oxytocin spray is used for systemic absorption
  • For local effect – decongestant nasal drops, e.g. oxymetazoline; budesonide nasal spray for allergic rhinitis.
TRANSMUCOSAL -Purpose and Advantages

TRANSDERMAL ROUTE OF DRUG ADMINISTRATION

TRANSDERMAL ROUTE

Highly lipid soluble drugs can be applied over the skin for slow and prolonged absorption, e.g. nitroglycerine ointment in angina pectoris. Adhesive units, inunction, iontophoresis and jet injection are some forms of transdermal drug delivery.

Adhesive units (transdermal therapeutic systems) are adhesive patches of different sizes and shapes made to suit the area of application. The drug is held in a reservoir between an outer layer and a porous membrane. This membrane is smeared with an adhesive to hold on to the area of application. The drug slowly diffuses through the membrane and percutaneous absorption takes place. The rate of absorption is constant and predictable. Highly potent:

  • Pulmonary epithelium and mucous membranes of the respiratory tract and are also absorbed through these membranes. (because small quantity is sufficient) and short acting (effect terminates quickly after the unit is removed) drugs are suitable for use in such systems
  • Sites of application are chest, abdomen, upper arm, back or mastoid region, e.g. hyoscine, nitroglycerine fentanyl, estrogen, testosterone transdermal patches

Advantages

  • Duration of action is prolonged
  • Provides constant plasma drug levels
  • Patient compliance is good
  • Inunction: in this route of administration, the drug is rubbed into the skin and it gets absorbed to produce systemic effects
  • Iontophoresis: in this procedure, galvanic current is used for bringing about penetration of lipid insoluble drugs into the deeper tissues where its action is required, e.g. salicylates. Fluoride iontophores is used in the treatment of dental hypersensitivity
  • Jet injection as absorption of drug occurs across the layers of the skin, dermojet may also be considered as a form of transdermal drug administration
TRANSDERMAL ROUTE OF DRUG ADMINISTRATION - Advantages and Purpose
TRANSDERMAL ROUTE OF DRUG ADMINISTRATION – Advantages and Purpose

INTRAVENOUS INFUSIONS

INTRAVENOUS INFUSIONS

NURSING PROCEDURES LIST CLICK HERE

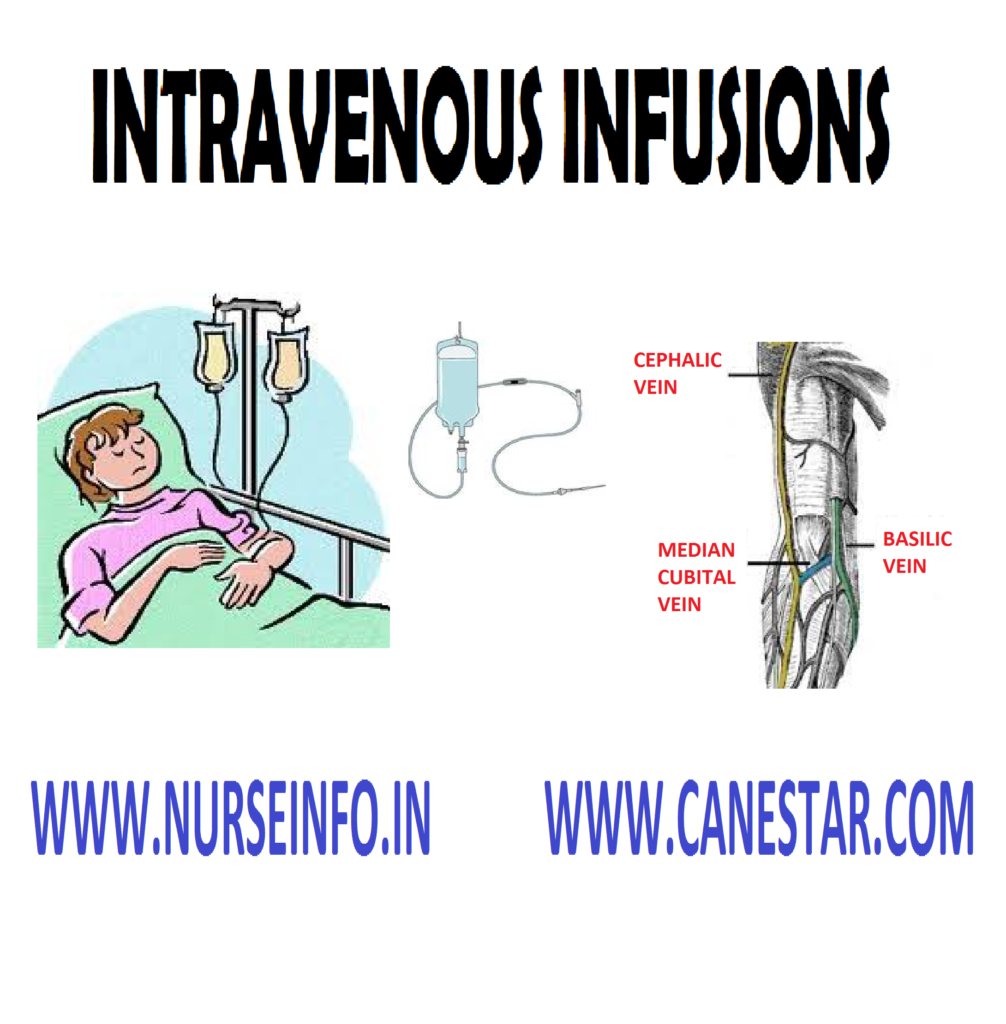
An introduction of a large amount of fluid into body via veins is called as intravenous infusion

Intravenous infusion is puncturing vein with sterile cannula/needle into a vein to supply the body with fluids electrolyte, nutrients and medication

Purpose

  • To supply fluids and electrolytes
  • To restore fluid volume due to dehydration, hemorrhage, vomiting, diarrhea, etc
  • To meet patient’s basic requirements, e.g. calories, vitamins, etc
  • To maintain homeostatic balance
  • To treat in emergency conditions some medications are given intravenously
  • To prevent and treat shock and collapse

Indication

  • To save the patients in life-threatening situations, e.g. extensive burns
  • To introduce a drug into the circulation for diagnosis purpose, e.g. IVP (intravenous pyelogram)
  • To supply fluids and nutrients to the patients who are unable to digest or absorb a diet administered mouth or through the nasal tube
  • To dilute toxins in case of toxemia or septicemia
  • When blood or blood products are to be given, e.g. anemia, hemorrhage

Solutions Used

  • Isotonic solutions: sodium chloride 0.9% commonly used
  • Hypotonic solutions or buffer substances sodium/potassium, calcium chlorides and lactic acid
  • Nutrient solutions dextrose 5, 10, 25, 50%
  • Alkalinizing and acidifying solutions
  • Blood volume expanders: plasma substitute and contains large molecular substances, e.g. dextran, lomodex, hemocoele, etc

Factors Affecting Fluid Movement

  • Diffusion molecules move from a solution of higher concentration to solution of lower concentration. Increase in the temperature increases the rate of diffusion
  • Osmosis: the diffusion water molecules through a permeable membrane from an area  of lesser solute concentration
  • Hydrostatic pressure: it is the pressure exerted by a fluid within a closed system. Counter balancing the osmotic pressure of the plasma, which attract fluid into the vascular system
  • Dialysis: the diffusion of molecules of soluble constituents through a permeable membrane is known as dialysis
  • Filtration: it may be defined as the passage of fluids and dissolved substances across membranes because of differences in mechanical pressure on two sides of the membrane
  • Selective permeability of membranes: in body, the capillary and the cell membranes are described as selective permeable

Factors that Favors Absorption

  • Warmth: application of heat over the site of injection or the use of warm solution
  • Massaging: massaging the part gently increases the local supply and increase absorption
  • Diffusibility and solubility of the drug

Venipuncture Site

The selection of site depends upon following facts:

  • The condition of veins
  • The characteristics of tissues over the vein
  • Purpose and durations of infusions
  • The type and amount of IV fluids ordered
  • The diagnosis and general condition of the patient

The commonly used veins are:

  • Basilic and cephalic veins (forearm)
  • Median cubital, cephalic and basilica veins (antecubital fossa)
  • Radial vein (radial area)
  • Dorsal metacarpal veins (the hand)
  • Veins in the foot
  • Femoral and saphenous veins (thigh)
  • Veins in the scalp (for infants)

Complications of IV Infusion

  • Circulatory overload: the intravascular compartment contains more fluid than the normal. Circulatory overload results in cardiac failure and pulmonary edema
  • Infiltration: it is the escape of fluid into the subcutaneous tissues due to dislodgement of needle
  • Hematoma formation: the walls of blood vessels may be damaged due to careless introduction of the needle into the body
  • Thrombophlebitis: it is caused by mechanical trauma to the vein or the chemical irritation of some substances introduced into the veins such as potassium chloride
  • Pyrogenic reactions: it is characterized by temperature elevation, chills, headache, nausea, vomiting and circulatory collapse in severe cases
  • Air embolism: the vascular collapse occurs due to occlusion of the vessel by embolism. The signs of pulmonary embolism are dyspnea, cyanosis, low blood pressure, shock and collapse, tachycardia and unconsciousness
  • Infection at the needle site: contamination occurs during insertion or left exposed for a long period
  • Serum hepatitis: infectious hepatitis has been attributed to improperly disinfected syringes and needles
  • Allergic reaction: this may due to certain drugs administered along with the IV fluids

Fluid Rate Calculation

Flow rate = total volume infused in ml (multiply) drops/ml //total time of the infusion in minutes

Total volume infused = 200 ml in 24 hours

Drops per ml = 15

Total time in minutes = 24 (multiply) 60 = 1440 minutes

Flow rate = 2000 (multiply) 15 /144 = 16.6 drops

General Instructions

  • Follow strict aseptic technique throughout the procedure
  • Administer IV fluids only with a clearly written prescription
  • Maintain the specified rate of flow to prevent circulatory overload
  • Constant and continuous observation for any unfavorable symptoms
  • Observe the rights during administration
  • Check the expiry date before opening the bottles
  • If fluids are discolored, cloudy in appearance that should not be used for infusion
  • Do not use any site that is tender, red, edematous and inflamed
  • Never allow the bottle to get empty completely to prevent the entry of air into the tissues
  • Keep the patient warm and comfortable with blankets if necessary
  • Immobilize the joints with splints when the needle is placed near a joint
  • Frequent observation of the vital signs throughout the procedure will help to detect many complications
  • Allow the patient to void before the IV infusion is started

Observation Needed Throughout the Procedure

  • Flow rate and potency of IV tubing
  • Dislodgement of needle
  • Signs of circulatory over load
  • Urinary output
  • Needle site
  • Fluid level in the bottle
  • Vital signs at frequent intervals

Preliminary Assessment

Check

  • Patients name, age, bed number and diagnosis
  • Purpose of infusion
  • Doctors order
  • Level of consciousness
  • General conditions
  • Abilities and limitation
  • Need for additional restraints
  • Articles available
  • Previous experience

Equipment

A tray containing

  • Sterile IV solution
  • Sterile IV infusion set
  • Sterile needle of choice (butterfly or cannula)
  • Sterile syringe (2 or 5 ml)
  • Sterile transfer forceps in a jar
  • Sterile cotton swabs and gauze pieces
  • Surgical spirit
  • Kidney tray and paper bag
  • Bowl with water
  • Tourniquet
  • Adhesive tape and scissors
  • Specimen bottles
  • Mackintosh and towel
  • IV pole
  • Restrainer (Splint with roller bandages)

Preparation of the Patient and Environment

  • Explain the procedure
  • Sent the visitors outside
  • Provide privacy
  • Allow the patient to empty the bladder
  • Check the vital signs
  • Adjust the height of the bed
  • Arrange the articles at the bedside
  • Place the patient in comfortable and relaxed position
  • Provide adequate light in the room

Procedure

  • Hand wash
  • Prepare the IV solution; insert the drip set, and the air vent into the bottle openings
  • Hand the bottle on the IV pole about 18 to 24 inches high
  • The patient is placed in supine or sitting position with head titled back
  • Draw the lower lid and ask the patient to look up
  • Instill the ordered number of drops in the center of the lower lid 2 cm above the eyes
  • After instillation, ask the patient to close the eye and move eye balls from side so that medications will spread all over the sac
  • Wipe of excess medication

After Care

  • Dry lids with dry cotton swabs
  • Make the patient comfortable
  • Remove articles from bed side
  • Hand wash
  • Record the procedure in the nurse’s record

Patient Education

  • If the patient is on self-medication, give him clear instructions and make sure that he is clear of it
  • Ask the patient to consult the doctor regularly
  • Do not massage the eyeball after instillation of medications

Complications

Improper dressing and procedure may lead to further serious infection

INTRAVENOUS INFUSIONS - Purpose,  Instructions,  Equipment, After Care, Procedure, Complications, After Care, Patient Education, Assessment
INTRAVENOUS INFUSIONS – Purpose, Instructions, Equipment, After Care, Procedure, Complications, After Care, Patient Education, Assessment

INTRAVENOUS INJECTION

INTRAVENOUS INJECTION

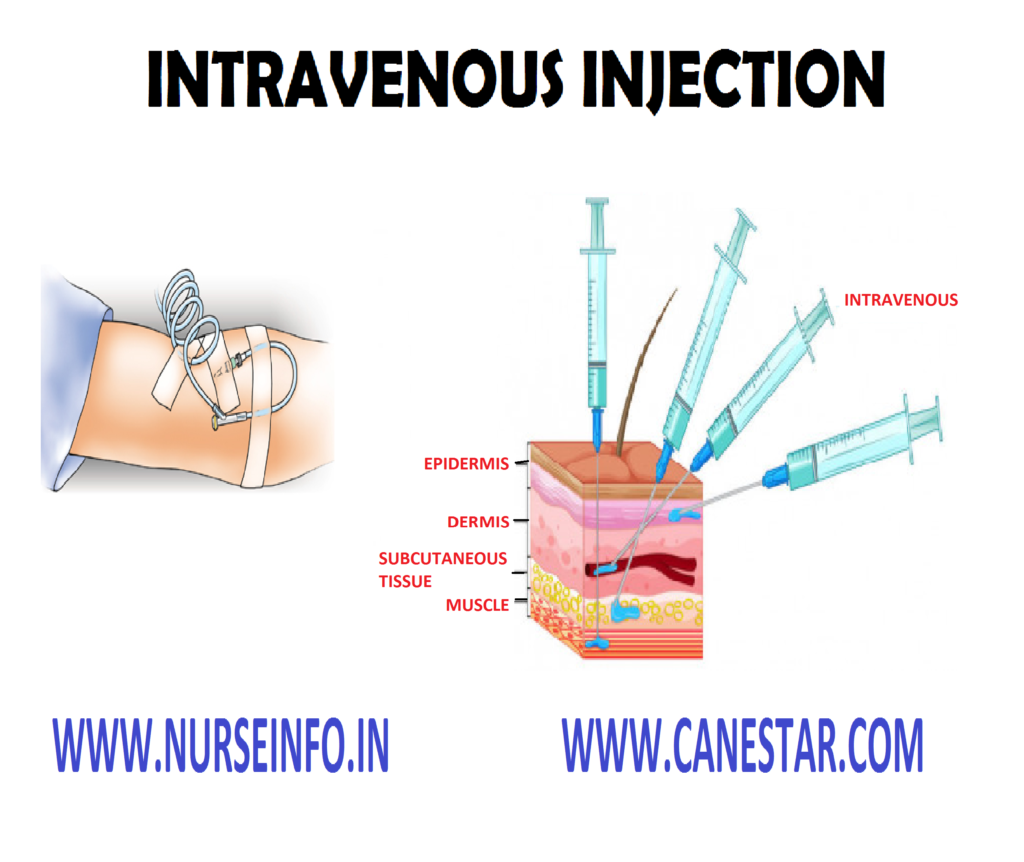
Intravenous injection (IV) is the introduction of a small quantity of drug into the vein by venous puncture

Introduction of drug directly into the bloodstream is called intravenous injection

Purpose

  • To have a fast action of the medicine as in emergency
  • To give medicines those are irritating or ineffective when given by other routes
  • To have the action of medicines on the blood stream or the blood vessels

Common Sites for IV Injection

  • Ventral aspect of elbow or forearm median cubical, basilica or cephalic veins
  • Doral aspect of hand – branchial, cephalic or metacarpal veins
  • In the infants the scalp vein is used

General Instructions

Expel the air from the syringe before giving the injection by holding it in upright position and gently pressing the piston until a drop of solution comes to the tip of the needle

  • Always dissolve the drug in correct amount of fluid to minimize the risk of adverse effect of the medicine
  • Observe the patient closely for the signs of adverse reaction of the medicine and have emergency drugs and the antidote in hand while injecting the medicine
  • Do not give the medicine if the injection site shows any edema or intravenous solution is not following properly to avoid accidental administration of medicine into the surrounding tissues
  • When giving iron preparation always confirms that the patient is not sensitive to it by giving a test done

Types of IV Administration

  • Adding the medicine in intravenous solution bottle (intravenous infusion)
  • Existing intravenous line for continuous infusion
  • Bolus: direct intravenous push for immediate or fast action

Selection of Syringe and Needle

  • The size of syringe used for intravenous infusion depends upon the amount of fluids to be injected
  • Size of the needle used are 18 to 21 gauge or 1 to 2 inches

Preliminary Assessment

Check

  • The diagnosis and age of the patient
  • The purpose of injection
  • The doctors order for the type, dosage, time and route of administration
  • The patient’s name and bed number
  • The nurses record to find out the time at which the last dose was given
  • The symptoms of overdose or allergic reaction
  • The necessity for giving test dose
  • The form of the medicine available and correct method of administration
  • The level of consciousness of the patient
  • The site and previous experience of the patient

Equipment

A tray containing

  • Syringe and needles of various sizes according to the need in a covered tray (sterile)
  • Transfer forceps in a jar containing antiseptic solution
  • Sterile cotton swabs and gauze pieces in sterile containers
  • Methylated spirit in a container
  • Bowl with water
  • Tourniquet
  • Water for injection
  • Drug order sheet
  • File to cut open the ampoules
  • Small covered tray (sterile)

Preparation of the Patient and Environment

  • Identify the patient correctly
  • Explain the procedure to the patient
  • Provide privacy
  • Place the patient in comfortable and relaxed position suitable of intravenous injection
  • Select a site suitable for the route of administration, quantity of medication to be given and characteristics of medication

Procedure

  • Read the doctors order and select the medication
  • Wash hands
  • Select appropriate syringe and needle and check whether they are in good working order
  • Recheck the order, medicine card with the label of the medicine, expiry date, etc
  • Mix well and take out the required amount of solution in the syringe
  • Carry medicine to the patient

Method of Administering IV Infection

  • Apply a tourniquet on the upper arm
  • Ask the patient to clench and unclench the hand
  • Pull the skin taut and place the needle in line with vein at a 15 to 45 degree angle
  • Insert the needle, a bit below the point where the needle will pierce the vein
  • When the back flow of blood occurs into the syringe release the tourniquet and injects the medicine very slowly
  • Pressure with swab at the puncture site after the needle is withdrawn to prevent bleeding

After Care

  • Observe the area for bleeding if bleeding occurs apply pressure but do not massage
  • Give comfortable position to the patient
  • Ask the patient to take rest at least 15 to 30 minutes so that you can observe him for any reaction
  • Observe the patient for any allergic reaction
  • Replace the equipment used for injection
  • Clean all other articles and replace them in their proper place
  • Wash hands
  • Record the procedure on the nurse record sheet and medication sheet

Complications

  • Allergic reactions
  • Pain
  • Injection abscess
  • Injury to nerves
  • Air embolism
 INTRAVENOUS INJECTIONS - Purpose, Sites, Instructions, Administration, Equipment, After Care, Procedure, Complications
INTRAVENOUS INJECTIONS – Purpose, Sites, Instructions, Administration, Equipment, After Care, Procedure, Complications

INTRADERMAL INJECTION

INTRADERMAL INJECTIONS

An intradermal injection is the introduction of a hypodermic needle into the dermis

Intradermal medicine when introduced into the dermis (under the epidermis)

Purpose

  • To obtain a local effect at the site of injection of local anesthesia such as xylocaine and novocaine
  • Diagnostic purpose as in sick test, tuberculin test, etc
  • To test for allergic reaction of a drug, e.g. penicillin serum, etc

Selection of Syringe and Needle

  • Size of syringe used for intradermal injections are 1 ml calibrated in 0.01 ml units (tuberculin syringe)
  • Size of needle used for intradermal injections are 26 to 27 gauge diameter and 3/8 to 5/8 inch length

Equipment

A tray containing

  • Syringe and needles of various sizes according to the need in a covered tray (sterile)
  • Sterile cotton swabs and gauge piece in sterile containers
  • Methylated spirit in a container
  • Kidney tray and paper bag
  • Drug order sheet
  • Small covered tray (sterile) to carry the prepared injections (syringes and needles with medication) to the bed side

Preparation of the Patient and Equipment

Identify the patient correctly:

  • Explain the procedure to the patient
  • Provide privacy
  • Place the patient in comfortable and relaxed position suitable for the type of injection
  • Select a site suitable for the route of administration, quantity of medication to given to the characteristics of medication

Procedure

  • Read the doctor’s order and select the medication
  • Wash hands
  • Select appropriate syringe and needle and check whether they are in good working order
  • Recheck the order, medicine card with the label of the medicine, expiry date, etc
  • Mix well and take out the required amount of solution in the syringe
  • Carry medication to the patient and identify the correct patient

Method of Administration

  • This method is also used for skin tests to detect the allergies
  • Hold the skin tight by grasping it
  • With the bevel of the needle facing up insert the needle at an angle of 10-15 degree to the skin
  • The needle enters between the two layers of the skin. The bevel should be practically visible through the skin
  • Inject the medication slowly to produce wheel on the skin
  • 0.01 to 0.1 ml of medication injected intradermal
  • Take out the needle quickly do not clean or massage the area

After Care

  • Inspect the area but do no massage
  • Help the patient to dress up
  • Watch for the sign and symptoms of any allergic reaction
  • Replace the equipment used for injection
  • Clean all other articles and replace them in their proper place
  • Wash hands
  • Record the procedure on the nurse’s record and drug sheet

General Instructions

  • As skin contains sensory nerve ending only a small amount of solution can be injected into the skin as it is painful
  • The skin should be healthy, free of any skin infection such as edema or irritation, the cloths should not irritate the skin
  • Separate syringe and needles should be used for giving injections

Observations of the Site after Intradermal Injection

Tuberculin Test

  • If tuberculin test is done, ask the patient to report after 48 hours
  • Reddened raised area at the site of injection shows a positive reaction
  • If the area is not discolored or raised it is a negative reaction

Penicillin Test

If the test dose is given for penicillin observes the area for reactionary changes after 20 minutes to 1 hour

The area will be reddened the wheel will be increase in case of reactionary changes

If the patient is sensitive to penicillin he may develop the signs and symptoms of anaphylactic shock within few minutes after the injection

INTRADERMAL INJECTION - Purpose, Instructions, Preparation, Administration, After Care, Observation
INTRADERMAL INJECTION – Purpose, Instructions, Preparation, Administration, After Care, Observation

SUBCUTANEOUS INJECTION

SUBCUTANEOUS INJECTION

Subcutaneous injection involves placing of medication into the loose connective tissue under the dermis

Subcutaneous injection means the introduction of medicine into the subcutaneous tissues

Drug is injected into the layer of fatty tissues beneath the upper layers of the skin

Purpose

  • To administer the medication that is ineffective in the gastrointestinal tract by the action of the digestive juice
  • To administer smaller doses
  • For slow drug absorption
  • To obtain a prompt action of a medicine that is obtained by oral administration

General Instructions

  • A 90 degree angle is normally used with a 5/8 inch needle for obese patients
  • A 45 degree angle is used with the needle ¾ inch long or longer for an average patients are in a thin patient
  • The techniques of giving injection for hypodermic injections will be same as in TM injection
  • Use only non-irritating medications
  • Use only small quantity of medication
  • Deposit the medication in a fold formed by picking up a layer of skin and fat
  • Be sure to insert the needle beyond the thickness of the skin (the medication is to be deposited in the subcutaneous tissue)

Equipment

  • One ml calibrated in 40 or 80 units, e.g. insulin syringe
  • Hypodermic needles (24-25 gauge, ½-5/8 inches length)
  • Sterile cotton scubas
  • Methylated spirit in container
  • Kidney tray with paper bag
  • Drug ordered sheet
  • Small covered tray (sterile) to carry the prepared injections to the bed side

Criteria for Selection of Site

  • The skin and underlying tissues are free of abnormalities
  • Not over bony appearance
  • Free of large blood vessels and nerves

Common Sites for Subcutaneous Injection

  • Outer aspect of the upper arm
  • Posterior chest wall below the scapula
  • Anterior abdominal wall from below breast to iliac crests
  • Anterior and lateral aspect of the thigh

Procedure

  • Read the doctors order and select the medication
  • Wash hands
  • Select appropriate syringe and needle and check whether they are in good working order
  • Recheck the order, medicine card with the label of the medicine, expiry date, etc
  • Mix well and take out the required amount of solution in the syringe
  • Keep in syringe with medication in the sterile tray and cover it
  • Carry medication to the patient and identity the correct medicine
  • Prepare the site for the injection
  • A 90 degree angle is normally used with a 5/8 inch needle for obese patients
  • A 45 degree angle is used with a needle ¾ inch longer for an average patient or in a thin patient
  • The technique of giving injection for hypodermic injections will be same as in TM injections

After Care

  • Inspect the area but do not massage
  • Help the patient to dress up
  • Watch for signs and symptoms of any allergic reaction
  • Replace the equipment used for injection
  • Clean all other articles and replace them in their proper place
  • Wash hands
  • Record the procedure on the nurse’s record and drug sheet
SUBCUTANEOUS INJECTION - Purpose, General Instruction, Responsibility, Equipment, After care, Procedure, Preparation
SUBCUTANEOUS INJECTION – Purpose, General Instruction, Responsibility, Equipment, After care, Procedure, Preparation

INTRAMUSCULAR INJECTION

INTRAMUSCULAR INJECTION

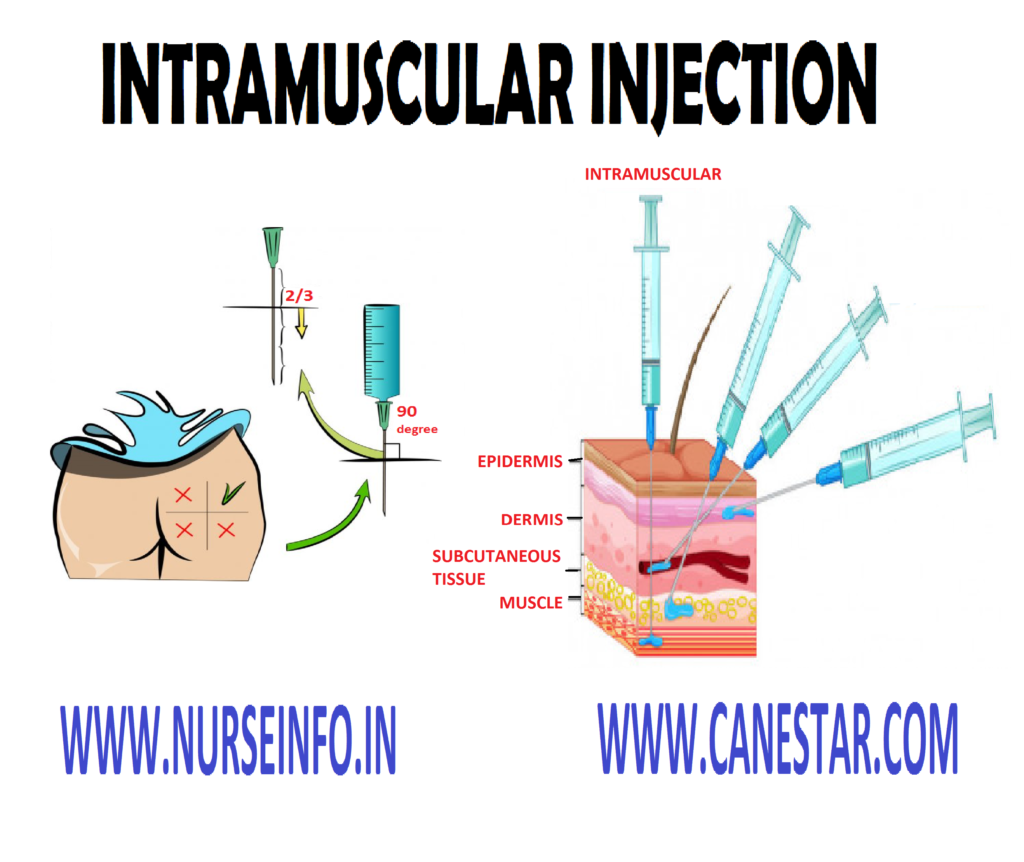
Intramuscular injection is defines as introduction of medicine into the muscle in form of solution

Purpose

  • To obtain a quick effect of medicine than is obtained by oral administration and subcutaneous administration
  • Assures that the total dosage will be administered and the same will be absorbed for the systemic action of the drug
  • The medicines that is not suitable for intravenous administration

Principle

  • The knowledge of the anatomy and physiology of the body is essential for the safe administration of the injection
  • Injections are means of introducing infection into the body, if carelessly given
  • Drugs that change the chemical composition of the blood will endanger the life of the patient, if not used cautiously
  • Any unfamiliar situation produces anxiety
  • Once a drug is injected it is irretrievable. Antidote may be available for particular medications but the best antidote is prevention
  • Organization and planning results in the economy of time, material and effort

General Instructions

  • Give injections only on the doctors written orders
  • Follow strict aseptic techniques
  • Syringes and needles used for injections should be kept separate from those used for other purpose
  • Always have the syringe and needles in good order
  • Change the needle after withdrawing the drug from a rubber stopped container before giving injection to the patient
  • Observe the five rights of the administration of medicines
  • Never use a drug whose expiry date is over
  • Always have a patient relaxed and placed in a comfortable position
  • Never allow the patient to walk soon after the injection
  • Select the appropriate site for giving injections
  • Rotate the site for patients getting insulin to prevent lip dystrophy
  • Use correct technique of injection – the needle inserted gently and quickly, and the drug injected slowly
  • After inserting the needle, always withdraw the piston to make sure that it is not in a blood vessel in case of intramuscular and subcutaneous injections
  • Solution for injection should be clear, sterile, nearly neutral in reaction
  • Massage the area at the site of injection except in case of intradermal injections
  • Injection should be charted immediately

Site of Intramuscular Injections

  • Dorsal gluteal site: find out the greater trochanter of the femur and the posterior superior iliac spine drawn an imaginary line between these two bony prominences. Site will be upper and outer quadrant
  • Vastus lateralis site: the site is at the outer aspect of the thigh. It is the area between mid-anterior thigh and mid lateral thigh one hands span from elbow and great trochanter to one hands span above knee
  • Ventrogluteal site: place the tip of the index finger on the anterior superior iliac spine of the patient the middle finger just below the iliac chest
  • Mid deltoid site: locate the lower edge of the acromion process and form a rectangle. The deltoid area is used to inject very small quantities of non-irritating drugs

Methods of Intramuscular Injection Administration

  • Air lock method: expel the air from the syringe leaving 0.2 ml, stretch the skin lightly with the index finger. Insert the full needle quickly into the muscle. Withdraw the piston to confirm that the needle is not in the blood vessel. Push the piston gently to give the medicine very slowly
  • Z-tract method: expel the air from the syringe; displace the skin laterally using the side of your left hand. Insert the needle, aspirate the placement, inject the medicine very slowly, marinating tissue displacement wait for ten seconds to allow the medicine to disperse. Withdraw the needle allowing the displaced tissue to return to its normal position

Nurses Responsibility

Check

  • The diagnosis and age of the patient
  • The purpose of injection
  • The doctors order
  • The patient details
  • The nurses record about previous
  • The allergic reactions
  • The necessity for giving test dose
  • The levels of consciousness and follow instructions
  • The site of injection
  • The patient’s previous experiences

Equipment

A tray containing:

  • Syringe and needles of various size (sterile)
  • Transfer forceps in a jar containing antiseptic solution
  • Sterile cotton swabs and gauze pieces in sterile container
  • Methylated spirit in a container
  • Bowl with water
  • Kidney tray and paper bag
  • Drug order sheet
  • Water for injection
  • File to cut upon the ampoules
  • Small covered tray (sterile) to carry the prepared injection to the bed side

Preparation of the Patient and Environment

  • Identify the patient correctly
  • Explain the procedure to the patient
  • Provide privacy
  • Keep the patient’s attention away from the injection by friendly conversation
  • Place the patient in a comfortable and relaxed position
  • Select a site suitable for the route of administration

Procedure

  • Select the medication
  • Hand wash
  • Prepare the medication
  • Keep the syringe with medications in the sterile tray and cover it
  • Make sure that the medicine taken right and correct dosage
  • Carry medication to the patient in a sterile tray
  • Identify the right patient
  • Prepare the site of injection
  • Inject the medicine by correct technique is essential for the safety of the injection
  • Spread the tissue between the thumb and forefingers to make the skin taut
  • Needle is inserted at a 90 degree angle holding the syringe back the piston with the left hand
  • Using a steady push on the needle and aspirate by pulling back the piston with left hand
  • If no blood comes gives the medication slowly by pushing the piston
  • Remove the needle quickly and massage the site for quick absorption of the drug

After Care

  • Inspect the area for bleeding
  • Help the patient to dress up
  • Ask the patient to take rest for 15 minutes
  • Check the limb movement to confirm there is no nerve injury
  • Watch for the signs and symptoms of allergic reaction
  • Replace the equipment in the proper place
  • Hand wash
  • Record the procedure on the nurse’s record
INTRAMUSCULAR INJECTION - Purpose, Equipment, Nurse Responsibility, Site Selection, Preparation, Procedure, Instructions
INTRAMUSCULAR INJECTION – Purpose, Equipment, Nurse Responsibility, Site Selection, Preparation, Procedure, Instructions
Nursing Notes, MCQs & Procedures
Download Our App
×
Nurseinfo Nursing Notes
⭐⭐⭐⭐⭐ 4.8 • Free
Get Nursing Notes, MCQs, PDFs, Exam Updates and Practice Questions in one app.
📲 Download App Not Now